Panasonic WJ-HD716/1000 Installation Guide - Page 34
Connection of a VCR
 |
View all Panasonic WJ-HD716/1000 manuals
Add to My Manuals
Save this manual to your list of manuals |
Page 34 highlights
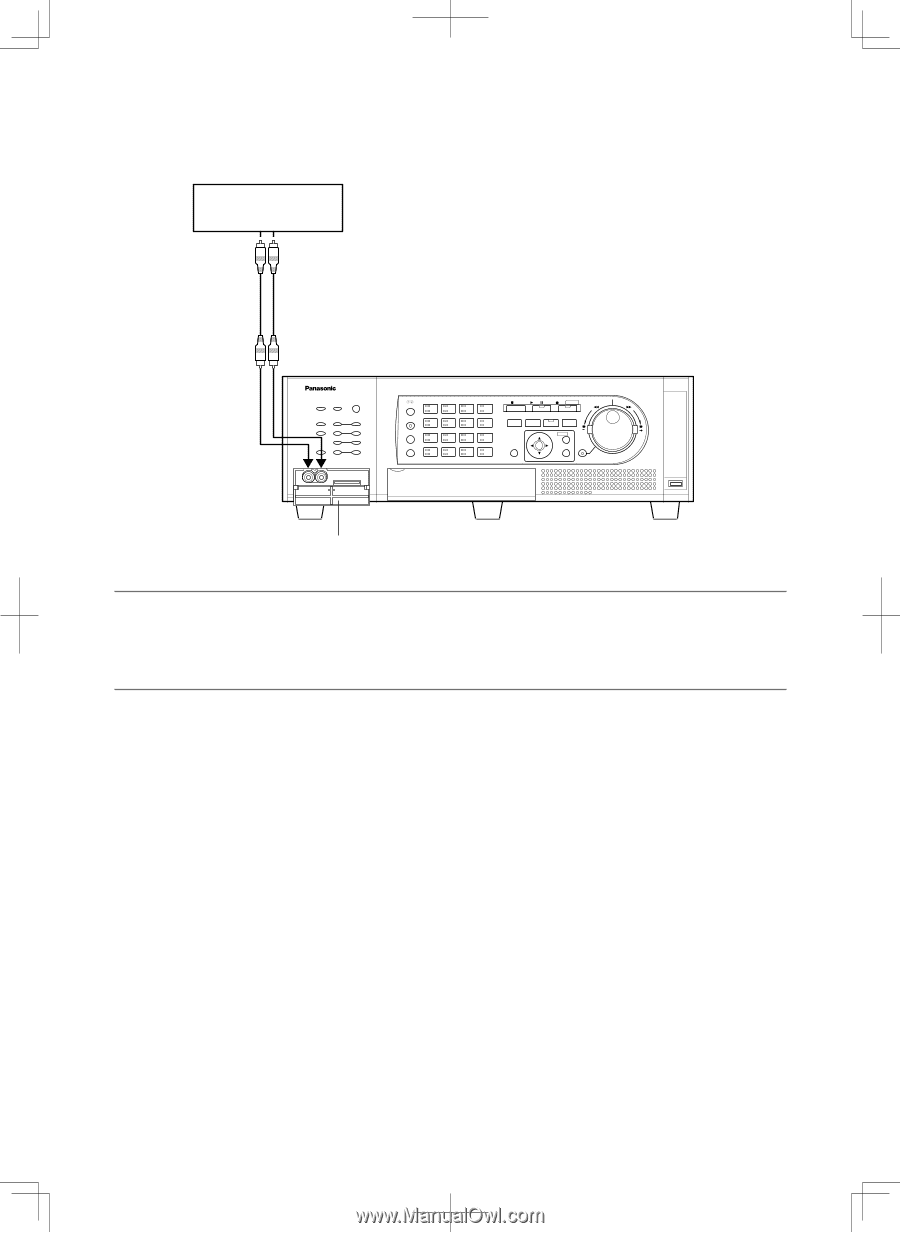
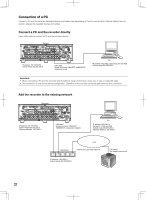
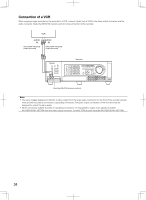
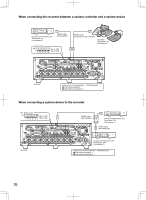
Connection of a VCR When copying images recorded on the recorder to a VCR, connect cables from a VCR to the video output connector and the audio connector inside the SDHC/SD memory card slot cover at the front of the recorder. VCR AUDIO IN Audio cable with plugs (locally procured) VIDEO IN Video cable with plugs (locally procured) ERROR ALARM ALARM RESET ALARM SUSPEND TIMER OPERATE STS HDD 1 A/F HDD 2 HDD 3 HDD 4 AUDIO VIDEO OUT OUT Recorder MONITOR 1 2 3 4 SEQ 5 6 7 8 OSD 9 0/10 11 12 MULTI SCREEN 13 14 15 16 STOP PLAY PAUSE REC REC STOP GOTO LAST GOTO DATE SEARCH COPY REV FWD SUB MENU SETUP /ESC SET HOLD Digital Disk Recorder WJ-HD616 MOUSE Open the SDHC/SD memory card slot. Note: • The same images displayed on Monitor 2 will be output from the video output connector on the front of the recorder (except when another recorder is connected in cascading connection).The audio output connectors on the front and rear are designed to output the same audio. • When connecting multiple recorders in cascading connection, it is impossible to output video signals of another WJ-HD616K/WJ-HD716K from the video output connector. Connect VCRs to each recorder (WJ-HD616K/WJ-HD716K). 34
-
 1
1 -
2
-
3
-
4
-
5
-
6
-
7
-
8
-
9
-
10
-
11
-
12
-
13
-
14
-
15
-
16
-
17
-
18
-
19
-
20
-
21
-
22
-
23
-
24
-
25
-
26
-
27
-
28
-
 29
29 -
 30
30 -
 31
31 -
 32
32 -
 33
33 -
 34
34 -
 35
35 -
 36
36 -
 37
37 -
 38
38 -
 39
39 -
40
-
41
-
42
-
43
-
44
-
45
-
46
-
47
-
48
-
49
-
50
-
51
-
52
-
53
-
54
-
55
-
56
-
57
-
58
-
59
-
60
-
61
-
62
-
63
-
64
-
65
-
66
-
67
-
68
-
69
-
70
-
71
-
72
-
73
-
74
-
75
-
76
-
77
-
78
-
79
-
80
-
81
-
82
-
83
-
84
-
85
-
86
-
87
-
88
-
89
-
90
-
91
-
92
-
93
-
94
-
95
-
96
-
97
-
98
-
99
-
100
-
101
-
102
-
103
-
104
-
105
-
106
-
107
-
108
-
109
-
110
-
111
-
112
-
113
-
114
-
115
-
116
-
117
-
118
-
119
-
120
-
121
-
122
-
123
-
124
-
125
-
126
-
127
-
128
-
129
-
130
-
131
-
132
-
133
-
134
-
135
-
136
-
137
-
138
-
139
-
140
-
141
-
142
-
143
-
144
-
145
-
146
-
147
-
148
-
149
-
150
-
151
-
152
-
153
-
154
-
155
-
156
 |
 |