Panasonic WJ-HD716/1000 Installation Guide - Page 53
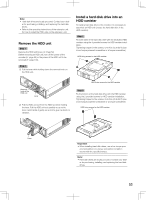
Remove the HDD unit, Install a hard disk drive into an, HDD canister
 |
View all Panasonic WJ-HD716/1000 manuals
Add to My Manuals
Save this manual to your list of manuals |
Page 53 highlights
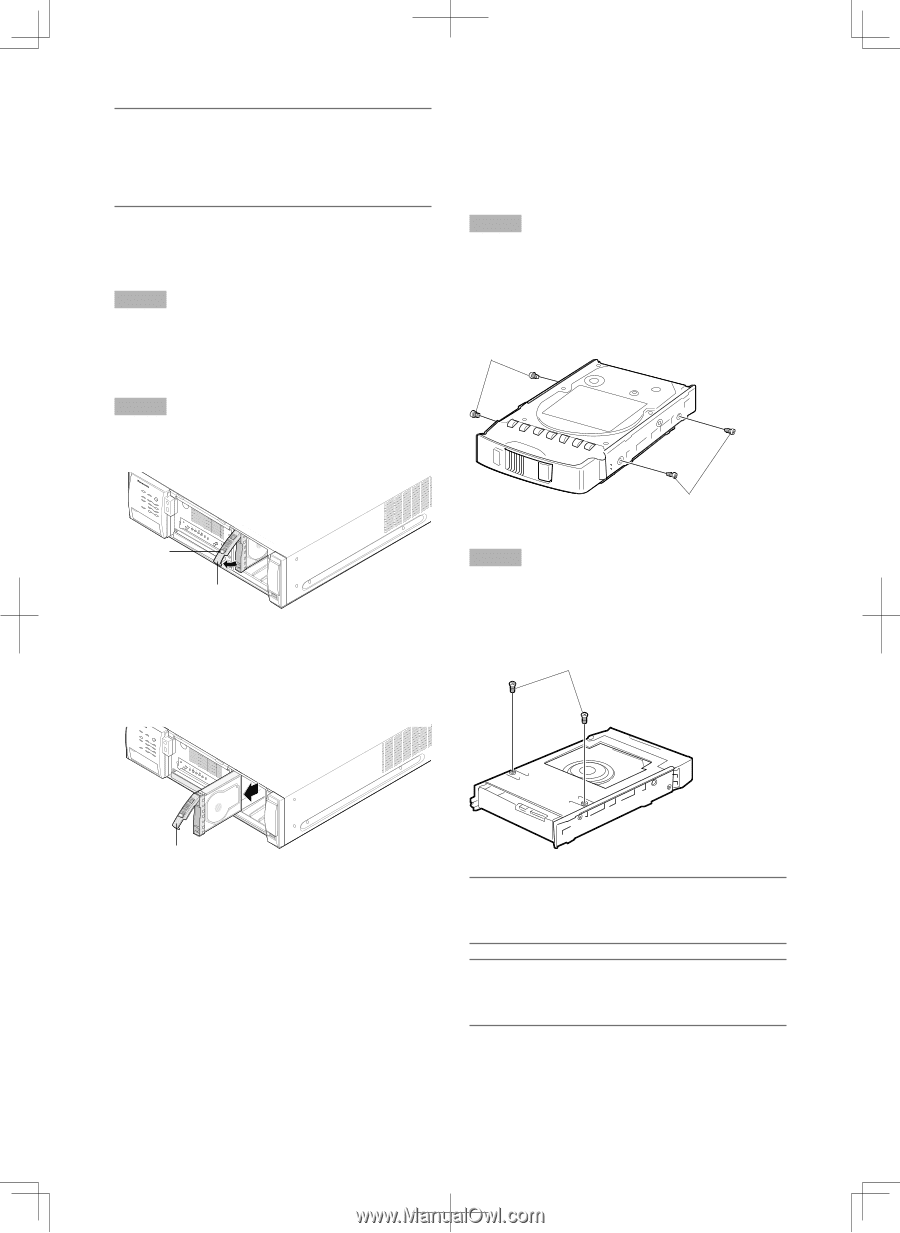
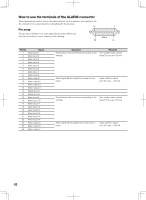
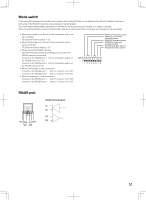
Note: • Hard disk drives are locally procured. Contact your deal- er for purchasing, installing, and replacing the hard disk drives. • Refer to the operating instructions of the extension unit for how to install the HDD units on the extension unit. Remove the HDD unit Step 1 Remove the HDD unit brace. (☞ Page 52) Before removing an HDD unit, turn off the power of the recorder (☞ page 55) or the power of the HDD unit to be removed (☞ page 133). Step 2 (1) Pull the lever while holding down the removal knob on the HDD unit. Install a hard disk drive into an HDD canister To install a hard disk drive in the recorder, it is necessary to assemble an HDD unit (encase the hard disk drive in the HDD canister). Step 1 Fix both sides of the hard disk drive with the dedicated HDD canister using the 4 provided screws for HDD canister installation. Tightening torque for the screws: 0.49 N·m {0.36 lbf·ft} (use a low-torque powered screwdriver or a torque screwdriver) HDD fixing screws for the HDD canister HDD fixing screws for the HDD canister Removal knob of the HDD unit Lever (2)RknePomubollovtfahtlheeHDD unit out from the HDD slot while holding HDthDeulneivt er. Pull the HDD unit out carefully so as not to drop it and hanLdelveerit gently so as not to give it a shock or vibration. Step 2 Fix the bottom of the hard disk drive with the HDD canister using the 2 provided screws for HDD canister installation. Tightening torque for the screws: 0.49 N·m {0.36 lbf·ft} (use a low-torque powered screwdriver or a torque screwdriver) HDD fixing screws for the HDD canister Lever Lever Important: • When installing hard disk drives, use a low-torque pow- ered screwdriver or a torque screwdriver to tighten screws with the specified torque. Note: • Hard disk drives are locally procured. Contact your deal- er for purchasing, installing, and replacing the hard disk drives. 53
-
 1
1 -
2
-
3
-
4
-
5
-
6
-
7
-
8
-
9
-
10
-
11
-
12
-
13
-
14
-
15
-
16
-
17
-
18
-
19
-
20
-
21
-
22
-
23
-
24
-
25
-
26
-
27
-
28
-
29
-
30
-
31
-
32
-
33
-
34
-
35
-
36
-
37
-
38
-
39
-
40
-
41
-
42
-
43
-
44
-
45
-
46
-
47
-
 48
48 -
 49
49 -
 50
50 -
 51
51 -
 52
52 -
 53
53 -
 54
54 -
 55
55 -
 56
56 -
 57
57 -
 58
58 -
59
-
60
-
61
-
62
-
63
-
64
-
65
-
66
-
67
-
68
-
69
-
70
-
71
-
72
-
73
-
74
-
75
-
76
-
77
-
78
-
79
-
80
-
81
-
82
-
83
-
84
-
85
-
86
-
87
-
88
-
89
-
90
-
91
-
92
-
93
-
94
-
95
-
96
-
97
-
98
-
99
-
100
-
101
-
102
-
103
-
104
-
105
-
106
-
107
-
108
-
109
-
110
-
111
-
112
-
113
-
114
-
115
-
116
-
117
-
118
-
119
-
120
-
121
-
122
-
123
-
124
-
125
-
126
-
127
-
128
-
129
-
130
-
131
-
132
-
133
-
134
-
135
-
136
-
137
-
138
-
139
-
140
-
141
-
142
-
143
-
144
-
145
-
146
-
147
-
148
-
149
-
150
-
151
-
152
-
153
-
154
-
155
-
156
 |
 |