Panasonic WJ-HD716/1000 Installation Guide - Page 20
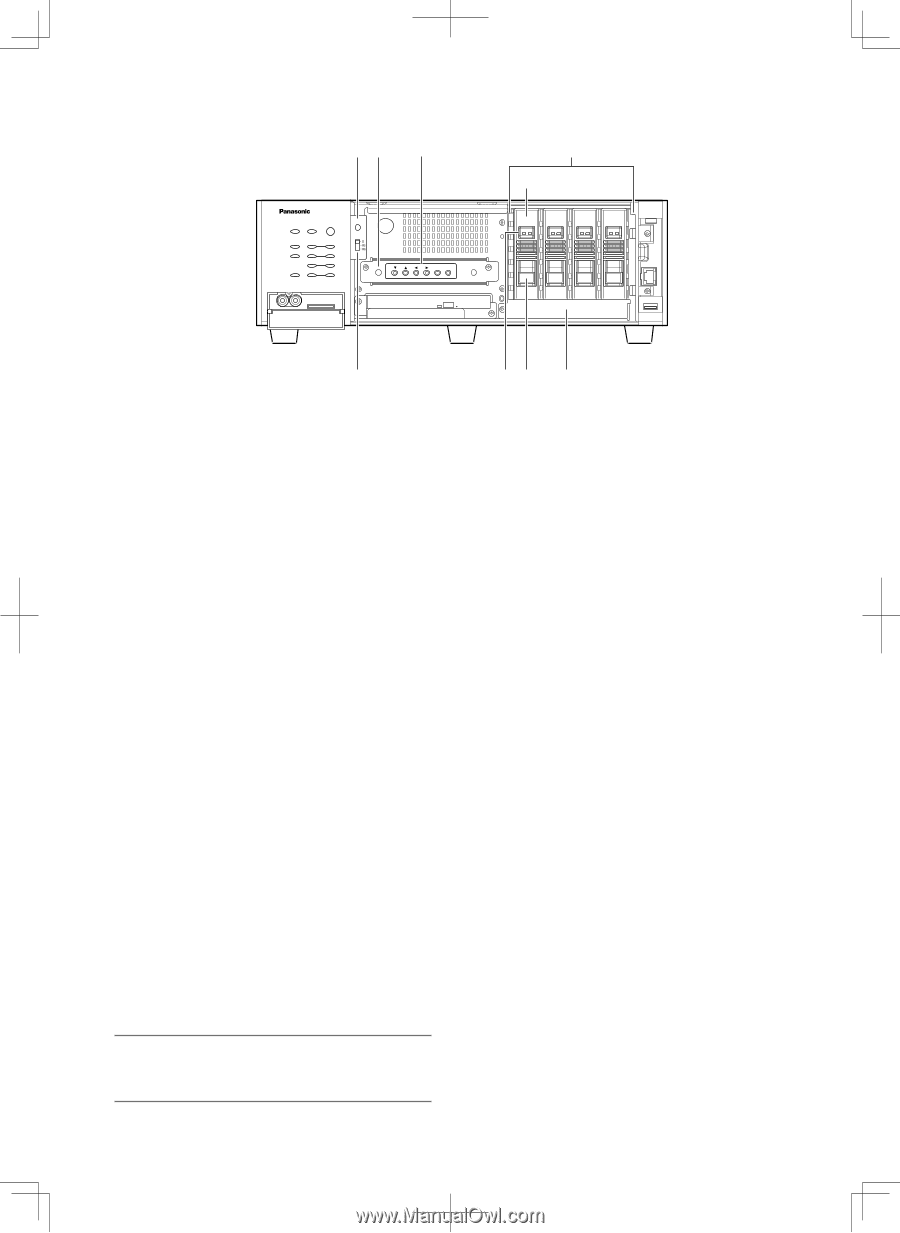
Behind the front cover
 |
View all Panasonic WJ-HD716/1000 manuals
Add to My Manuals
Save this manual to your list of manuals |
Page 20 highlights
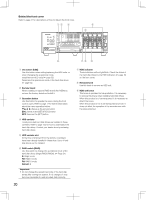
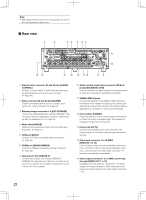
Behind the front cover Refer to page 21 for descriptions of how to detach the front cover. qw e ALARM USE RESET ERROR ALARM RAID ALARM SUSPEND STS HDD 1 A/F TIMER HDD 2 HDD 3 OPERATE HDD 4 ESC SET t r STS A/F STS A/F STS A/F STS A/F MAINTENANCE MOUSE y ui o q Use button [USE] Use this button when adding/replacing the HDD units, or when changing the operational mode. Install/remove HDD units (☞ page 52) Determine the operational mode of the hard disk drives (☞ page 54) w Dummy board When installing an optional RAID board (WJ-HDB601), remove the dummy board and install it. e Operation button Use this button to operate the menu during the front cover is open. Refer to page 17 for further information about the menu operation button. CDA B: Same as the arrows button ESC: Same as the [SETUP/ESC] button SET: Same as the [SET] button r HDD canister Locally procured hard disk drives are installed in these canisters. Refer to page 133 for how to add/replace the hard disk drives. Contact your dealer about purchasing hard disk drives. t HDD canister slot At the time of shipment from the factory, 4 canisters have been already installed in these slots. Up to 4 hard disk drives can be installed. y RAID switch [RAID] Use this switch to change the operational mode of the hard disk drives (Single/RAID5/RAID6). (☞ Page 54) S: Single mode R5: RAID 5 mode R6: RAID 6 mode Default: S Important: • Do not change the operational mode of the hard disk drives after running the system. If it is changed, it may become impossible to read recorded data correctly. 20 u HDD indicator These indicators will not light/blink. Check the status of the hard disk drives by the HDD indicators (+ page 16) on the front cover. i Removal knob Use this knob to remove an HDD unit. o HDD unit brace This brace is provided for transportation. It is necessary to remove this brace when installing hard disk drives. When this product is to be transported, it is necessary to attach the brace. When this product is not to be transported anymore, it does not affect the operation of the recorder even with the brace attached.
-
 1
1 -
2
-
3
-
4
-
5
-
6
-
7
-
8
-
9
-
10
-
11
-
12
-
13
-
14
-
 15
15 -
 16
16 -
 17
17 -
 18
18 -
 19
19 -
 20
20 -
 21
21 -
 22
22 -
 23
23 -
 24
24 -
 25
25 -
26
-
27
-
28
-
29
-
30
-
31
-
32
-
33
-
34
-
35
-
36
-
37
-
38
-
39
-
40
-
41
-
42
-
43
-
44
-
45
-
46
-
47
-
48
-
49
-
50
-
51
-
52
-
53
-
54
-
55
-
56
-
57
-
58
-
59
-
60
-
61
-
62
-
63
-
64
-
65
-
66
-
67
-
68
-
69
-
70
-
71
-
72
-
73
-
74
-
75
-
76
-
77
-
78
-
79
-
80
-
81
-
82
-
83
-
84
-
85
-
86
-
87
-
88
-
89
-
90
-
91
-
92
-
93
-
94
-
95
-
96
-
97
-
98
-
99
-
100
-
101
-
102
-
103
-
104
-
105
-
106
-
107
-
108
-
109
-
110
-
111
-
112
-
113
-
114
-
115
-
116
-
117
-
118
-
119
-
120
-
121
-
122
-
123
-
124
-
125
-
126
-
127
-
128
-
129
-
130
-
131
-
132
-
133
-
134
-
135
-
136
-
137
-
138
-
139
-
140
-
141
-
142
-
143
-
144
-
145
-
146
-
147
-
148
-
149
-
150
-
151
-
152
-
153
-
154
-
155
-
156
 |
 |