Panasonic WJ-HD716/1000 Installation Guide - Page 28
Rack mounting
 |
View all Panasonic WJ-HD716/1000 manuals
Add to My Manuals
Save this manual to your list of manuals |
Page 28 highlights
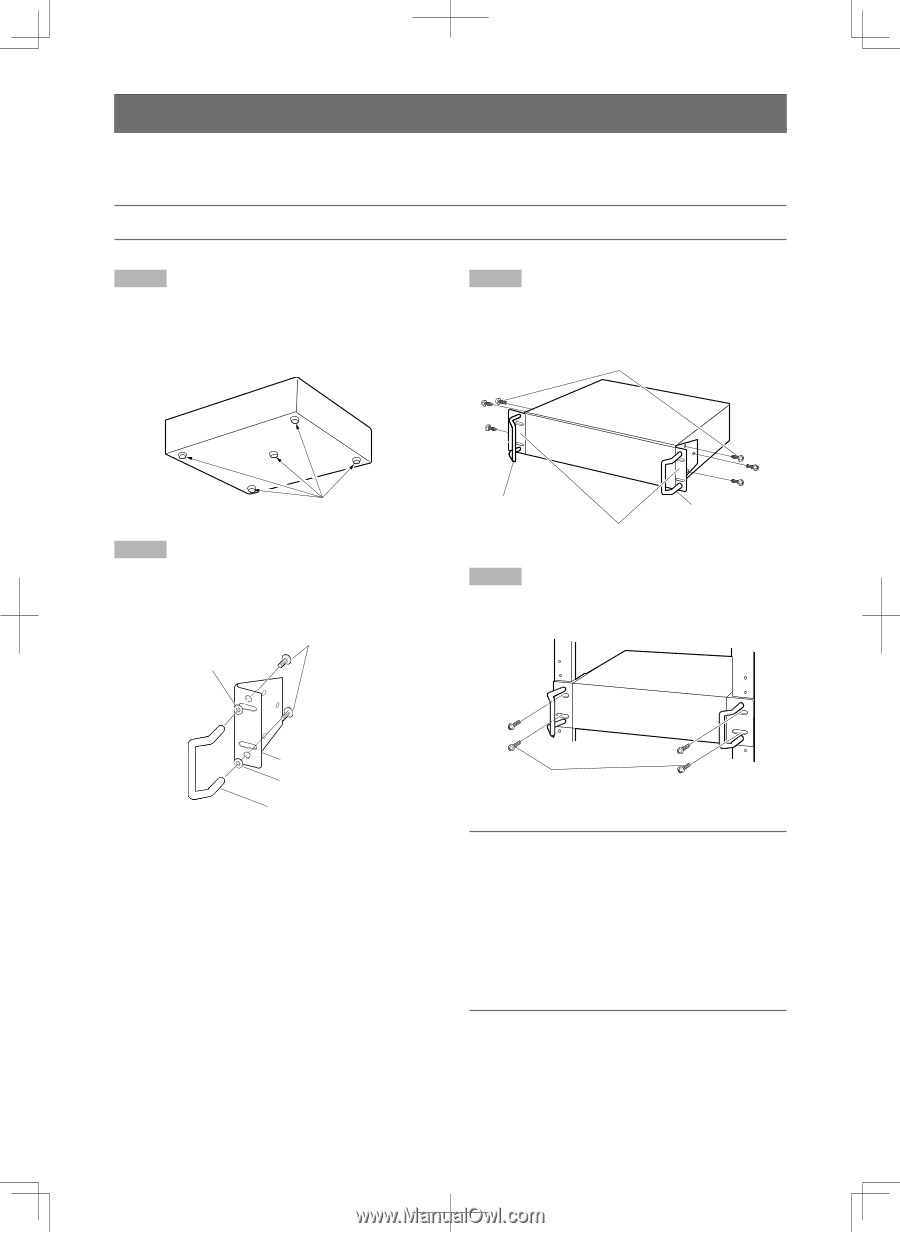
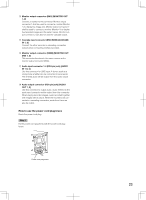
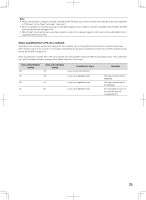
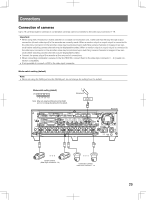
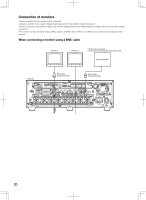
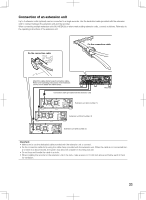
Rack mounting Install the recorder in an EIA standard rack. Equivalent to EIA standard rack (not manufactured by Panasonic): EIA 19-inch rack type (Depth: 550 mm or more) Note: • Use four M5 x 12 screws (locally procured) to install the recorder in a rack. Step 1 Remove the five rubber feet from the bottom of the recorder using a flathead screwdriver. Use a screwdriver to remove the screws holding the rubber feet. Step 3 Place the rack mount brackets on both sides of the recorder. Fix them firmly with the rack mount bracket fixing screws (x6). Screw for rack mount bracket (provided) Remove the rubber feet. Step 2 Attach the rack handles to the rack mount brackets. Fix them firmly using the screws for the rack handle (x4) and the washers (x4). Screw for rack handle Washer Rack handle Rack handle Rack mount bracket (provided) Step 4 Install the recorder in the rack. Fix them firmly using the rack mount screws. Rack mount bracket Washer Rack handle Rack mount screws M5 x 12 (locally procured) Important: • Keep the temperature in the rack below +45 °C {+113 °F}. • It is recommended to install cooling fans or equivalents to keep the temperature in the rack below +30 °C {+86 °F}. • When installing the recorder in the rack, make a space of 1U (44 mm {1-23/32"}) above and below the recorder for ventilation. • Do not block the ventilation openings or slots to prevent the recorder from overheating. 28
-
 1
1 -
2
-
3
-
4
-
5
-
6
-
7
-
8
-
9
-
10
-
11
-
12
-
13
-
14
-
15
-
16
-
17
-
18
-
19
-
20
-
21
-
22
-
 23
23 -
 24
24 -
 25
25 -
 26
26 -
 27
27 -
 28
28 -
 29
29 -
 30
30 -
 31
31 -
 32
32 -
 33
33 -
34
-
35
-
36
-
37
-
38
-
39
-
40
-
41
-
42
-
43
-
44
-
45
-
46
-
47
-
48
-
49
-
50
-
51
-
52
-
53
-
54
-
55
-
56
-
57
-
58
-
59
-
60
-
61
-
62
-
63
-
64
-
65
-
66
-
67
-
68
-
69
-
70
-
71
-
72
-
73
-
74
-
75
-
76
-
77
-
78
-
79
-
80
-
81
-
82
-
83
-
84
-
85
-
86
-
87
-
88
-
89
-
90
-
91
-
92
-
93
-
94
-
95
-
96
-
97
-
98
-
99
-
100
-
101
-
102
-
103
-
104
-
105
-
106
-
107
-
108
-
109
-
110
-
111
-
112
-
113
-
114
-
115
-
116
-
117
-
118
-
119
-
120
-
121
-
122
-
123
-
124
-
125
-
126
-
127
-
128
-
129
-
130
-
131
-
132
-
133
-
134
-
135
-
136
-
137
-
138
-
139
-
140
-
141
-
142
-
143
-
144
-
145
-
146
-
147
-
148
-
149
-
150
-
151
-
152
-
153
-
154
-
155
-
156
 |
 |