Panasonic WJ-HD716/1000 Installation Guide - Page 54
Determine the operational mode of the hard disk drives
 |
View all Panasonic WJ-HD716/1000 manuals
Add to My Manuals
Save this manual to your list of manuals |
Page 54 highlights
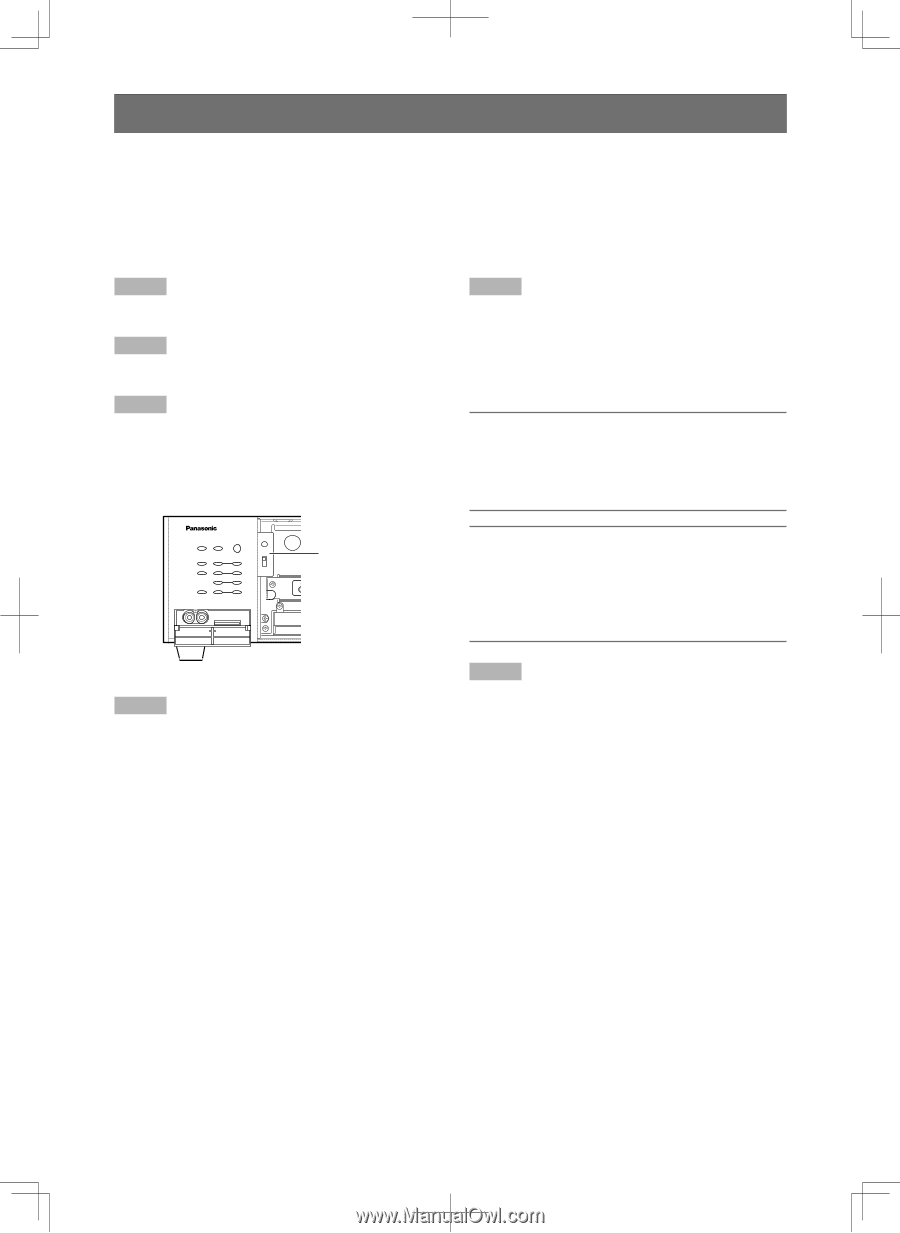
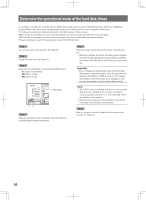
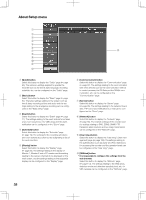
Determine the operational mode of the hard disk drives It is possible to operate the recorder with the RAID function that is known as the HDD fault-tolerance system by installing an optional RAID board. Refer to the operating instructions of the RAID board for how to install the RAID board. The following operational modes are provided to the RAID function of the recorder. RAID 5 mode: it is possible to recover recorded images even when a single hard disk drive becomes faulty. RAID 6 mode: it is possible to recover recorded images even when 2 hard disk drives become faulty. Proceed as follows to switch the operational mode of the RAID function. Step 1 Turn off the power of the recorder. (☞ Page 55) Step 2 Detach the front cover. (☞ Page 21) Step 3 Determine the operational mode using the [RAID] switch. S: Single mode (default) R5: RAID 5 mode R6: RAID 6 mode Step 5 Press the power switch while holding down the [USE] button. → When the recorder is booted, the setting will be applied, and the hard disk drives will be automatically formatted. Hold down the [USE] button until the buzzer start sounding. Important: • Do not change the operational mode of the hard disk drives after running the system. Once the operation has started in the RAID 5 or RAID 6 mode, do not change the positions of the HDD units. If it is changed, it may become impossible to read recorded data correctly. ERROR ALARM ALARM RESET ALARM SUSPEND TIMER OPERATE STS HDD 1 A/F HDD 2 HDD 3 HDD 4 USE RAID • S • R5 • R6 AUDIO VIDEO OUT OUT RAID switch ESC SET Note: • The RAID 5 mode is operable only when 3 or more hard disk drives are installed in the recorder. The RAID 6 mode is operable only when 4 or more hard disk drives are installed in the recorder. • When using an extension unit, change the operational mode after connecting it to the recorder. Step 4 When an extension unit is connected, boot the extension unit first before booting the recorder. Step 6 After the recorder is booted, attach the front cover to the recorder. (+ Page 21) 54
-
 1
1 -
2
-
3
-
4
-
5
-
6
-
7
-
8
-
9
-
10
-
11
-
12
-
13
-
14
-
15
-
16
-
17
-
18
-
19
-
20
-
21
-
22
-
23
-
24
-
25
-
26
-
27
-
28
-
29
-
30
-
31
-
32
-
33
-
34
-
35
-
36
-
37
-
38
-
39
-
40
-
41
-
42
-
43
-
44
-
45
-
46
-
47
-
48
-
 49
49 -
 50
50 -
 51
51 -
 52
52 -
 53
53 -
 54
54 -
 55
55 -
 56
56 -
 57
57 -
 58
58 -
 59
59 -
60
-
61
-
62
-
63
-
64
-
65
-
66
-
67
-
68
-
69
-
70
-
71
-
72
-
73
-
74
-
75
-
76
-
77
-
78
-
79
-
80
-
81
-
82
-
83
-
84
-
85
-
86
-
87
-
88
-
89
-
90
-
91
-
92
-
93
-
94
-
95
-
96
-
97
-
98
-
99
-
100
-
101
-
102
-
103
-
104
-
105
-
106
-
107
-
108
-
109
-
110
-
111
-
112
-
113
-
114
-
115
-
116
-
117
-
118
-
119
-
120
-
121
-
122
-
123
-
124
-
125
-
126
-
127
-
128
-
129
-
130
-
131
-
132
-
133
-
134
-
135
-
136
-
137
-
138
-
139
-
140
-
141
-
142
-
143
-
144
-
145
-
146
-
147
-
148
-
149
-
150
-
151
-
152
-
153
-
154
-
155
-
156
 |
 |