Samsung SGH-A997 User Manual Ver.lk8_f6 (English(north America)) - Page 59
Adding More Fields to a Number, Add More Fields
 |
View all Samsung SGH-A997 manuals
Add to My Manuals
Save this manual to your list of manuals |
Page 59 highlights
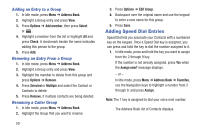
3. Highlight the First Name and Last Name fields and use the keypad to enter names for this contact. For more information, refer to "Entering Text" on page 25. 4. Press the Mobile field and use the keypad to enter the phone number for this contact. 5. Highlight the Telephone, Home field and use the keypad to enter the home telephone number for this contact. 6. Highlight the Email, Private field and use the keypad to enter a private email address for this contact. 7. Highlight the Group field and press Assign. Select a group name and Select. 8. Highlight the Ringtone field and press Assign. Select a tone to represent this contact and press Select. 9. Highlight the Company and Job title fields, if desired, and use the keypad to enter a note. For more information, refer to "Entering Text" on page 25. 10. Highlight the Address, Private field and press Add. Use the keypad to enter the required information and press Save. 11. Press Options ➔ Save. Note: By default, Contacts are saved on the phone. To copy Contacts to a SIM card, see "Copying an Entry to the SIM Card" on page 60. Note: Ringtones assigned to a contact will not be synchronized to AT&T Address Book. Adding More Fields to a Number While in the process of creating a new entry or editing an existing contact, you can add additional fields to the entry's list of information. 1. In Idle mode, press Menu ➔ Address Book, highlight a contact name, and press View. 2. Press Edit. 3. Press Options ➔ Add More Fields. 4. From the Add More Fields screen, use the Left or Right Navigation key to highlight the field to add and press Select or . The selected field type displays on the Edit contact screen. 5. Enter the information into the new field and press Save. Understanding Your Address Book 54
-
 1
1 -
2
-
3
-
4
-
5
-
6
-
7
-
8
-
9
-
10
-
11
-
12
-
13
-
14
-
15
-
16
-
17
-
18
-
19
-
20
-
21
-
22
-
23
-
24
-
25
-
26
-
27
-
28
-
29
-
30
-
31
-
32
-
33
-
34
-
35
-
36
-
37
-
38
-
39
-
40
-
41
-
42
-
43
-
44
-
45
-
46
-
47
-
48
-
49
-
50
-
51
-
52
-
53
-
 54
54 -
 55
55 -
 56
56 -
 57
57 -
 58
58 -
 59
59 -
 60
60 -
 61
61 -
 62
62 -
 63
63 -
 64
64 -
65
-
66
-
67
-
68
-
69
-
70
-
71
-
72
-
73
-
74
-
75
-
76
-
77
-
78
-
79
-
80
-
81
-
82
-
83
-
84
-
85
-
86
-
87
-
88
-
89
-
90
-
91
-
92
-
93
-
94
-
95
-
96
-
97
-
98
-
99
-
100
-
101
-
102
-
103
-
104
-
105
-
106
-
107
-
108
-
109
-
110
-
111
-
112
-
113
-
114
-
115
-
116
-
117
-
118
-
119
-
120
-
121
-
122
-
123
-
124
-
125
-
126
-
127
-
128
-
129
-
130
-
131
-
132
-
133
-
134
-
135
-
136
-
137
-
138
-
139
-
140
-
141
-
142
-
143
-
144
-
145
-
146
-
147
-
148
-
149
-
150
-
151
-
152
-
153
-
154
-
155
-
156
-
157
-
158
-
159
-
160
-
161
-
162
-
163
-
164
-
165
-
166
-
167
-
168
-
169
-
170
-
171
-
172
-
173
-
174
-
175
-
176
-
177
-
178
-
179
-
180
-
181
-
182
-
183
-
184
-
185
-
186
-
187
-
188
-
189
-
190
 |
 |
