Samsung SGH-A997 User Manual Ver.lk8_f6 (English(north America)) - Page 63
Group Settings, Viewing FDN Contacts, Creating New Group
 |
View all Samsung SGH-A997 manuals
Add to My Manuals
Save this manual to your list of manuals |
Page 63 highlights
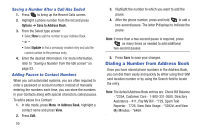
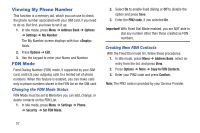
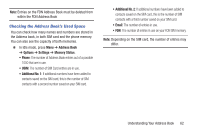
Viewing FDN Contacts To view your FDN Contacts: 1. In Idle mode, press Menu ➔ Address Book, select FDN Contacts from the list, and press View. 2. Highlight an FDN Contact and press View. 3. Highlight the SIM card location field and press Edit. 4. Enter your PIN2 code and press Confirm. 5. Use the keypad to enter a location value for the entry on the SIM card, if desired. 6. Press Save to store the FDN entry. Deleting FDN Contacts To delete one or more FDN Contacts: 1. In Idle mode, press Menu ➔ Address Book, select FDN Contacts from the list, and press View. 2. Highlight an FDN Contact and press Options ➔ Delete Contacts. 3. Press Selected or Multiple and select the FND Contact or Contacts to delete. 4. Enter your PIN2 code and press Confirm. Group Settings Creating New Group 1. In Idle mode, press Menu ➔ Address Book ➔ Options ➔ Create ➔ New Group. 2. Enter a name for this group in the Create group field and press Save. For more information, refer to "Entering Text" on page 25. 3. Highlight the new Group and press Options ➔ Edit Group. 4. Highlight the Picture field and press Assign to assign a photo to the Group. Select an image and press Options ➔ Select or . The selected image name displays in the Picture field. 5. Highlight the Ringtone field and press Assign to assign an audio file to the group. Select an audio file and then press Options ➔ Select. The selected audio file name displays in the Ringtone field. 6. Press Options ➔ Save and press Select or . Note: Groups are not synchronized between your phone Address Book and AT&T Address Book. Understanding Your Address Book 58
-
 1
1 -
2
-
3
-
4
-
5
-
6
-
7
-
8
-
9
-
10
-
11
-
12
-
13
-
14
-
15
-
16
-
17
-
18
-
19
-
20
-
21
-
22
-
23
-
24
-
25
-
26
-
27
-
28
-
29
-
30
-
31
-
32
-
33
-
34
-
35
-
36
-
37
-
38
-
39
-
40
-
41
-
42
-
43
-
44
-
45
-
46
-
47
-
48
-
49
-
50
-
51
-
52
-
53
-
54
-
55
-
56
-
57
-
 58
58 -
 59
59 -
 60
60 -
 61
61 -
 62
62 -
 63
63 -
 64
64 -
 65
65 -
 66
66 -
 67
67 -
 68
68 -
69
-
70
-
71
-
72
-
73
-
74
-
75
-
76
-
77
-
78
-
79
-
80
-
81
-
82
-
83
-
84
-
85
-
86
-
87
-
88
-
89
-
90
-
91
-
92
-
93
-
94
-
95
-
96
-
97
-
98
-
99
-
100
-
101
-
102
-
103
-
104
-
105
-
106
-
107
-
108
-
109
-
110
-
111
-
112
-
113
-
114
-
115
-
116
-
117
-
118
-
119
-
120
-
121
-
122
-
123
-
124
-
125
-
126
-
127
-
128
-
129
-
130
-
131
-
132
-
133
-
134
-
135
-
136
-
137
-
138
-
139
-
140
-
141
-
142
-
143
-
144
-
145
-
146
-
147
-
148
-
149
-
150
-
151
-
152
-
153
-
154
-
155
-
156
-
157
-
158
-
159
-
160
-
161
-
162
-
163
-
164
-
165
-
166
-
167
-
168
-
169
-
170
-
171
-
172
-
173
-
174
-
175
-
176
-
177
-
178
-
179
-
180
-
181
-
182
-
183
-
184
-
185
-
186
-
187
-
188
-
189
-
190
 |
 |
