Samsung SGH-T499 User Manual (user Manual) (ver.f9) (English) - Page 73
Sending a Namecard
 |
View all Samsung SGH-T499 manuals
Add to My Manuals
Save this manual to your list of manuals |
Page 73 highlights
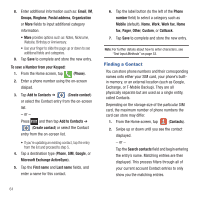
Unjoining a Contact 1. From the Home screen, tap . 2. Tap a contact name (the account name from which you want to unjoin an entry). This reveals the details for entry. Note: Typically this is the same contact with a different name or account information. 3. Tap the Joined contacts area. 4. Tap next to the entry you want to unjoin. The contacts are "unjoined" or separated and no longer display in the merged record screen. Both contacts now go back to being separately displayed. Marking a Contact as Default When you use applications such as the Voice Dialer or other messaging type applications, the application needs to know which information is primary (default) in a contact entry list. For example, when you say "Call John Smith", if you have three phone records for John Smith, the Voice dialer is looking for the "default" number or entry. The Mark as default option marks one entry in a contact record to use as the default. This comes in handy when you have multiple entries for the same person (see Linked contacts). 1. From the Home screen, tap . 2. Tap a Contact entry. 3. Press and then tap Mark as default. The Mark as default screen displays radio buttons next to the contact name, phone number, or other contact information. 4. Tap the radio button next to the entry information you want to be the primary information (such as name, phone number, or email) and select Save. Sending a Namecard A Namecard contains contact information, and can be sent to recipients as a Virtual Business Card (Vcard) attachment using Bluetooth, Google Mail, or as a message. 1. From the Home screen, tap . 2. Tap a Contact entry. 3. Press and then tap Send via and select a delivery method: Bluetooth, Email, Gmail, or Messaging. The Namecard attaches to the selected message type and is delivered when you send the message. Sending All Current Namecards Rather than selecting once Contact entry at a time, you can send all of your current entries at once. 1. From the Home screen, tap . Contacts 69
-
 1
1 -
2
-
3
-
4
-
5
-
6
-
7
-
8
-
9
-
10
-
11
-
12
-
13
-
14
-
15
-
16
-
17
-
18
-
19
-
20
-
21
-
22
-
23
-
24
-
25
-
26
-
27
-
28
-
29
-
30
-
31
-
32
-
33
-
34
-
35
-
36
-
37
-
38
-
39
-
40
-
41
-
42
-
43
-
44
-
45
-
46
-
47
-
48
-
49
-
50
-
51
-
52
-
53
-
54
-
55
-
56
-
57
-
58
-
59
-
60
-
61
-
62
-
63
-
64
-
65
-
66
-
67
-
 68
68 -
 69
69 -
 70
70 -
 71
71 -
 72
72 -
 73
73 -
 74
74 -
 75
75 -
 76
76 -
 77
77 -
 78
78 -
79
-
80
-
81
-
82
-
83
-
84
-
85
-
86
-
87
-
88
-
89
-
90
-
91
-
92
-
93
-
94
-
95
-
96
-
97
-
98
-
99
-
100
-
101
-
102
-
103
-
104
-
105
-
106
-
107
-
108
-
109
-
110
-
111
-
112
-
113
-
114
-
115
-
116
-
117
-
118
-
119
-
120
-
121
-
122
-
123
-
124
-
125
-
126
-
127
-
128
-
129
-
130
-
131
-
132
-
133
-
134
-
135
-
136
-
137
-
138
-
139
-
140
-
141
-
142
-
143
-
144
-
145
-
146
-
147
-
148
-
149
-
150
-
151
-
152
-
153
-
154
-
155
-
156
-
157
-
158
-
159
-
160
-
161
-
162
-
163
-
164
-
165
-
166
-
167
-
168
-
169
-
170
-
171
-
172
-
173
-
174
-
175
-
176
-
177
-
178
-
179
-
180
-
181
-
182
-
183
-
184
-
185
-
186
-
187
-
188
-
189
-
190
-
191
-
192
-
193
-
194
-
195
 |
 |
