3Ware 9550SXU-16ML User Guide - Page 165
Removing a Unit Through 3BM, Start > Administrative Tools > Computer
 |
UPC - 693494971606
View all 3Ware 9550SXU-16ML manuals
Add to My Manuals
Save this manual to your list of manuals |
Page 165 highlights
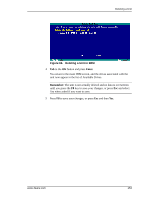
Removing a Unit Under Windows, go to Start > Administrative Tools > Computer Management, and select Disk Management. Remove the logical drive letter for the unit. Under Linux and FreeBSD, you can unmount the unit with this command: umount 3 In 3DM, choose Management > Maintenance. 4 In the Unit Maintenance table on the Maintenance Page, select the unit you want to remove and click Remove Unit. 5 When a message asks you to confirm, click OK. The unit number and information is removed from the Maintenance page in 3DM. The operating system is notified that the unit was removed. In Linux the device node associated with this unit is removed. In Windows the Device Manager will reflect the changes under the disk drives icon. You can now physically remove the drives and move them to another controller. If you have a hotswap carrier, you can do this without shutting down the system. If you do not have a hot-swap carrier, power-down the system and ground yourself before making changes to the hardware. If you change your mind and want to reuse the drives and unit on the current controller, click Rescan Controller. Removing a Unit Through 3BM Note: Even though removing a unit is supported in 3BM, you can also simply power down to remove the applicable drives since you are not booted yet. 1 If your drives are not in hot swap carriers, you do not need to remove a unit via 3BM. Simply power down and remove the applicable drives. Refer to your system's user guide for details on removing fixed disks. Warning: Physically removing drives which are not in hot swap carriers can result in a system hang or may even damage the system and the drive. 2 At the main 3BM screen, highlight the unit you want to remove and press Enter to select it. An asterisk appears in the left-most column to indicate that the unit is selected. www.3ware.com 155
-
 1
1 -
2
-
3
-
4
-
5
-
6
-
7
-
8
-
9
-
10
-
11
-
12
-
13
-
14
-
15
-
16
-
17
-
18
-
19
-
20
-
21
-
22
-
23
-
24
-
25
-
26
-
27
-
28
-
29
-
30
-
31
-
32
-
33
-
34
-
35
-
36
-
37
-
38
-
39
-
40
-
41
-
42
-
43
-
44
-
45
-
46
-
47
-
48
-
49
-
50
-
51
-
52
-
53
-
54
-
55
-
56
-
57
-
58
-
59
-
60
-
61
-
62
-
63
-
64
-
65
-
66
-
67
-
68
-
69
-
70
-
71
-
72
-
73
-
74
-
75
-
76
-
77
-
78
-
79
-
80
-
81
-
82
-
83
-
84
-
85
-
86
-
87
-
88
-
89
-
90
-
91
-
92
-
93
-
94
-
95
-
96
-
97
-
98
-
99
-
100
-
101
-
102
-
103
-
104
-
105
-
106
-
107
-
108
-
109
-
110
-
111
-
112
-
113
-
114
-
115
-
116
-
117
-
118
-
119
-
120
-
121
-
122
-
123
-
124
-
125
-
126
-
127
-
128
-
129
-
130
-
131
-
132
-
133
-
134
-
135
-
136
-
137
-
138
-
139
-
140
-
141
-
142
-
143
-
144
-
145
-
146
-
147
-
148
-
149
-
150
-
151
-
152
-
153
-
154
-
155
-
156
-
157
-
158
-
159
-
 160
160 -
 161
161 -
 162
162 -
 163
163 -
 164
164 -
 165
165 -
 166
166 -
 167
167 -
 168
168 -
 169
169 -
 170
170 -
171
-
172
-
173
-
174
-
175
-
176
-
177
-
178
-
179
-
180
-
181
-
182
-
183
-
184
-
185
-
186
-
187
-
188
-
189
-
190
-
191
-
192
-
193
-
194
-
195
-
196
-
197
-
198
-
199
-
200
-
201
-
202
-
203
-
204
-
205
-
206
-
207
-
208
-
209
-
210
-
211
-
212
-
213
-
214
-
215
-
216
-
217
-
218
-
219
-
220
-
221
-
222
-
223
-
224
-
225
-
226
-
227
-
228
-
229
-
230
-
231
-
232
-
233
-
234
-
235
-
236
-
237
-
238
-
239
-
240
-
241
-
242
-
243
-
244
-
245
-
246
-
247
-
248
-
249
-
250
-
251
-
252
-
253
-
254
-
255
-
256
-
257
-
258
-
259
-
260
 |
 |