3Ware 9550SXU-16ML User Guide - Page 195
Cancelling a Rebuild and Restarting It with a Different Drive, Enter, Remove Drive
 |
UPC - 693494971606
View all 3Ware 9550SXU-16ML manuals
Add to My Manuals
Save this manual to your list of manuals |
Page 195 highlights
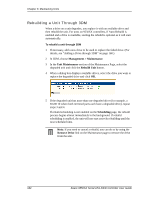
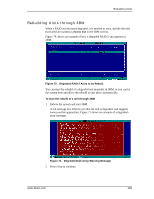
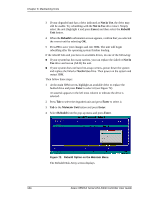
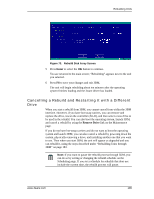
Rebuilding Units Figure 73. Rebuild Disk Array Screen 5 Press Enter to select the OK button to continue. You are returned to the main screen; "Rebuilding" appears next to the unit you selected. 6 Press F8 to save your changes and exit 3BM. The unit will begin rebuilding about ten minutes after the operating system finishes loading and the 3ware driver has loaded. Cancelling a Rebuild and Restarting It with a Different Drive When you start a rebuild from 3BM, you cannot cancel from within the 3BM interface. However, if you have hot-swap carriers, you can remove and replace the drive, rescan the controller (Alt-R), and then select a new drive to be used in the rebuild. You can also boot the operating system, launch 3DM, and cancel a rebuild by using the Remove Drive link on the Maintenance page. If you do not have hot-swap carriers and do not want to boot the operating system and launch 3DM, you can also cancel a rebuild by powering down the system, physically removing a drive, and installing another one that you want to use. Then when you start 3BM, the unit will appear as degraded and you can rebuild it, using the steps described under "Rebuilding Units through 3BM" on page 183. Note: If you want to pause the rebuild process through 3DM, you can do so by setting or changing the rebuild schedule on the Scheduling page. If you set a schedule for rebuilds that does not include the current time, the rebuild process will pause. www.3ware.com 185
-
 1
1 -
2
-
3
-
4
-
5
-
6
-
7
-
8
-
9
-
10
-
11
-
12
-
13
-
14
-
15
-
16
-
17
-
18
-
19
-
20
-
21
-
22
-
23
-
24
-
25
-
26
-
27
-
28
-
29
-
30
-
31
-
32
-
33
-
34
-
35
-
36
-
37
-
38
-
39
-
40
-
41
-
42
-
43
-
44
-
45
-
46
-
47
-
48
-
49
-
50
-
51
-
52
-
53
-
54
-
55
-
56
-
57
-
58
-
59
-
60
-
61
-
62
-
63
-
64
-
65
-
66
-
67
-
68
-
69
-
70
-
71
-
72
-
73
-
74
-
75
-
76
-
77
-
78
-
79
-
80
-
81
-
82
-
83
-
84
-
85
-
86
-
87
-
88
-
89
-
90
-
91
-
92
-
93
-
94
-
95
-
96
-
97
-
98
-
99
-
100
-
101
-
102
-
103
-
104
-
105
-
106
-
107
-
108
-
109
-
110
-
111
-
112
-
113
-
114
-
115
-
116
-
117
-
118
-
119
-
120
-
121
-
122
-
123
-
124
-
125
-
126
-
127
-
128
-
129
-
130
-
131
-
132
-
133
-
134
-
135
-
136
-
137
-
138
-
139
-
140
-
141
-
142
-
143
-
144
-
145
-
146
-
147
-
148
-
149
-
150
-
151
-
152
-
153
-
154
-
155
-
156
-
157
-
158
-
159
-
160
-
161
-
162
-
163
-
164
-
165
-
166
-
167
-
168
-
169
-
170
-
171
-
172
-
173
-
174
-
175
-
176
-
177
-
178
-
179
-
180
-
181
-
182
-
183
-
184
-
185
-
186
-
187
-
188
-
189
-
 190
190 -
 191
191 -
 192
192 -
 193
193 -
 194
194 -
 195
195 -
 196
196 -
 197
197 -
 198
198 -
 199
199 -
 200
200 -
201
-
202
-
203
-
204
-
205
-
206
-
207
-
208
-
209
-
210
-
211
-
212
-
213
-
214
-
215
-
216
-
217
-
218
-
219
-
220
-
221
-
222
-
223
-
224
-
225
-
226
-
227
-
228
-
229
-
230
-
231
-
232
-
233
-
234
-
235
-
236
-
237
-
238
-
239
-
240
-
241
-
242
-
243
-
244
-
245
-
246
-
247
-
248
-
249
-
250
-
251
-
252
-
253
-
254
-
255
-
256
-
257
-
258
-
259
-
260
 |
 |
