Brother International Quattro 2 6700D Users Manual - English - Page 305
Applique Material.
 |
View all Brother International Quattro 2 6700D manuals
Add to My Manuals
Save this manual to your list of manuals |
Page 305 highlights
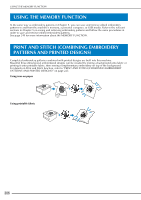
VARIOUS EMBROIDERING FUNCTIONS h Hoop the appliqué fabric in the embroidery frame, attach the embroidery frame to the machine, and then start embroidering. i After the pattern is embroidered, thread the machine with the thread for the cutting line, and then sew the cutting line (APPLIQUE MATERIAL). k Use two layers of adhesive water-soluble stabilizer material with their sticky sides together, and then hoop them in the embroidery frame. a Cutting line for appliqué Memo • We recommend using thread for the cutting line that is closest to the color of the fabric. j Remove the appliqué material from the embroidery frame, and then carefully cut along the stitching. After cutting, carefully remove all of the cutting line thread. Note • If water-soluble stabilizer is used, it is not necessary to remove the stabilizer material after sewing the appliqué outline. To reduce shrinkage of the pattern, we recommend using water-soluble stabilizer. • Put together two layers of water-soluble stabilizer, otherwise the stabilizer material may tear during embroidering. l Thread outline the machine with the thread for from step n, and then sew the the placement line for the appliqué position (APPLIQUE POSITION). 6 Embroidery Edit Note • Depending on the pattern density and fabric used, there may be shrinking of the pattern or the appliqué may be misaligned with the placement line. We recommend cutting slightly outside of the cutting line. • When using patterns that are vertically and horizontally symmetrical, use a chalk pencil to indicate the pattern orientation before cutting it out. • Carefully cut out the pattern on the outline you just sewed. Do not cut inside the cutting line, otherwise the appliqué fabric will not be caught by the appliqué stitch. a Pattern placement line m Lightly apply glue or spray adhesive, and paste the appliqué piece so that it aligns with the placement line. Note • Before pasting the appliqué piece down, make sure the appliqué piece is positioned correctly within the placement line. 303
-
 1
1 -
2
-
3
-
4
-
5
-
6
-
7
-
8
-
9
-
10
-
11
-
12
-
13
-
14
-
15
-
16
-
17
-
18
-
19
-
20
-
21
-
22
-
23
-
24
-
25
-
26
-
27
-
28
-
29
-
30
-
31
-
32
-
33
-
34
-
35
-
36
-
37
-
38
-
39
-
40
-
41
-
42
-
43
-
44
-
45
-
46
-
47
-
48
-
49
-
50
-
51
-
52
-
53
-
54
-
55
-
56
-
57
-
58
-
59
-
60
-
61
-
62
-
63
-
64
-
65
-
66
-
67
-
68
-
69
-
70
-
71
-
72
-
73
-
74
-
75
-
76
-
77
-
78
-
79
-
80
-
81
-
82
-
83
-
84
-
85
-
86
-
87
-
88
-
89
-
90
-
91
-
92
-
93
-
94
-
95
-
96
-
97
-
98
-
99
-
100
-
101
-
102
-
103
-
104
-
105
-
106
-
107
-
108
-
109
-
110
-
111
-
112
-
113
-
114
-
115
-
116
-
117
-
118
-
119
-
120
-
121
-
122
-
123
-
124
-
125
-
126
-
127
-
128
-
129
-
130
-
131
-
132
-
133
-
134
-
135
-
136
-
137
-
138
-
139
-
140
-
141
-
142
-
143
-
144
-
145
-
146
-
147
-
148
-
149
-
150
-
151
-
152
-
153
-
154
-
155
-
156
-
157
-
158
-
159
-
160
-
161
-
162
-
163
-
164
-
165
-
166
-
167
-
168
-
169
-
170
-
171
-
172
-
173
-
174
-
175
-
176
-
177
-
178
-
179
-
180
-
181
-
182
-
183
-
184
-
185
-
186
-
187
-
188
-
189
-
190
-
191
-
192
-
193
-
194
-
195
-
196
-
197
-
198
-
199
-
200
-
201
-
202
-
203
-
204
-
205
-
206
-
207
-
208
-
209
-
210
-
211
-
212
-
213
-
214
-
215
-
216
-
217
-
218
-
219
-
220
-
221
-
222
-
223
-
224
-
225
-
226
-
227
-
228
-
229
-
230
-
231
-
232
-
233
-
234
-
235
-
236
-
237
-
238
-
239
-
240
-
241
-
242
-
243
-
244
-
245
-
246
-
247
-
248
-
249
-
250
-
251
-
252
-
253
-
254
-
255
-
256
-
257
-
258
-
259
-
260
-
261
-
262
-
263
-
264
-
265
-
266
-
267
-
268
-
269
-
270
-
271
-
272
-
273
-
274
-
275
-
276
-
277
-
278
-
279
-
280
-
281
-
282
-
283
-
284
-
285
-
286
-
287
-
288
-
289
-
290
-
291
-
292
-
293
-
294
-
295
-
296
-
297
-
298
-
299
-
 300
300 -
 301
301 -
 302
302 -
 303
303 -
 304
304 -
 305
305 -
 306
306 -
 307
307 -
 308
308 -
 309
309 -
 310
310 -
311
-
312
-
313
-
314
-
315
-
316
-
317
-
318
-
319
-
320
-
321
-
322
-
323
-
324
-
325
-
326
-
327
-
328
-
329
-
330
-
331
-
332
-
333
-
334
-
335
-
336
-
337
-
338
-
339
-
340
-
341
-
342
-
343
-
344
-
345
-
346
-
347
-
348
-
349
-
350
-
351
-
352
-
353
-
354
-
355
-
356
-
357
-
358
-
359
-
360
-
361
-
362
-
363
-
364
-
365
-
366
-
367
-
368
-
369
-
370
-
371
-
372
-
373
-
374
-
375
-
376
 |
 |
