Brother International Quattro 2 6700D Users Manual - English - Page 324
Adjusting The Thread Tension
 |
View all Brother International Quattro 2 6700D manuals
Add to My Manuals
Save this manual to your list of manuals |
Page 324 highlights
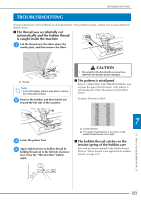
ADJUSTING THE THREAD TENSION ADJUSTING THE THREAD TENSION After sewing trial stitches and checking the sewing results, adjust the thread tensions if necessary. After adjusting the tensions, be sure to sew trial stitches again in order to check the sewing results. ■ Adjusting the upper thread tension We recommend a setting between 6 and 8 for the upper thread tension. If utility stitches are being used, refer to "Setting the Thread Tension" on page 79. If embroidery patterns are being used, refer to "Adjusting Thread Tension" on page 233. ■ Adjusting the tension of the bobbin thread Note • Turning the screw on the bobbin case (gray) may push up the spring plate, as shown below. If this occurs, gently press down the spring plate with a screwdriver so it is lower than the top surface of the bobbin case (gray), and then insert the bobbin case into the machine. If the desired stitching cannot be achieved after adjusting the upper thread tension, adjust the tension of the bobbin thread. The tension of the bobbin thread can be adjusted by turning the slotted-head (-) screw on the bobbin case (gray) for bobbin work. a Do not turn the phillips screw (+). b Adjust with a small screwdriver. To increase the tension of the bobbin thread, turn the slotted-head (-) screw 30° to 45° clockwise. To decrease the tension of the bobbin thread, turn the slotted-head (-) screw 30° to 45° counterclockwise. a Spring plate CAUTION • DO NOT adjust the position of the phillips (+) screw on the bobbin case (gray) as this may result in damage to the bobbin case, rendering it useless. • If the slotted screw (-) is difficult to turn, do not use force. Turning the screw too much or providing force in either (rotational) direction may cause damage to the bobbin case. Should damage occur, the bobbin case may not maintain proper tension. Note • If the bobbin thread tension is tight, the thread cannot be passed through the tension spring when the bobbin is installed in the bobbin case. (Refer to "When tension is not applied to the bobbin thread" on page 312.) 322
-
 1
1 -
2
-
3
-
4
-
5
-
6
-
7
-
8
-
9
-
10
-
11
-
12
-
13
-
14
-
15
-
16
-
17
-
18
-
19
-
20
-
21
-
22
-
23
-
24
-
25
-
26
-
27
-
28
-
29
-
30
-
31
-
32
-
33
-
34
-
35
-
36
-
37
-
38
-
39
-
40
-
41
-
42
-
43
-
44
-
45
-
46
-
47
-
48
-
49
-
50
-
51
-
52
-
53
-
54
-
55
-
56
-
57
-
58
-
59
-
60
-
61
-
62
-
63
-
64
-
65
-
66
-
67
-
68
-
69
-
70
-
71
-
72
-
73
-
74
-
75
-
76
-
77
-
78
-
79
-
80
-
81
-
82
-
83
-
84
-
85
-
86
-
87
-
88
-
89
-
90
-
91
-
92
-
93
-
94
-
95
-
96
-
97
-
98
-
99
-
100
-
101
-
102
-
103
-
104
-
105
-
106
-
107
-
108
-
109
-
110
-
111
-
112
-
113
-
114
-
115
-
116
-
117
-
118
-
119
-
120
-
121
-
122
-
123
-
124
-
125
-
126
-
127
-
128
-
129
-
130
-
131
-
132
-
133
-
134
-
135
-
136
-
137
-
138
-
139
-
140
-
141
-
142
-
143
-
144
-
145
-
146
-
147
-
148
-
149
-
150
-
151
-
152
-
153
-
154
-
155
-
156
-
157
-
158
-
159
-
160
-
161
-
162
-
163
-
164
-
165
-
166
-
167
-
168
-
169
-
170
-
171
-
172
-
173
-
174
-
175
-
176
-
177
-
178
-
179
-
180
-
181
-
182
-
183
-
184
-
185
-
186
-
187
-
188
-
189
-
190
-
191
-
192
-
193
-
194
-
195
-
196
-
197
-
198
-
199
-
200
-
201
-
202
-
203
-
204
-
205
-
206
-
207
-
208
-
209
-
210
-
211
-
212
-
213
-
214
-
215
-
216
-
217
-
218
-
219
-
220
-
221
-
222
-
223
-
224
-
225
-
226
-
227
-
228
-
229
-
230
-
231
-
232
-
233
-
234
-
235
-
236
-
237
-
238
-
239
-
240
-
241
-
242
-
243
-
244
-
245
-
246
-
247
-
248
-
249
-
250
-
251
-
252
-
253
-
254
-
255
-
256
-
257
-
258
-
259
-
260
-
261
-
262
-
263
-
264
-
265
-
266
-
267
-
268
-
269
-
270
-
271
-
272
-
273
-
274
-
275
-
276
-
277
-
278
-
279
-
280
-
281
-
282
-
283
-
284
-
285
-
286
-
287
-
288
-
289
-
290
-
291
-
292
-
293
-
294
-
295
-
296
-
297
-
298
-
299
-
300
-
301
-
302
-
303
-
304
-
305
-
306
-
307
-
308
-
309
-
310
-
311
-
312
-
313
-
314
-
315
-
316
-
317
-
318
-
 319
319 -
 320
320 -
 321
321 -
 322
322 -
 323
323 -
 324
324 -
 325
325 -
 326
326 -
 327
327 -
 328
328 -
 329
329 -
330
-
331
-
332
-
333
-
334
-
335
-
336
-
337
-
338
-
339
-
340
-
341
-
342
-
343
-
344
-
345
-
346
-
347
-
348
-
349
-
350
-
351
-
352
-
353
-
354
-
355
-
356
-
357
-
358
-
359
-
360
-
361
-
362
-
363
-
364
-
365
-
366
-
367
-
368
-
369
-
370
-
371
-
372
-
373
-
374
-
375
-
376
 |
 |
