Cisco 7920 Administration Guide - Page 79
Charging the Battery, Battery Type, Power Supply, Connected to Phone, Power Supply Connected
 |
UPC - 746320774732
View all Cisco 7920 manuals
Add to My Manuals
Save this manual to your list of manuals |
Page 79 highlights
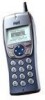
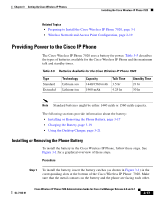
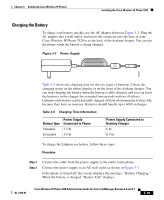
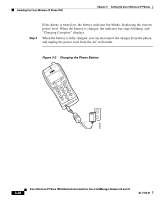
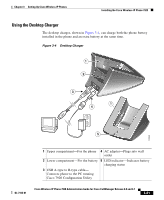
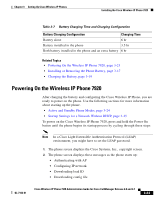
Chapter 3 Setting Up Cisco Wireless IP Phones Installing the Cisco Wireless IP Phone 7920 Charging the Battery To charge your battery quickly, use the AC adapter shown in Figure 3-2. Plug the AC adapter into a wall outlet, and insert the connector into the base of your Cisco Wireless IP Phone 7920 or to the back of the desktop charger. You can use the phone while the battery is being charged. Figure 3-2 Power Supply 79679 Table 3-6 shows the charging time for the two types of batteries. Check the charging status on the phone display or on the front of the desktop charger. You can stop charging the battery when the battery is fully charged, and you can leave the batteries in the charger for extended time periods with no ill effects. Lithium ion batteries can be partially charged without shortening the battery life, because they have no memory. Batteries should handle up to 4000 recharges. Table 3-6 Charging Time Information Battery Type Standard Extended Power Supply Connected to Phone 3.5 hr 4.5 hr Power Supply Connected to Desktop Charger 6 hr 8.5 hr To charge the Lithium ion battery, follow these steps: Procedure Step 1 Step 2 Connect the cable from the power supply to the outlet in the phone. Connect the power supply to an AC wall outlet as shown in Figure 3-3. If the phone is turned off, the screen displays the message, "Battery Charging." When the battery is charged, "Battery Full" displays. OL-7104-01 Cisco Wireless IP Phone 7920 Administration Guide for Cisco CallManager Release 4.0 and 4.1 3-19
-
 1
1 -
2
-
3
-
4
-
5
-
6
-
7
-
8
-
9
-
10
-
11
-
12
-
13
-
14
-
15
-
16
-
17
-
18
-
19
-
20
-
21
-
22
-
23
-
24
-
25
-
26
-
27
-
28
-
29
-
30
-
31
-
32
-
33
-
34
-
35
-
36
-
37
-
38
-
39
-
40
-
41
-
42
-
43
-
44
-
45
-
46
-
47
-
48
-
49
-
50
-
51
-
52
-
53
-
54
-
55
-
56
-
57
-
58
-
59
-
60
-
61
-
62
-
63
-
64
-
65
-
66
-
67
-
68
-
69
-
70
-
71
-
72
-
73
-
 74
74 -
 75
75 -
 76
76 -
 77
77 -
 78
78 -
 79
79 -
 80
80 -
 81
81 -
 82
82 -
 83
83 -
 84
84 -
85
-
86
-
87
-
88
-
89
-
90
-
91
-
92
-
93
-
94
-
95
-
96
-
97
-
98
-
99
-
100
-
101
-
102
-
103
-
104
-
105
-
106
-
107
-
108
-
109
-
110
-
111
-
112
-
113
-
114
-
115
-
116
-
117
-
118
-
119
-
120
-
121
-
122
-
123
-
124
-
125
-
126
-
127
-
128
-
129
-
130
-
131
-
132
-
133
-
134
-
135
-
136
-
137
-
138
-
139
-
140
-
141
-
142
-
143
-
144
-
145
-
146
-
147
-
148
-
149
-
150
-
151
-
152
-
153
-
154
-
155
-
156
-
157
-
158
-
159
-
160
-
161
-
162
-
163
-
164
-
165
-
166
-
167
-
168
-
169
-
170
-
171
-
172
-
173
-
174
-
175
-
176
-
177
-
178
-
179
-
180
-
181
-
182
-
183
-
184
-
185
-
186
-
187
-
188
-
189
-
190
-
191
-
192
-
193
-
194
-
195
-
196
-
197
-
198
-
199
-
200
-
201
-
202
-
203
-
204
-
205
-
206
-
207
-
208
-
209
-
210
-
211
-
212
-
213
-
214
-
215
-
216
-
217
-
218
-
219
-
220
-
221
-
222
-
223
-
224
-
225
-
226
-
227
-
228
-
229
-
230
-
231
-
232
-
233
-
234
-
235
-
236
-
237
-
238
 |
 |
