Dell XPS M2010 Owner's Manual - Page 111
About Your RAID Configuration, RAID Level 0 Configuration
 |
View all Dell XPS M2010 manuals
Add to My Manuals
Save this manual to your list of manuals |
Page 111 highlights
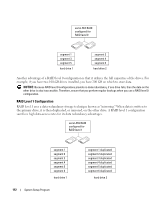
Performing a One-Time Boot You can set a one-time-only boot sequence without entering system setup. (You can also use this procedure to boot the Dell Diagnostics on the diagnostics utility partition on your hard drive.) 1 Shut down the computer through the Start menu. 2 Connect the computer to an electrical outlet. 3 Turn on the computer. When the DELL logo appears, press immediately. NOTE: The keyboard must be awake to recognize the keystroke. Ensure the keyboard is awake by touching the touchpad. If you wait too long and the Windows logo appears, continue to wait until you see the Windows desktop. Then shut down your computer and try again. 4 When the boot device list appears, highlight the device from which you want to boot and press . The computer boots to the selected device. The next time you reboot the computer, the previous boot order is restored. About Your RAID Configuration This section provides an overview of the RAID configuration that you might have selected when you purchased your computer. Although several RAID configurations are available, Dell offers either a RAID level 0 configuration or a RAID level 1 configuration for the Dell™ XPS™ M2010 computer. A RAID level 0 configuration is recommended for high-performance computing and gaming, and a RAID level 1 configuration is recommended for the data integrity requirements of digital photography and audio. The Intel® RAID controller on your computer can only create a RAID level 0 configuration using two physical drives. NOTE: RAID levels do not represent a hierarchy. A RAID level 1 configuration is not inherently better or worse than a RAID level 0 configuration. RAID Level 0 Configuration A RAID level 0 configuration uses a storage technique known as "data striping" to provide a high data access rate. Data striping is a method of writing consecutive segments, or stripes, of data sequentially across the physical drives to create a large virtual drive. Data striping allows one of the drives to read data while the other drive is searching for and reading the next block. System Setup Program 111
-
 1
1 -
2
-
3
-
4
-
5
-
6
-
7
-
8
-
9
-
10
-
11
-
12
-
13
-
14
-
15
-
16
-
17
-
18
-
19
-
20
-
21
-
22
-
23
-
24
-
25
-
26
-
27
-
28
-
29
-
30
-
31
-
32
-
33
-
34
-
35
-
36
-
37
-
38
-
39
-
40
-
41
-
42
-
43
-
44
-
45
-
46
-
47
-
48
-
49
-
50
-
51
-
52
-
53
-
54
-
55
-
56
-
57
-
58
-
59
-
60
-
61
-
62
-
63
-
64
-
65
-
66
-
67
-
68
-
69
-
70
-
71
-
72
-
73
-
74
-
75
-
76
-
77
-
78
-
79
-
80
-
81
-
82
-
83
-
84
-
85
-
86
-
87
-
88
-
89
-
90
-
91
-
92
-
93
-
94
-
95
-
96
-
97
-
98
-
99
-
100
-
101
-
102
-
103
-
104
-
105
-
 106
106 -
 107
107 -
 108
108 -
 109
109 -
 110
110 -
 111
111 -
 112
112 -
 113
113 -
 114
114 -
 115
115 -
 116
116 -
117
-
118
-
119
-
120
-
121
-
122
-
123
-
124
-
125
-
126
-
127
-
128
-
129
-
130
-
131
-
132
-
133
-
134
-
135
-
136
-
137
-
138
-
139
-
140
-
141
-
142
-
143
-
144
-
145
-
146
-
147
-
148
-
149
-
150
-
151
-
152
-
153
-
154
-
155
-
156
-
157
-
158
-
159
-
160
-
161
-
162
-
163
-
164
-
165
-
166
-
167
-
168
-
169
-
170
-
171
-
172
-
173
-
174
-
175
-
176
-
177
-
178
-
179
-
180
-
181
-
182
-
183
-
184
-
185
-
186
-
187
-
188
-
189
-
190
-
191
-
192
-
193
-
194
 |
 |