Dell XPS M2010 Owner's Manual - Page 40
Adjusting the Picture, Copying CD, DVD, and BD Media, How to Copy a CD, or BD - memory
 |
View all Dell XPS M2010 manuals
Add to My Manuals
Save this manual to your list of manuals |
Page 40 highlights
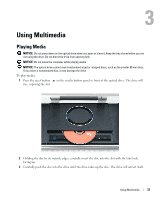
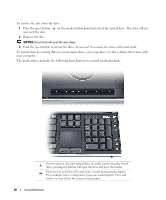
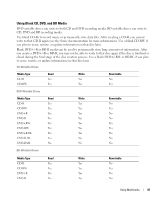
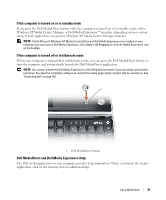
Adjusting the Picture If an error message notifies you that the current resolution and color depth are using too much memory and preventing media playback, adjust the display properties. 1 Click Start→ Control Panel→ Display→ Settings. 2 Under Screen resolution, click and drag the bar to reduce the resolution setting. 3 In the drop-down menu under Color quality, click Medium (16 bit)→ OK. Copying CD, DVD, and BD Media This section applies only to computers that have a DVD+/-RW drive or a BD-RE drive. NOTE: Ensure that you observe all copyright laws when copying media. NOTE: The types of optical drives offered by Dell may vary by country. The following instructions explain how to make an exact copy of a CD, DVD, or BD using Roxio Creator. You can also use Roxio Creator for other purposes, such as creating music CDs from audio files stored on your computer or backing up important data. For help, open Roxio Creator, and then press . The DVD drives and BD drives installed in Dell computers do not support HD-DVD media. For a list of supported media formats, see "Using Blank CD, DVD, and BD Media" on page 41. How to Copy a CD, DVD, or BD NOTE: BD media can only be copied to other BD media. NOTE: Copying a BD-R to BD-RE will not produce an exact copy. NOTE: Most commercial DVDs and BDs have copyright protection and cannot be copied using Roxio Creator. 1 Click Start → All Programs→ Roxio Creator DE→ Projects→ Copy. 2 Click the Copy tab, and then click Copy Disc. 3 To copy the CD, DVD, or BD: • If you have one optical drive, insert the source disc into the drive, ensure that the settings are correct, and then click the Copy Disc button to continue. The computer reads your source disc and copies the data to a temporary folder on your computer hard drive. When prompted, insert a blank disc into the drive and click OK. • If you have two optical drives, select the drive into which you have inserted your source disc and click the Copy Disc button to continue. The computer copies the data from the source disc to the blank disc. Once you have finished copying the source disc, the disc that you have created automatically ejects. 40 Using Multimedia
-
 1
1 -
2
-
3
-
4
-
5
-
6
-
7
-
8
-
9
-
10
-
11
-
12
-
13
-
14
-
15
-
16
-
17
-
18
-
19
-
20
-
21
-
22
-
23
-
24
-
25
-
26
-
27
-
28
-
29
-
30
-
31
-
32
-
33
-
34
-
 35
35 -
 36
36 -
 37
37 -
 38
38 -
 39
39 -
 40
40 -
 41
41 -
 42
42 -
 43
43 -
 44
44 -
 45
45 -
46
-
47
-
48
-
49
-
50
-
51
-
52
-
53
-
54
-
55
-
56
-
57
-
58
-
59
-
60
-
61
-
62
-
63
-
64
-
65
-
66
-
67
-
68
-
69
-
70
-
71
-
72
-
73
-
74
-
75
-
76
-
77
-
78
-
79
-
80
-
81
-
82
-
83
-
84
-
85
-
86
-
87
-
88
-
89
-
90
-
91
-
92
-
93
-
94
-
95
-
96
-
97
-
98
-
99
-
100
-
101
-
102
-
103
-
104
-
105
-
106
-
107
-
108
-
109
-
110
-
111
-
112
-
113
-
114
-
115
-
116
-
117
-
118
-
119
-
120
-
121
-
122
-
123
-
124
-
125
-
126
-
127
-
128
-
129
-
130
-
131
-
132
-
133
-
134
-
135
-
136
-
137
-
138
-
139
-
140
-
141
-
142
-
143
-
144
-
145
-
146
-
147
-
148
-
149
-
150
-
151
-
152
-
153
-
154
-
155
-
156
-
157
-
158
-
159
-
160
-
161
-
162
-
163
-
164
-
165
-
166
-
167
-
168
-
169
-
170
-
171
-
172
-
173
-
174
-
175
-
176
-
177
-
178
-
179
-
180
-
181
-
182
-
183
-
184
-
185
-
186
-
187
-
188
-
189
-
190
-
191
-
192
-
193
-
194
 |
 |