Dell XPS M2010 Owner's Manual - Page 116
Intel Matrix Storage Manager, Select Member Hard Drive
 |
View all Dell XPS M2010 manuals
Add to My Manuals
Save this manual to your list of manuals |
Page 116 highlights
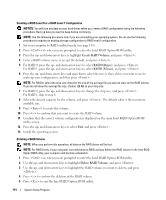
9 On the Select Member Hard Drive screen, double-click the hard drive to select the member drive to span the array and click Next. 10 For RAID 0, on the Specify Volume Size screen, select the Volume Size you want, and click Next. For RAID 1, skip to step 11. NOTE: In the following step, you will lose all data contained on the member drive. 11 Click Finish to start migrating, or click Back to make changes. You can use your computer normally during the migration process. Rebuilding a Degraded RAID Level 1 Configuration If your computer has reported a degraded RAID level 1 volume, contact Dell about replacing your hard drive. See "Contacting Dell" on page 150. You can manually rebuild the computer's redundancy mirror to a new hard drive by performing the following steps: 1 Click the Start button and point to All Programs→ Intel Matrix Storage Manager → Intel Matrix Storage Console to launch the Intel Storage Console. 2 Right-click the available hard drive to which you want to rebuild the RAID level 1 volume, and click Rebuild to this Disk. You can use your computer while the computer is rebuilding the RAID level 1 volume. 116 System Setup Program
-
 1
1 -
2
-
3
-
4
-
5
-
6
-
7
-
8
-
9
-
10
-
11
-
12
-
13
-
14
-
15
-
16
-
17
-
18
-
19
-
20
-
21
-
22
-
23
-
24
-
25
-
26
-
27
-
28
-
29
-
30
-
31
-
32
-
33
-
34
-
35
-
36
-
37
-
38
-
39
-
40
-
41
-
42
-
43
-
44
-
45
-
46
-
47
-
48
-
49
-
50
-
51
-
52
-
53
-
54
-
55
-
56
-
57
-
58
-
59
-
60
-
61
-
62
-
63
-
64
-
65
-
66
-
67
-
68
-
69
-
70
-
71
-
72
-
73
-
74
-
75
-
76
-
77
-
78
-
79
-
80
-
81
-
82
-
83
-
84
-
85
-
86
-
87
-
88
-
89
-
90
-
91
-
92
-
93
-
94
-
95
-
96
-
97
-
98
-
99
-
100
-
101
-
102
-
103
-
104
-
105
-
106
-
107
-
108
-
109
-
110
-
 111
111 -
 112
112 -
 113
113 -
 114
114 -
 115
115 -
 116
116 -
 117
117 -
 118
118 -
 119
119 -
 120
120 -
 121
121 -
122
-
123
-
124
-
125
-
126
-
127
-
128
-
129
-
130
-
131
-
132
-
133
-
134
-
135
-
136
-
137
-
138
-
139
-
140
-
141
-
142
-
143
-
144
-
145
-
146
-
147
-
148
-
149
-
150
-
151
-
152
-
153
-
154
-
155
-
156
-
157
-
158
-
159
-
160
-
161
-
162
-
163
-
164
-
165
-
166
-
167
-
168
-
169
-
170
-
171
-
172
-
173
-
174
-
175
-
176
-
177
-
178
-
179
-
180
-
181
-
182
-
183
-
184
-
185
-
186
-
187
-
188
-
189
-
190
-
191
-
192
-
193
-
194
 |
 |