HP 6125G HP 6125G & 6125G/XG Blade Switches Network Management and Mon - Page 22
Configuring the client/server mode, Configuring the symmetric peers mode, Command, Remarks
 |
View all HP 6125G manuals
Add to My Manuals
Save this manual to your list of manuals |
Page 22 highlights
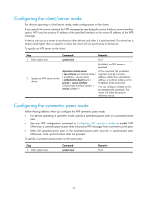
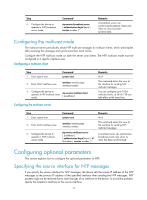
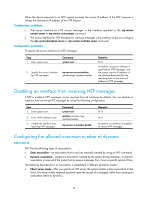
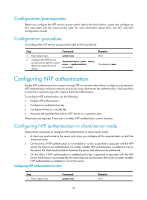
Configuring the client/server mode For devices operating in client/server mode, make configurations on the clients. If you specify the source interface for NTP messages by specifying the source interface source-interface option, NTP uses the primary IP address of the specified interface as the source IP address of the NTP messages. A device can act as a server to synchronize other devices only after it is synchronized. If a server has a stratum level higher than or equal to a client, the client will not synchronize to that server. To specify an NTP server on the client: Step Command Remarks 1. Enter system view. system-view N/A By default, no NTP server is specified. ntp-service unicast-server In this command, the ip-address [ vpn-instance vpn-instance-name ] argument must be a unicast 2. Specify an NTP server for the device. { ip-address | server-name } [ authentication-keyid keyid | priority | source-interface address, rather than a broadcast address, a multicast address or the IP address of the local clock. interface-type interface-number | version number ] * You can configure multiple servers by repeating the command. The clients will select the optimal reference source. Configuring the symmetric peers mode Follow these guidelines when you configure the NTP symmetric peers mode: • For devices operating in symmetric mode, specify a symmetric-passive peer on a symmetric-active peer. • Use any NTP configuration command in Configuring NTP operation modes to enable NTP. Otherwise, a symmetric-passive peer does not process NTP messages from a symmetric-active peer. • Either the symmetric-active peer or the symmetric-passive peer must be in synchronized state. Otherwise, clock synchronization does not proceed. To specify a symmetric-passive peer on the active peer: Step 1. Enter system view. Command system-view Remarks N/A 15
-
 1
1 -
2
-
3
-
4
-
5
-
6
-
7
-
8
-
9
-
10
-
11
-
12
-
13
-
14
-
15
-
16
-
 17
17 -
 18
18 -
 19
19 -
 20
20 -
 21
21 -
 22
22 -
 23
23 -
 24
24 -
 25
25 -
 26
26 -
 27
27 -
28
-
29
-
30
-
31
-
32
-
33
-
34
-
35
-
36
-
37
-
38
-
39
-
40
-
41
-
42
-
43
-
44
-
45
-
46
-
47
-
48
-
49
-
50
-
51
-
52
-
53
-
54
-
55
-
56
-
57
-
58
-
59
-
60
-
61
-
62
-
63
-
64
-
65
-
66
-
67
-
68
-
69
-
70
-
71
-
72
-
73
-
74
-
75
-
76
-
77
-
78
-
79
-
80
-
81
-
82
-
83
-
84
-
85
-
86
-
87
-
88
-
89
-
90
-
91
-
92
-
93
-
94
-
95
-
96
-
97
-
98
-
99
-
100
-
101
-
102
-
103
-
104
-
105
-
106
-
107
-
108
-
109
-
110
-
111
-
112
-
113
-
114
-
115
-
116
-
117
-
118
-
119
-
120
-
121
-
122
-
123
-
124
-
125
-
126
-
127
-
128
-
129
-
130
-
131
-
132
-
133
-
134
-
135
-
136
-
137
-
138
-
139
-
140
-
141
-
142
-
143
-
144
-
145
-
146
-
147
-
148
-
149
-
150
-
151
-
152
-
153
-
154
-
155
-
156
-
157
 |
 |
