HP 6125G HP 6125G & 6125G/XG Blade Switches Network Management and Mon - Page 93
Network diagram, Display the configuration of all mirroring groups.
 |
View all HP 6125G manuals
Add to My Manuals
Save this manual to your list of manuals |
Page 93 highlights
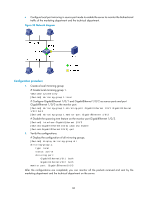
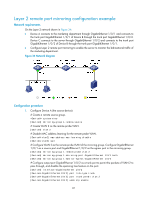
• Configure local port mirroring in source port mode to enable the server to monitor the bidirectional traffic of the marketing department and the technical department. Figure 33 Network diagram Configuration procedure 1. Create a local mirroring group: # Create local mirroring group 1. system-view [DeviceA] mirroring-group 1 local # Configure GigabitEthernet 1/0/1 and GigabitEthernet 1/0/2 as source ports and port GigabitEthernet 1/0/3 as the monitor port. [DeviceA] mirroring-group 1 mirroring-port GigabitEthernet 1/0/1 GigabitEthernet 1/0/2 both [DeviceA] mirroring-group 1 monitor-port GigabitEthernet 1/0/3 # Disable the spanning tree feature on the monitor port GigabitEthernet 1/0/3. [DeviceA] interface GigabitEthernet 1/0/3 [DeviceA-GigabitEthernet1/0/3] undo stp enable [DeviceA-GigabitEthernet1/0/3] quit 2. Verify the configurations: # Display the configuration of all mirroring groups. [DeviceA] display mirroring-group all mirroring-group 1: type: local status: active mirroring port: GigabitEthernet1/0/1 both GigabitEthernet1/0/2 both monitor port: GigabitEthernet1/0/3 After the configurations are completed, you can monitor all the packets received and sent by the marketing department and the technical department on the server. 86
-
 1
1 -
2
-
3
-
4
-
5
-
6
-
7
-
8
-
9
-
10
-
11
-
12
-
13
-
14
-
15
-
16
-
17
-
18
-
19
-
20
-
21
-
22
-
23
-
24
-
25
-
26
-
27
-
28
-
29
-
30
-
31
-
32
-
33
-
34
-
35
-
36
-
37
-
38
-
39
-
40
-
41
-
42
-
43
-
44
-
45
-
46
-
47
-
48
-
49
-
50
-
51
-
52
-
53
-
54
-
55
-
56
-
57
-
58
-
59
-
60
-
61
-
62
-
63
-
64
-
65
-
66
-
67
-
68
-
69
-
70
-
71
-
72
-
73
-
74
-
75
-
76
-
77
-
78
-
79
-
80
-
81
-
82
-
83
-
84
-
85
-
86
-
87
-
 88
88 -
 89
89 -
 90
90 -
 91
91 -
 92
92 -
 93
93 -
 94
94 -
 95
95 -
 96
96 -
 97
97 -
 98
98 -
99
-
100
-
101
-
102
-
103
-
104
-
105
-
106
-
107
-
108
-
109
-
110
-
111
-
112
-
113
-
114
-
115
-
116
-
117
-
118
-
119
-
120
-
121
-
122
-
123
-
124
-
125
-
126
-
127
-
128
-
129
-
130
-
131
-
132
-
133
-
134
-
135
-
136
-
137
-
138
-
139
-
140
-
141
-
142
-
143
-
144
-
145
-
146
-
147
-
148
-
149
-
150
-
151
-
152
-
153
-
154
-
155
-
156
-
157
 |
 |
