HP 6125G HP 6125G & 6125G/XG Blade Switches Network Management and Mon - Page 76
Configuring the RMON alarm function
 |
View all HP 6125G manuals
Add to My Manuals
Save this manual to your list of manuals |
Page 76 highlights
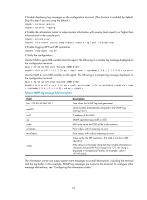
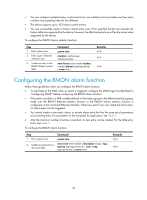
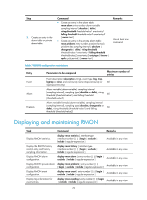
• You can configure multiple history control entries for one interface, but must make sure their entry numbers and sampling intervals are different. • The device supports up to 100 history control entries. • You can successfully create a history control entry, even if the specified bucket size exceeds the history table size supported by the device. However, the effective bucket size will be the actual value supported by the device. To configure the RMON history statistics function: Step 1. Enter system view. 2. Enter Layer 2 Ethernet interface view. 3. Create an entry in the RMON history control table. Command system-view interface interface-type interface-number rmon history entry-number buckets number interval sampling-interval [ owner text ] Remarks N/A N/A N/A Configuring the RMON alarm function Follow these guidelines when you configure the RMON alarm function: • To send traps to the NMS when an alarm is triggered, configure the SNMP agent as described in "Configuring SNMP" before configuring the RMON alarm function. • If the alarm variable is a MIB variable defined in the history group or the Ethernet statistics group, make sure the RMON Ethernet statistics function or the RMON history statistics function is configured on the monitored Ethernet interface. Otherwise, even if you can create the alarm entry, no alarm event can be triggered. • You cannot create a new event, alarm, or private alarm entry that has the same set of parameters as an existing entry. For parameters to be compared for duplication, see Table 7. • After the maximum number of entries is reached, no new entry can be created. For the table entry limits, see Table 7. To configure the RMON alarm function: Step 1. Enter system view. Command system-view 2. Create an event entry in rmon event entry-number [ description string ] { log | the event table. log-trap log-trapcommunity | none | trap trap-community } [ owner text ] Remarks N/A N/A 69
-
 1
1 -
2
-
3
-
4
-
5
-
6
-
7
-
8
-
9
-
10
-
11
-
12
-
13
-
14
-
15
-
16
-
17
-
18
-
19
-
20
-
21
-
22
-
23
-
24
-
25
-
26
-
27
-
28
-
29
-
30
-
31
-
32
-
33
-
34
-
35
-
36
-
37
-
38
-
39
-
40
-
41
-
42
-
43
-
44
-
45
-
46
-
47
-
48
-
49
-
50
-
51
-
52
-
53
-
54
-
55
-
56
-
57
-
58
-
59
-
60
-
61
-
62
-
63
-
64
-
65
-
66
-
67
-
68
-
69
-
70
-
 71
71 -
 72
72 -
 73
73 -
 74
74 -
 75
75 -
 76
76 -
 77
77 -
 78
78 -
 79
79 -
 80
80 -
 81
81 -
82
-
83
-
84
-
85
-
86
-
87
-
88
-
89
-
90
-
91
-
92
-
93
-
94
-
95
-
96
-
97
-
98
-
99
-
100
-
101
-
102
-
103
-
104
-
105
-
106
-
107
-
108
-
109
-
110
-
111
-
112
-
113
-
114
-
115
-
116
-
117
-
118
-
119
-
120
-
121
-
122
-
123
-
124
-
125
-
126
-
127
-
128
-
129
-
130
-
131
-
132
-
133
-
134
-
135
-
136
-
137
-
138
-
139
-
140
-
141
-
142
-
143
-
144
-
145
-
146
-
147
-
148
-
149
-
150
-
151
-
152
-
153
-
154
-
155
-
156
-
157
 |
 |