HP Color LaserJet CM4730 HP Color LaserJet CM4730 MFP - Software Technical Ref - Page 106
Install drivers by using Add Printer Wizard, Add a printer, Start, Settings, Printers and Faxes
 |
View all HP Color LaserJet CM4730 manuals
Add to My Manuals
Save this manual to your list of manuals |
Page 106 highlights
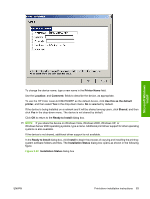
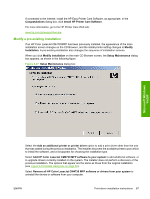
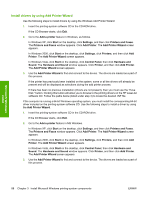
Microsoft Windows install Install drivers by using Add Printer Wizard Use the following steps to install drivers by using the Windows Add Printer Wizard: 1. Insert the printing-system software CD in the CD-ROM drive. If the CD Browser starts, click Exit. 2. Go to the Add a printer feature in Windows, as follows. In Windows XP, click Start on the desktop, click Settings, and then click Printers and Faxes. The Printers and Faxes window appears. Click Add Printer. The Add Printer Wizard screen appears. In Windows 2000, click Start on the desktop, click Settings, click Printers, and then click Add Printer. The Add Printer Wizard screen appears. In Windows Vista, click Start on the desktop, click Control Panel, then click Hardware and Sound. The Hardware and Sound window appears. Click Printer, and then click Add Printer. The Add Printer Wizard screen appears. 3. Use the Add Printer Wizard to find and connect to the device. The drivers are loaded as a part of this process. If the printer has previously been installed on the system, some or all the drivers will already be present and will be displayed as selections during the add printer process. If there has been no previous installation (drivers are not present), then you must use the "Have Disk " button. Clicking this button will allow you to browse to the printing drivers on the HP LaserJet software CD. Follow the paths below (listed under step 4) to locate the desired .INF file. If the computer is running a 64-bit Windows operating system, you must install the corresponding 64-bit driver included on the printing-system software CD. Use the following steps to install a driver by using the Add Printer Wizard. 1. Insert the printing-system software CD in the CD-ROM drive. If the CD Browser starts, click Exit. 2. Go to the Add a printer feature in MS Windows. In Windows XP, click Start on the desktop, click Settings, and then click Printers and Faxes. The Printers and Faxes window appears. Click Add Printer. The Add Printer Wizard screen appears. In Windows 2000, click Start on the desktop, click Settings, click Printers, and then click Add Printer. The Add Printer Wizard screen appears. In Windows Vista, click Start on the desktop, click Control Panel, then click Hardware and Sound. The Hardware and Sound window appears. Click Printer, and then click Add Printer. The Add Printer Wizard screen appears. 3. Use the Add Printer Wizard to find and connect to the device. The drivers are loaded as a part of this process. 88 Chapter 3 Install Microsoft Windows printing-system components ENWW
-
 1
1 -
2
-
3
-
4
-
5
-
6
-
7
-
8
-
9
-
10
-
11
-
12
-
13
-
14
-
15
-
16
-
17
-
18
-
19
-
20
-
21
-
22
-
23
-
24
-
25
-
26
-
27
-
28
-
29
-
30
-
31
-
32
-
33
-
34
-
35
-
36
-
37
-
38
-
39
-
40
-
41
-
42
-
43
-
44
-
45
-
46
-
47
-
48
-
49
-
50
-
51
-
52
-
53
-
54
-
55
-
56
-
57
-
58
-
59
-
60
-
61
-
62
-
63
-
64
-
65
-
66
-
67
-
68
-
69
-
70
-
71
-
72
-
73
-
74
-
75
-
76
-
77
-
78
-
79
-
80
-
81
-
82
-
83
-
84
-
85
-
86
-
87
-
88
-
89
-
90
-
91
-
92
-
93
-
94
-
95
-
96
-
97
-
98
-
99
-
100
-
 101
101 -
 102
102 -
 103
103 -
 104
104 -
 105
105 -
 106
106 -
 107
107 -
 108
108 -
 109
109 -
 110
110 -
 111
111 -
112
-
113
-
114
-
115
-
116
-
117
-
118
-
119
-
120
-
121
-
122
-
123
-
124
-
125
-
126
-
127
-
128
-
129
-
130
-
131
-
132
-
133
-
134
-
135
-
136
-
137
-
138
-
139
-
140
-
141
-
142
-
143
-
144
-
145
-
146
-
147
-
148
-
149
-
150
-
151
-
152
-
153
-
154
-
155
-
156
-
157
-
158
-
159
-
160
-
161
-
162
-
163
-
164
-
165
-
166
-
167
-
168
-
169
-
170
-
171
-
172
-
173
-
174
-
175
-
176
-
177
-
178
-
179
-
180
-
181
-
182
-
183
-
184
-
185
-
186
-
187
-
188
-
189
-
190
-
191
-
192
-
193
-
194
-
195
-
196
-
197
-
198
-
199
-
200
-
201
-
202
-
203
-
204
-
205
-
206
-
207
-
208
-
209
-
210
-
211
-
212
-
213
-
214
-
215
-
216
-
217
-
218
-
219
-
220
-
221
-
222
-
223
-
224
-
225
-
226
-
227
-
228
-
229
-
230
-
231
-
232
-
233
-
234
-
235
-
236
-
237
-
238
-
239
-
240
-
241
-
242
-
243
-
244
-
245
-
246
-
247
-
248
-
249
-
250
-
251
-
252
-
253
-
254
-
255
-
256
-
257
-
258
-
259
-
260
-
261
-
262
-
263
-
264
-
265
-
266
-
267
-
268
-
269
-
270
-
271
-
272
-
273
-
274
-
275
-
276
-
277
-
278
-
279
-
280
-
281
-
282
-
283
-
284
-
285
-
286
-
287
-
288
-
289
-
290
-
291
-
292
-
293
-
294
-
295
-
296
-
297
-
298
-
299
-
300
-
301
-
302
-
303
-
304
-
305
-
306
-
307
-
308
-
309
-
310
-
311
-
312
-
313
-
314
-
315
-
316
-
317
-
318
 |
 |