HP Color LaserJet CM4730 HP Color LaserJet CM4730 MFP - Software Technical Ref - Page 298
Registry settings, Device settings, SSNP_Level, Plus sign, <PrinterName>
 |
View all HP Color LaserJet CM4730 manuals
Add to My Manuals
Save this manual to your list of manuals |
Page 298 highlights
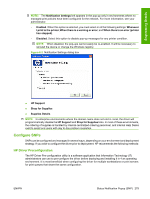
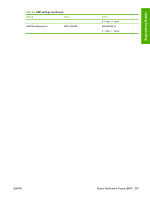
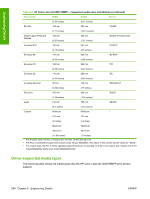
Engineering Details Follow these steps to pre-configure the SNP behavior of the driver. 1. Download and launch the DMC driver Pre-configuration utility (www.hp.com/go/hpdriverpreconfig). You will see a message indicating that depending on how the driver driver is installed, changes made to the driver may invalidate the digital signature and Microsoft may display a warning message. This is normal behavior. Click OK to continue. 2. Click File, then Open and browse to the directory where the driver resides. 3. Select the driver's .inf file and click the Open button. The following screen will appear. 4. Click Device settings and expand the SSNP_Level listing by clicking the Plus sign (+). Select the SNP characteristics you desire. 5. When finished, click File and Save to complete. A file will be created in the same folder as the driver file. This configuration file will follow all installations of the driver and control the SNP behavior for each installation. For additional information on the HP Driver Pre-configuration utility, please refer to the PDF manual that is included in the download image of the HP Pre-configuration utility. The HP Driver Pre-configuration utility is also available as a plug-in for HP's Web Jetadmin application. Refer to the WJA documentation for instructions on using the Driver Preconfiguration within WJA. Download the HP Driver Pre-configuration plug-ins via: http://www.hp.com/go/wja_components Registry settings All of the previous methods for changing the behavior of SNP make changes to the specific registry settings. It is also possible to directly change the SNP settings by editing the registry directly. Editing the registry to modify SNP behavior is beyond the scope of this document. The registry location below contains the entries that modify the SNP behavior for each installed printer on the client PC or server. Modify the SNP behavior by making changes to each of the installed printers. HKEY_LOCAL_MACHINE\SYSTEM\CurrentControlSet\Control\Print\Printers \\PrinterDriverData Where represents the names of each of your installed printers. Table 6-5 SNP settings Setting Type Value SSNPDeviceUpdateInterval REG_DWORD 0x00000000 (0) 0 = Normal, 1 = Minimize SSNPNotifyEventSetting REG_DWORD 0x00000001 (1) 0 = Disabled, 1 = When Printing, 2 = On Warnings or Errors 3 = On Errors only SSNPShowAlertLink REG_DWORD 0x00000001 (1) SSNPShowShopLink REG_DWORD 0 = Hide, 1 = Show 0x00000000 (0) SSNPShowSSNSettings REG_DWORD 0 = Hide, 1 = Show 0x00000000 (0) 280 Chapter 6 Engineering Details ENWW
-
 1
1 -
2
-
3
-
4
-
5
-
6
-
7
-
8
-
9
-
10
-
11
-
12
-
13
-
14
-
15
-
16
-
17
-
18
-
19
-
20
-
21
-
22
-
23
-
24
-
25
-
26
-
27
-
28
-
29
-
30
-
31
-
32
-
33
-
34
-
35
-
36
-
37
-
38
-
39
-
40
-
41
-
42
-
43
-
44
-
45
-
46
-
47
-
48
-
49
-
50
-
51
-
52
-
53
-
54
-
55
-
56
-
57
-
58
-
59
-
60
-
61
-
62
-
63
-
64
-
65
-
66
-
67
-
68
-
69
-
70
-
71
-
72
-
73
-
74
-
75
-
76
-
77
-
78
-
79
-
80
-
81
-
82
-
83
-
84
-
85
-
86
-
87
-
88
-
89
-
90
-
91
-
92
-
93
-
94
-
95
-
96
-
97
-
98
-
99
-
100
-
101
-
102
-
103
-
104
-
105
-
106
-
107
-
108
-
109
-
110
-
111
-
112
-
113
-
114
-
115
-
116
-
117
-
118
-
119
-
120
-
121
-
122
-
123
-
124
-
125
-
126
-
127
-
128
-
129
-
130
-
131
-
132
-
133
-
134
-
135
-
136
-
137
-
138
-
139
-
140
-
141
-
142
-
143
-
144
-
145
-
146
-
147
-
148
-
149
-
150
-
151
-
152
-
153
-
154
-
155
-
156
-
157
-
158
-
159
-
160
-
161
-
162
-
163
-
164
-
165
-
166
-
167
-
168
-
169
-
170
-
171
-
172
-
173
-
174
-
175
-
176
-
177
-
178
-
179
-
180
-
181
-
182
-
183
-
184
-
185
-
186
-
187
-
188
-
189
-
190
-
191
-
192
-
193
-
194
-
195
-
196
-
197
-
198
-
199
-
200
-
201
-
202
-
203
-
204
-
205
-
206
-
207
-
208
-
209
-
210
-
211
-
212
-
213
-
214
-
215
-
216
-
217
-
218
-
219
-
220
-
221
-
222
-
223
-
224
-
225
-
226
-
227
-
228
-
229
-
230
-
231
-
232
-
233
-
234
-
235
-
236
-
237
-
238
-
239
-
240
-
241
-
242
-
243
-
244
-
245
-
246
-
247
-
248
-
249
-
250
-
251
-
252
-
253
-
254
-
255
-
256
-
257
-
258
-
259
-
260
-
261
-
262
-
263
-
264
-
265
-
266
-
267
-
268
-
269
-
270
-
271
-
272
-
273
-
274
-
275
-
276
-
277
-
278
-
279
-
280
-
281
-
282
-
283
-
284
-
285
-
286
-
287
-
288
-
289
-
290
-
291
-
292
-
 293
293 -
 294
294 -
 295
295 -
 296
296 -
 297
297 -
 298
298 -
 299
299 -
 300
300 -
 301
301 -
 302
302 -
 303
303 -
304
-
305
-
306
-
307
-
308
-
309
-
310
-
311
-
312
-
313
-
314
-
315
-
316
-
317
-
318
 |
 |