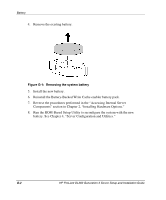
HP DL360 HP ProLiant DL360 Generation 3 Server Setup and Installation Guide - Page 115
PCI support slot, PCI riser board, assembly, RBSU ROM-Based Setup Utility
 |
UPC - 613326948835
View all HP DL360 manuals
Add to My Manuals
Save this manual to your list of manuals |
Page 115 highlights
installation service 3-15 memory 2-7 processors 2-16 P password protection, how to setup E-9 PCI riser board assembly installing 2-12 removal 2-9 support slot 2-12 thumbscrew 2-10 PCI support slot, PCI riser board assembly 2-12 peripheral devices, connecting 3-8 plate, thumbscrew 2-12 POST (Power-On Self-Test) accessing 4-8 audible error messages D-8 error messages, more information D-5 overview 4-8 sequence D-3 troubleshooting D-2, D-4 power load requirements 1-4 rack requirements 1-4 rated input F-1 ratings 1-4 troubleshooting D-4 power cord compliance notice A-8 connecting 3-8 current rating A-8 placement A-8 safe use 1-7 set A-8 voltage rating A-8 power cycling D-2, D-9 Power On/Off switch 2-3, 3-12 power strips grounding requirements 1-5 load restriction 1-5 power supplies Index load balancing 1-5 output power F-2 power switch See Power On/Off switch power up sequence, POST D-3 powering up the server 3-12 Power-On Self-Test See POST preconfigured operating system, installation instructions 3-14 problems, diagnosing See troubleshooting processor, troubleshooting D-6 R rack airflow requirements 1-3 blanking panels 1-3 clearances 1-3 grounding requirements 1-5 power requirements 1-4 resources 1-5 server installation service 3-15 space requirements 1-3 stabilization 1-6 telco, stability of 1-6 tools, installation 1-7 warnings 1-6 weight 1-6 rack door ventilation 1-3 rack rails, fixed aligning inner slide 3-3 attaching to the rack 3-3 installing 3-4 rack template, measuring with 3-2 rail release latches disengaging 2-5 engage 2-5 warning 3-5 RBSU (ROM-Based Setup Utility), overview 4-1 rear panel connection sequence 3-9 connectors, illustrated 3-9 connectors, location and order 3-9 HP ProLiant DL360 Generation 3 Server Setup and Installation Guide Index-5
-
 1
1 -
2
-
3
-
4
-
5
-
6
-
7
-
8
-
9
-
10
-
11
-
12
-
13
-
14
-
15
-
16
-
17
-
18
-
19
-
20
-
21
-
22
-
23
-
24
-
25
-
26
-
27
-
28
-
29
-
30
-
31
-
32
-
33
-
34
-
35
-
36
-
37
-
38
-
39
-
40
-
41
-
42
-
43
-
44
-
45
-
46
-
47
-
48
-
49
-
50
-
51
-
52
-
53
-
54
-
55
-
56
-
57
-
58
-
59
-
60
-
61
-
62
-
63
-
64
-
65
-
66
-
67
-
68
-
69
-
70
-
71
-
72
-
73
-
74
-
75
-
76
-
77
-
78
-
79
-
80
-
81
-
82
-
83
-
84
-
85
-
86
-
87
-
88
-
89
-
90
-
91
-
92
-
93
-
94
-
95
-
96
-
97
-
98
-
99
-
100
-
101
-
102
-
103
-
104
-
105
-
106
-
107
-
108
-
109
-
 110
110 -
 111
111 -
 112
112 -
 113
113 -
 114
114 -
 115
115 -
 116
116 -
 117
117 -
 118
118
 |
 |