HP DL360 HP ProLiant DL360 Generation 3 Server Setup and Installation Guide - Page 27
Access internal server components. Refer to Accessing Internal Server - proliant quickspecs
 |
UPC - 613326948835
View all HP DL360 manuals
Add to My Manuals
Save this manual to your list of manuals |
Page 27 highlights
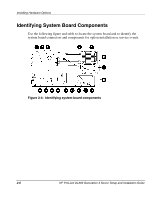
Installing Hardware Options • All DIMMs installed must be the same speed. Do not install DIMM modules supporting different speeds. For example, DIMM modules supporting speeds of 266 MHz and 200 MHz should not be installed together. • To facilitate successive DIMM installations, install the DIMMs in ascending sequential order, starting with DIMM socket 1A. • DIMMs are installed in banks of two DIMMs per bank. Bank A is DIMMs 1 and 2, and Bank B is DIMMs 3 and 4. CAUTION: Use only HP DIMMs. DIMMs from other sources can adversely affect data integrity. Refer to www.compaq.com/quickspecs for DIMM option kits. CAUTION: Electrostatic discharge can damage electronic components. Be sure you are properly grounded before beginning any installation procedure. Refer to Appendix B, "Electrostatic Discharge," for more information. To install a DIMM onto the system board: 1. Access internal server components. Refer to "Accessing Internal Server Components" section earlier in this chapter. 2. Open the DIMM socket latches. 3. Align the key slot in the bottom edge of the DIMM with the tab in the expansion socket. 4. Insert the DIMM at the same angle as the DIMM socket on the system board. As the DIMM enters the socket, the latches close. IMPORTANT: Misaligned DIMMs do not seat. 5. Press down firmly on the DIMM while pushing the latches inward until the latches snap into place. 6. Reverse the procedures performed in the "Accessing Internal Server Components" section earlier in this chapter. 2-8 HP ProLiant DL360 Generation 3 Server Setup and Installation Guide
-
 1
1 -
2
-
3
-
4
-
5
-
6
-
7
-
8
-
9
-
10
-
11
-
12
-
13
-
14
-
15
-
16
-
17
-
18
-
19
-
20
-
21
-
 22
22 -
 23
23 -
 24
24 -
 25
25 -
 26
26 -
 27
27 -
 28
28 -
 29
29 -
 30
30 -
 31
31 -
 32
32 -
33
-
34
-
35
-
36
-
37
-
38
-
39
-
40
-
41
-
42
-
43
-
44
-
45
-
46
-
47
-
48
-
49
-
50
-
51
-
52
-
53
-
54
-
55
-
56
-
57
-
58
-
59
-
60
-
61
-
62
-
63
-
64
-
65
-
66
-
67
-
68
-
69
-
70
-
71
-
72
-
73
-
74
-
75
-
76
-
77
-
78
-
79
-
80
-
81
-
82
-
83
-
84
-
85
-
86
-
87
-
88
-
89
-
90
-
91
-
92
-
93
-
94
-
95
-
96
-
97
-
98
-
99
-
100
-
101
-
102
-
103
-
104
-
105
-
106
-
107
-
108
-
109
-
110
-
111
-
112
-
113
-
114
-
115
-
116
-
117
-
118
 |
 |