HP DL360 HP ProLiant DL360 Generation 3 Server Setup and Installation Guide - Page 24
Press in and hold the rail release latches 2.
 |
UPC - 613326948835
View all HP DL360 manuals
Add to My Manuals
Save this manual to your list of manuals |
Page 24 highlights
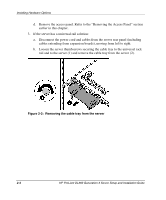
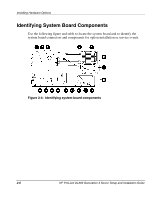
Installing Hardware Options c. Move to the front of the rack and loosen the thumbscrews securing the server in the rack (1). d. Grasp the front panel thumbscrews, and extend the server from the rack. The cables remain clamped in the cable tray. The rail release latches engage automatically. e. Press in and hold the rail release latches (2). f. Holding the rail release latches, extend the server until the latches clear the rack. g. Pull the server completely out of the rack and set it on a flat, level surface (3). Figure 2-3: Removing the server from the rack h. Remove the access panel. Refer to the "Removing the Access Panel" section earlier in this chapter. HP ProLiant DL360 Generation 3 Server Setup and Installation Guide 2-5
-
 1
1 -
2
-
3
-
4
-
5
-
6
-
7
-
8
-
9
-
10
-
11
-
12
-
13
-
14
-
15
-
16
-
17
-
18
-
 19
19 -
 20
20 -
 21
21 -
 22
22 -
 23
23 -
 24
24 -
 25
25 -
 26
26 -
 27
27 -
 28
28 -
 29
29 -
30
-
31
-
32
-
33
-
34
-
35
-
36
-
37
-
38
-
39
-
40
-
41
-
42
-
43
-
44
-
45
-
46
-
47
-
48
-
49
-
50
-
51
-
52
-
53
-
54
-
55
-
56
-
57
-
58
-
59
-
60
-
61
-
62
-
63
-
64
-
65
-
66
-
67
-
68
-
69
-
70
-
71
-
72
-
73
-
74
-
75
-
76
-
77
-
78
-
79
-
80
-
81
-
82
-
83
-
84
-
85
-
86
-
87
-
88
-
89
-
90
-
91
-
92
-
93
-
94
-
95
-
96
-
97
-
98
-
99
-
100
-
101
-
102
-
103
-
104
-
105
-
106
-
107
-
108
-
109
-
110
-
111
-
112
-
113
-
114
-
115
-
116
-
117
-
118
 |
 |

Installing Hardware Options
HP ProLiant DL360 Generation 3 Server Setup and Installation Guide
2-5
c.
Move to the front of the rack and loosen the thumbscrews securing the server
in the rack (1).
d.
Grasp the front panel thumbscrews, and extend the server from the rack. The
cables remain clamped in the cable tray. The rail release latches engage
automatically.
e.
Press in and hold the rail release latches (2).
f.
Holding the rail release latches, extend the server until the latches clear the
rack.
g.
Pull the server completely out of the rack and set it on a flat, level
surface (3).
Figure 2-3:
Removing the server from the rack
h.
Remove the access panel. Refer to the “Removing the Access Panel” section
earlier in this chapter.