HP Dc7100 HP Compaq Business Desktop dc7100 Series Service Reference Guide, 3r - Page 247
Solving Power Supply Problems, Problem, Cause, Solution
 |
UPC - 829160356877
View all HP Dc7100 manuals
Add to My Manuals
Save this manual to your list of manuals |
Page 247 highlights
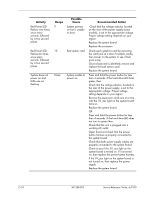
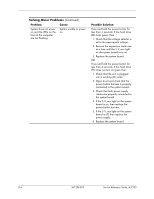
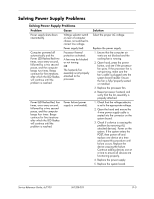
Solving Power Supply Problems Solving Power Supply Problems Problem Cause Power supply shuts down intermittently. Voltage selector switch on rear of computer chassis not switched to correct line voltage. Power supply fault. Computer powered off automatically and the Power LED flashes Red two times, once every second, followed by a two second pause, and the computer beeps two times. Beeps continue for five iterations after which the LED flashes will continue until the problem is resolved. Processor thermal protection activated: A fan may be blocked or not turning. OR The heatsink/fan assembly is not properly attached to the processor. Power LED flashes Red, four times, once every second, followed by a two second pause, and the computer beeps four times. Beeps continue for five iterations after which the LED flashes will continue until the problem is resolved. Power failure (power supply is overloaded). Solution Select the proper AC voltage. Replace the power supply. 1. Ensure that the computer air vents are not blocked and the cooling fan is running. 2. Open hood, press the power button, and see if the processor fan spins. If the processor fan is not spinning, make sure the fan's cable is plugged onto the system board header. Ensure the fan is fully/properly seated or installed. 3. Replace the processor fan. 4. Reseat processor heatsink and verify that the fan assembly is properly attached. 1. Check that the voltage selector, is set to the appropriate voltage. 2. Open the hood and ensure the 4-wire power supply cable is seated into the connector on the system board. 3. Check if a device is causing the problem by removing ALL attached devices). Power on the system. If the system enters the POST, then power off and replace one device at a time and repeat this procedure until failure occurs. Replace the device causing the failure. Continue adding devices one at a time to ensure all devices are functioning properly. 4. Replace the power supply. 5. Replace the system board. Service Reference Guide, dc7100 361288-003 D-5
-
 1
1 -
2
-
3
-
4
-
5
-
6
-
7
-
8
-
9
-
10
-
11
-
12
-
13
-
14
-
15
-
16
-
17
-
18
-
19
-
20
-
21
-
22
-
23
-
24
-
25
-
26
-
27
-
28
-
29
-
30
-
31
-
32
-
33
-
34
-
35
-
36
-
37
-
38
-
39
-
40
-
41
-
42
-
43
-
44
-
45
-
46
-
47
-
48
-
49
-
50
-
51
-
52
-
53
-
54
-
55
-
56
-
57
-
58
-
59
-
60
-
61
-
62
-
63
-
64
-
65
-
66
-
67
-
68
-
69
-
70
-
71
-
72
-
73
-
74
-
75
-
76
-
77
-
78
-
79
-
80
-
81
-
82
-
83
-
84
-
85
-
86
-
87
-
88
-
89
-
90
-
91
-
92
-
93
-
94
-
95
-
96
-
97
-
98
-
99
-
100
-
101
-
102
-
103
-
104
-
105
-
106
-
107
-
108
-
109
-
110
-
111
-
112
-
113
-
114
-
115
-
116
-
117
-
118
-
119
-
120
-
121
-
122
-
123
-
124
-
125
-
126
-
127
-
128
-
129
-
130
-
131
-
132
-
133
-
134
-
135
-
136
-
137
-
138
-
139
-
140
-
141
-
142
-
143
-
144
-
145
-
146
-
147
-
148
-
149
-
150
-
151
-
152
-
153
-
154
-
155
-
156
-
157
-
158
-
159
-
160
-
161
-
162
-
163
-
164
-
165
-
166
-
167
-
168
-
169
-
170
-
171
-
172
-
173
-
174
-
175
-
176
-
177
-
178
-
179
-
180
-
181
-
182
-
183
-
184
-
185
-
186
-
187
-
188
-
189
-
190
-
191
-
192
-
193
-
194
-
195
-
196
-
197
-
198
-
199
-
200
-
201
-
202
-
203
-
204
-
205
-
206
-
207
-
208
-
209
-
210
-
211
-
212
-
213
-
214
-
215
-
216
-
217
-
218
-
219
-
220
-
221
-
222
-
223
-
224
-
225
-
226
-
227
-
228
-
229
-
230
-
231
-
232
-
233
-
234
-
235
-
236
-
237
-
238
-
239
-
240
-
241
-
 242
242 -
 243
243 -
 244
244 -
 245
245 -
 246
246 -
 247
247 -
 248
248 -
 249
249 -
 250
250 -
 251
251 -
 252
252 -
253
-
254
-
255
-
256
-
257
-
258
-
259
-
260
-
261
-
262
-
263
-
264
-
265
-
266
-
267
-
268
-
269
-
270
-
271
-
272
-
273
-
274
-
275
-
276
-
277
-
278
-
279
-
280
-
281
-
282
-
283
-
284
-
285
-
286
-
287
-
288
-
289
-
290
 |
 |