HP Visualize J210XC IRIX to HP-UX Migration Guide - Page 48
Removing a Printer
 |
View all HP Visualize J210XC manuals
Add to My Manuals
Save this manual to your list of manuals |
Page 48 highlights
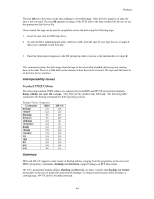
Printers Restarting the lpsched Daemon After you have defined the appropriate parallel and/or serial printers, the lpsched daemon must be restarted. To restart the lpsched daemon: 1. Run chkconfig to check the state of the lp spooler and set the state to on: # /sbin/chkconfig lp on 2. Start the lp spooler: # /etc/init.d/lp start Adding a Network Print Server Network printers allow for multiple users to share a single printer. This eliminates the need for a printer on every system and allows administration to consolidate resources. In such a networked environment, printers are attached to remote systems called print servers. Any client using the remote printer becomes a print client. Printer servers must be configured before they can accept remote print requests. To configure a print server, the system manager must successfully execute the following instructions: 1. Login as root to the print server system. 2. Grant permission to the print client, hostname, to access print servers across the network: # /usr/sbin/addclient hostname NOTE: The addclient command allows anyone who has access to the lp account on the print client to access the lp account on the print server. Therefore, any print client can modify the lp system. 3. Verify that both the print server and the print client can communicate over the network. 4. Log onto the print client as superuser. 5. On the print client, add the print server to the lp spooler using the script mknetpr: # /usr/sbin/mknetpr mknetpr should then prompt you for the name of the queue, the hostname and the printer name. 6. To make this print server the default printer, using the printer_name from the previous step, type: # /usr/lib/lpadmin -dprinter_name Removing a Printer Occasionally it may be necessary to remove one or more printers from the lp system. To use the rmprinter utility to remove the specified printer: 1. Become superuser with the su command, or login as root. 2. Remove the printer, printer_name, using the command: # /usr/sbin/rmprinter printer_name The printer, printer_name, should now be removed from the lp system. 43
-
 1
1 -
2
-
3
-
4
-
5
-
6
-
7
-
8
-
9
-
10
-
11
-
12
-
13
-
14
-
15
-
16
-
17
-
18
-
19
-
20
-
21
-
22
-
23
-
24
-
25
-
26
-
27
-
28
-
29
-
30
-
31
-
32
-
33
-
34
-
35
-
36
-
37
-
38
-
39
-
40
-
41
-
42
-
 43
43 -
 44
44 -
 45
45 -
 46
46 -
 47
47 -
 48
48 -
 49
49 -
 50
50 -
 51
51 -
 52
52 -
 53
53 -
54
-
55
-
56
-
57
-
58
-
59
-
60
-
61
-
62
-
63
-
64
-
65
-
66
-
67
-
68
-
69
-
70
-
71
-
72
-
73
-
74
-
75
-
76
-
77
-
78
-
79
-
80
-
81
-
82
-
83
-
84
-
85
-
86
-
87
-
88
-
89
-
90
-
91
-
92
-
93
-
94
-
95
-
96
-
97
-
98
-
99
-
100
-
101
-
102
-
103
-
104
-
105
-
106
-
107
-
108
-
109
-
110
-
111
-
112
-
113
-
114
-
115
-
116
-
117
-
118
-
119
-
120
-
121
-
122
-
123
-
124
-
125
 |
 |
