HP Visualize J210XC IRIX to HP-UX Migration Guide - Page 89
Setting Up NIS Clients, NIS Maps and Commands
 |
View all HP Visualize J210XC manuals
Add to My Manuals
Save this manual to your list of manuals |
Page 89 highlights
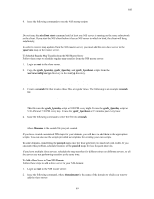
NIS Give the following command to start the daemons manually: slave1# ./ypinit -s cats The NIS maps are now available from the server slave1 in the domain shapes. Testing the NIS Slave Server Finally, to ensure that NIS services are functioning properly on the NIS slave server, give the ypwhich command. The response, localhost, indicates that nsd is correctly bound to the NIS server on the local system. Setting Up NIS Clients There are four procedures for setting up the NIS client. Repeat these steps for each NIS client you need to set up: • Setting the domain • Configuring NIS on the client • Starting NIS on the client • Testing the NIS client Configuring NIS on the Client If the NIS service is to start automatically when this client ("fish") is booted, the NIS environment must be configured with the chkconfig command. The yp flag allows this system to access NIS database information from an NIS server. To set the flag on, use the following command: fish# /etc/chkconfig yp on Edit the /etc/nsswitch.conf file, using any standard editor, by adding NIS to the hosts line: hosts: nis dns files Starting NIS on the Client The NIS service operates on this client as soon as you start it. You can start NIS by any one of these methods: • Rebooting this client • Stopping and restarting the network with the /etc/init.d/network script • Starting the nsd daemon manually Testing the NIS Client To ensure the NIS services are functioning properly on the NIS client, use the ypwhich command. NIS Under HP-UX NIS Maps and Commands On HP-UX 10.X the following commands are found in /usr/sbin: ypinit yppoll yppush ypset ypxfr ypxfrd 84
-
 1
1 -
2
-
3
-
4
-
5
-
6
-
7
-
8
-
9
-
10
-
11
-
12
-
13
-
14
-
15
-
16
-
17
-
18
-
19
-
20
-
21
-
22
-
23
-
24
-
25
-
26
-
27
-
28
-
29
-
30
-
31
-
32
-
33
-
34
-
35
-
36
-
37
-
38
-
39
-
40
-
41
-
42
-
43
-
44
-
45
-
46
-
47
-
48
-
49
-
50
-
51
-
52
-
53
-
54
-
55
-
56
-
57
-
58
-
59
-
60
-
61
-
62
-
63
-
64
-
65
-
66
-
67
-
68
-
69
-
70
-
71
-
72
-
73
-
74
-
75
-
76
-
77
-
78
-
79
-
80
-
81
-
82
-
83
-
 84
84 -
 85
85 -
 86
86 -
 87
87 -
 88
88 -
 89
89 -
 90
90 -
 91
91 -
 92
92 -
 93
93 -
 94
94 -
95
-
96
-
97
-
98
-
99
-
100
-
101
-
102
-
103
-
104
-
105
-
106
-
107
-
108
-
109
-
110
-
111
-
112
-
113
-
114
-
115
-
116
-
117
-
118
-
119
-
120
-
121
-
122
-
123
-
124
-
125
 |
 |
