Samsung GT-P5210 User Manual Generic Gt-p5210 Galaxy Tab 3 Jb English User Man - Page 15
Wi-Fi, Date and Time, End User License Agreement, Samsung Account, Add Wi-Fi network - update
 |
View all Samsung GT-P5210 manuals
Add to My Manuals
Save this manual to your list of manuals |
Page 15 highlights
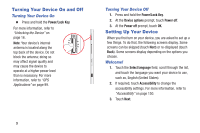
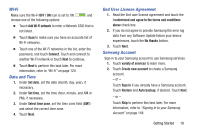
Wi-Fi Make sure the Wi-Fi OFF / ON icon is set to ON and choose one of the following options: Ⅲ Touch Add Wi-Fi network to enter a Network SSID that is not listed. Ⅲ Touch Scan to make sure you have an accurate list of Wi-Fi networks. Ⅲ Touch one of the Wi-Fi networks in the list, enter the password, and touch Connect. Touch and connect to another Wi-Fi network or touch Next to continue. Ⅲ Touch Next to perform this task later. For more information, refer to "Wi-Fi" on page 120. Date and Time 1. Under Set date, set the date (month, day, year), if necessary. 2. Under Set time, set the time (hour, minute, and AM or PM), if necessary. 3. Under Select time zone, set the time zone field (GMT) and select the correct time zone. 4. Touch Next. End User License Agreement 1. Read the End user license agreement and touch the I understand and agree to the terms and conditions above check box. 2. If you do not agree to provide Samsung the error log data from any Software Update failure your device experiences, touch the No thanks button. 3. Touch Next. Samsung Account Sign in to your Samsung account to use Samsung services. 1. Touch variety of services to learn more. 2. Touch Create new account to create a Samsung account. - or - Touch Sign in if you already have a Samsung account. Touch Restore and Auto backup, if desired. Touch Next. - or - Touch Skip to perform this task later. For more information, refer to "Signing In to your Samsung Account" on page 148. Getting Started 10
-
 1
1 -
2
-
3
-
4
-
5
-
6
-
7
-
8
-
9
-
 10
10 -
 11
11 -
 12
12 -
 13
13 -
 14
14 -
 15
15 -
 16
16 -
 17
17 -
 18
18 -
 19
19 -
 20
20 -
21
-
22
-
23
-
24
-
25
-
26
-
27
-
28
-
29
-
30
-
31
-
32
-
33
-
34
-
35
-
36
-
37
-
38
-
39
-
40
-
41
-
42
-
43
-
44
-
45
-
46
-
47
-
48
-
49
-
50
-
51
-
52
-
53
-
54
-
55
-
56
-
57
-
58
-
59
-
60
-
61
-
62
-
63
-
64
-
65
-
66
-
67
-
68
-
69
-
70
-
71
-
72
-
73
-
74
-
75
-
76
-
77
-
78
-
79
-
80
-
81
-
82
-
83
-
84
-
85
-
86
-
87
-
88
-
89
-
90
-
91
-
92
-
93
-
94
-
95
-
96
-
97
-
98
-
99
-
100
-
101
-
102
-
103
-
104
-
105
-
106
-
107
-
108
-
109
-
110
-
111
-
112
-
113
-
114
-
115
-
116
-
117
-
118
-
119
-
120
-
121
-
122
-
123
-
124
-
125
-
126
-
127
-
128
-
129
-
130
-
131
-
132
-
133
-
134
-
135
-
136
-
137
-
138
-
139
-
140
-
141
-
142
-
143
-
144
-
145
-
146
-
147
-
148
-
149
-
150
-
151
-
152
-
153
-
154
-
155
-
156
-
157
-
158
-
159
-
160
-
161
-
162
-
163
-
164
-
165
-
166
-
167
-
168
-
169
-
170
-
171
-
172
-
173
-
174
-
175
-
176
-
177
-
178
-
179
-
180
-
181
-
182
-
183
-
184
-
185
-
186
-
187
-
188
-
189
-
190
-
191
-
192
-
193
-
194
-
195
-
196
-
197
-
198
-
199
-
200
-
201
-
202
-
203
-
204
-
205
-
206
-
207
-
208
-
209
-
210
-
211
-
212
-
213
-
214
 |
 |