Samsung SGH-I617 User Manual (user Manual) (ver.f4) (English) - Page 39
Menu > Options - windows 8
 |
UPC - 899794003607
View all Samsung SGH-I617 manuals
Add to My Manuals
Save this manual to your list of manuals |
Page 39 highlights
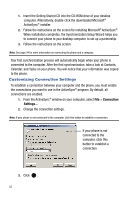
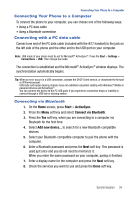
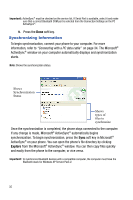
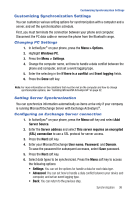
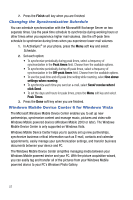
Customizing Synchronization Settings Customizing Synchronization Settings You can customize various setting options for synchronization with a computer and a server, and set the synchronization schedule. First, you must terminate the connection between your phone and computer. Disconnect the PC data cable or remove the phone from the Bluetooth range. Changing PC Settings 1. In ActiveSync® on your phone, press the Menu > Options. 2. Highlight Windows PC. 3. Press the Menu > Settings. 4. Change the computer name, set how to handle a data conflict between the phone and computer, and set a event logging type. 5. Enter the selecting in the If there is a conflict and Event logging fields. 6. Press the Done soft key. Note: For more information on the conditions that must be met on the computer and how to change synchronization options, see "Installing Microsoft® ActiveSync®" on page 32. Setting Server Synchronization You can synchronize information automatically as items arrive only if your company is running Microsoft Exchange Server with Exchange ActiveSync®. Configuring an Exchange Server connection 1. In ActiveSync® on your phone, press the Menu soft key and select Add Server Source. 2. Enter the Server address and select This server requires an encrypted (SSL) connection to use a SSL protocol for server access. 3. Press the Next soft key. 4. Enter your Microsoft Exchange User name, Password, and Domain. To save the password for subsequent accesses, select Save password. 5. Press the Next soft key. 6. Select data types to be synchronized. Press the Menu soft key to access the following options: • Settings: You can set the options for handle a data for each data type. • Advanced: You can set how to handle a data conflict between your device and computer, and set an event logging type. • Back: You can return to the previous step. Synchronization 36
-
 1
1 -
2
-
3
-
4
-
5
-
6
-
7
-
8
-
9
-
10
-
11
-
12
-
13
-
14
-
15
-
16
-
17
-
18
-
19
-
20
-
21
-
22
-
23
-
24
-
25
-
26
-
27
-
28
-
29
-
30
-
31
-
32
-
33
-
 34
34 -
 35
35 -
 36
36 -
 37
37 -
 38
38 -
 39
39 -
 40
40 -
 41
41 -
 42
42 -
 43
43 -
 44
44 -
45
-
46
-
47
-
48
-
49
-
50
-
51
-
52
-
53
-
54
-
55
-
56
-
57
-
58
-
59
-
60
-
61
-
62
-
63
-
64
-
65
-
66
-
67
-
68
-
69
-
70
-
71
-
72
-
73
-
74
-
75
-
76
-
77
-
78
-
79
-
80
-
81
-
82
-
83
-
84
-
85
-
86
-
87
-
88
-
89
-
90
-
91
-
92
-
93
-
94
-
95
-
96
-
97
-
98
-
99
-
100
-
101
-
102
-
103
-
104
-
105
-
106
-
107
-
108
-
109
-
110
-
111
-
112
-
113
-
114
-
115
-
116
-
117
-
118
-
119
-
120
-
121
-
122
-
123
-
124
-
125
-
126
-
127
-
128
-
129
-
130
-
131
-
132
-
133
-
134
-
135
-
136
-
137
-
138
-
139
-
140
-
141
-
142
-
143
-
144
-
145
-
146
-
147
-
148
-
149
-
150
-
151
-
152
-
153
-
154
-
155
-
156
-
157
-
158
-
159
-
160
-
161
-
162
 |
 |