Sharp MX-M363N Installation Manual - Page 104
D. Installation of the rear cabinet and the left rear lower cabinet
 |
View all Sharp MX-M363N manuals
Add to My Manuals
Save this manual to your list of manuals |
Page 104 highlights
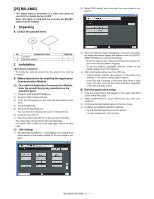
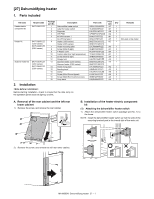
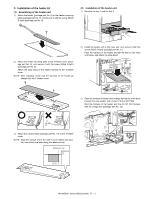
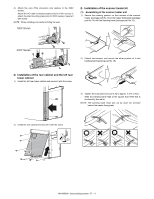
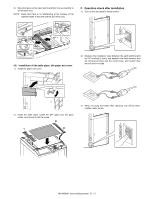
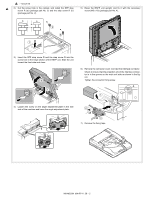
4) Attach the core (This procedure only applies to the 230V series). Attach the AC-cable connection plate (only for 120V series), or attach the inlet mounting plate (only for 230V series). Secure it with screw. NOTE: When installing, be careful to biting the wire. 120V Series E. Installation of the scanner heater kit (1) Assembling of the scanner heater unit 1) Secure the marking position on the harness of the scanner heater (package part No.13) to the heater fixing plate (package part No.14) with the banding band (package part No.15). 230V Series 2) Extend the harness, and secure the other position of it with banding band (packing part No.15). D. Installation of the rear cabinet and the left rear lower cabinet 1) Install the left rear lower cabinet and secure it with the screw. 3) Tighten the snap band and cut its tip to approx. 5 mm or less. Slide the banding band head to the square hole (Part that is enclosed by the mark). NOTE: The banding band head and cut tip must not protrude behind the heater fixing plate. 2) Install the rear cabinet and secure it with the screw. 1 2 MX-M503N Dehumidifying heater 27 - 4
-
 1
1 -
2
-
3
-
4
-
5
-
6
-
7
-
8
-
9
-
10
-
11
-
12
-
13
-
14
-
15
-
16
-
17
-
18
-
19
-
20
-
21
-
22
-
23
-
24
-
25
-
26
-
27
-
28
-
29
-
30
-
31
-
32
-
33
-
34
-
35
-
36
-
37
-
38
-
39
-
40
-
41
-
42
-
43
-
44
-
45
-
46
-
47
-
48
-
49
-
50
-
51
-
52
-
53
-
54
-
55
-
56
-
57
-
58
-
59
-
60
-
61
-
62
-
63
-
64
-
65
-
66
-
67
-
68
-
69
-
70
-
71
-
72
-
73
-
74
-
75
-
76
-
77
-
78
-
79
-
80
-
81
-
82
-
83
-
84
-
85
-
86
-
87
-
88
-
89
-
90
-
91
-
92
-
93
-
94
-
95
-
96
-
97
-
98
-
 99
99 -
 100
100 -
 101
101 -
 102
102 -
 103
103 -
 104
104 -
 105
105 -
 106
106 -
 107
107 -
 108
108 -
 109
109 -
110
-
111
-
112
-
113
-
114
-
115
-
116
-
117
 |
 |
