Sharp MX-M363N Installation Manual - Page 46
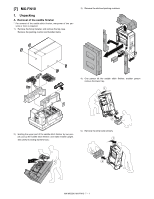
MX-PNX5A/B/C/D, 1. Unpacking, A. Removal of the punch unit, B. Check the packed items, 2.
 |
View all Sharp MX-M363N manuals
Add to My Manuals
Save this manual to your list of manuals |
Page 46 highlights
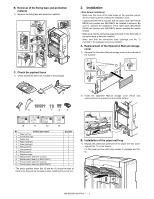
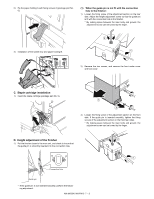
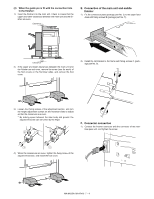
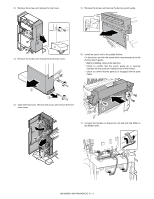
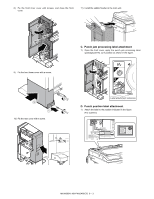
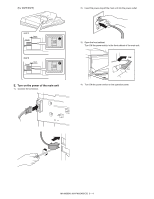
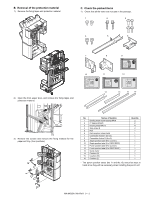
M[8X-]M50M3NX-PNX5A/B/C/D 1. Unpacking A. Removal of the punch unit S3)erDvisicconeneMctathneupaolwer plug of the main unit from the power outlet. B. Check the packed items 1) Check that all the items are included in the package. 1 2 4) Disconnect the connector between the main unit and the saddle finisher. 000-0000 3 No. Packed part names 1 Harness A (Purple) 2 Harness B (Gray) 3 Punch jam processing label Quantity 1 1 1 * Use the punch position labels bundled with the MX-FN10. 2. Installation * Before starting installation, check to insure that the data lamp on the operation panel does not light up or blink. A. Turn off the power of the main unit 1) Turn OFF the power switch on the operation panel. 2) Open the front cabinet. Turn OFF the power switch in the front cabinet of the main unit. B. Installation of the punch unit 1) Release the lock and separate the saddle finisher from the main unit. OFF MX-M503N MX-PNX5A/B/C/D 8 - 1
-
 1
1 -
2
-
3
-
4
-
5
-
6
-
7
-
8
-
9
-
10
-
11
-
12
-
13
-
14
-
15
-
16
-
17
-
18
-
19
-
20
-
21
-
22
-
23
-
24
-
25
-
26
-
27
-
28
-
29
-
30
-
31
-
32
-
33
-
34
-
35
-
36
-
37
-
38
-
39
-
40
-
 41
41 -
 42
42 -
 43
43 -
 44
44 -
 45
45 -
 46
46 -
 47
47 -
 48
48 -
 49
49 -
 50
50 -
 51
51 -
52
-
53
-
54
-
55
-
56
-
57
-
58
-
59
-
60
-
61
-
62
-
63
-
64
-
65
-
66
-
67
-
68
-
69
-
70
-
71
-
72
-
73
-
74
-
75
-
76
-
77
-
78
-
79
-
80
-
81
-
82
-
83
-
84
-
85
-
86
-
87
-
88
-
89
-
90
-
91
-
92
-
93
-
94
-
95
-
96
-
97
-
98
-
99
-
100
-
101
-
102
-
103
-
104
-
105
-
106
-
107
-
108
-
109
-
110
-
111
-
112
-
113
-
114
-
115
-
116
-
117
 |
 |
