Sharp MX-M363N Installation Manual - Page 52
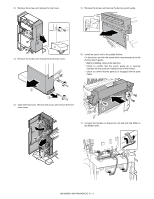
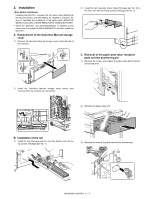
Installation, A. Replacement of the Operation Manual storage cover, B. Installation of the rail
 |
View all Sharp MX-M363N manuals
Add to My Manuals
Save this manual to your list of manuals |
Page 52 highlights
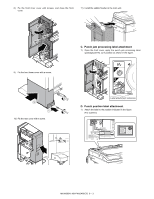
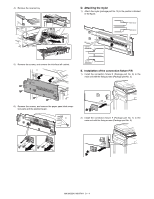
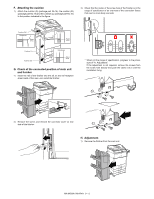
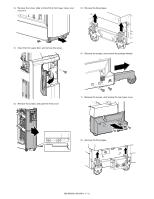
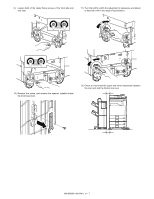
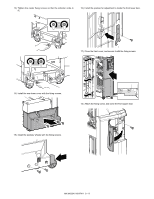
2. Installation * Installing the MX-FN11 requires that the option desk (MX-DEX8/ DEX9) and junction unit (MX-RBX3) be installed in advance. Be sure to complete the installation of the option desk (MX-DEX8/ DEX9) and junction unit (MX-RBX3) before installing the finisher. * When the MX-FN11 and MX-PNX6A/B/C/D is installed at the same time, first install the MX-PNX6A/B/C/D, and then install the MX-FN11. A. Replacement of the Operation Manual storage cover 1) Remove the Operation Manual storage cover on the left side of the machine. 1 2 2 2) Install the rail reception sheet metal (Package part No. 6) to the main unit with the fixing screws (Package part No. 2). C. Removal of the paper pass latch reception parts and the positioning pin 1) Remove the screw, and release the paper pass disconnection preventing lever. 2) Install the Operation Manual storage cover (which was removed from the machine) to the finisher. 2) Remove the paper pass unit. B. Installation of the rail 1) Install the rail (Package part No. 5) to the finisher with the fixing screws (Package part No. 1). 3) Remove the resin E-ring that secures the reverse tray. MX-M503N MX-FN11 9 - 3
-
 1
1 -
2
-
3
-
4
-
5
-
6
-
7
-
8
-
9
-
10
-
11
-
12
-
13
-
14
-
15
-
16
-
17
-
18
-
19
-
20
-
21
-
22
-
23
-
24
-
25
-
26
-
27
-
28
-
29
-
30
-
31
-
32
-
33
-
34
-
35
-
36
-
37
-
38
-
39
-
40
-
41
-
42
-
43
-
44
-
45
-
46
-
 47
47 -
 48
48 -
 49
49 -
 50
50 -
 51
51 -
 52
52 -
 53
53 -
 54
54 -
 55
55 -
 56
56 -
 57
57 -
58
-
59
-
60
-
61
-
62
-
63
-
64
-
65
-
66
-
67
-
68
-
69
-
70
-
71
-
72
-
73
-
74
-
75
-
76
-
77
-
78
-
79
-
80
-
81
-
82
-
83
-
84
-
85
-
86
-
87
-
88
-
89
-
90
-
91
-
92
-
93
-
94
-
95
-
96
-
97
-
98
-
99
-
100
-
101
-
102
-
103
-
104
-
105
-
106
-
107
-
108
-
109
-
110
-
111
-
112
-
113
-
114
-
115
-
116
-
117
 |
 |
