Sharp MX-M363N Installation Manual - Page 53
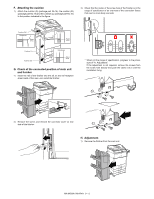
D. Attaching the mylar, E. Installation of the connection fixture F/R, in
 |
View all Sharp MX-M363N manuals
Add to My Manuals
Save this manual to your list of manuals |
Page 53 highlights
4) Remove the reverse tray. D. Attaching the mylar 1) Attach the mylar (package part No.13) to the position indicated in the figure. Reference Reference Corner reference 5) Remove the screws, and remove the interface left cabinet. Corner reference E. Installation of the connection fixture F/R 1) Install the connection fixture R (Package part No. 8) to the main unit with the fixing screws (Package part No. 3). 6) Remove the screws, and remove the paper pass latch reception parts and the positioning pin. 2) Install the connection fixture F (Package part No. 7) to the main unit with the fixing screws (Package part No. 3). MX-M503N MX-FN11 9 - 4
-
 1
1 -
2
-
3
-
4
-
5
-
6
-
7
-
8
-
9
-
10
-
11
-
12
-
13
-
14
-
15
-
16
-
17
-
18
-
19
-
20
-
21
-
22
-
23
-
24
-
25
-
26
-
27
-
28
-
29
-
30
-
31
-
32
-
33
-
34
-
35
-
36
-
37
-
38
-
39
-
40
-
41
-
42
-
43
-
44
-
45
-
46
-
47
-
 48
48 -
 49
49 -
 50
50 -
 51
51 -
 52
52 -
 53
53 -
 54
54 -
 55
55 -
 56
56 -
 57
57 -
 58
58 -
59
-
60
-
61
-
62
-
63
-
64
-
65
-
66
-
67
-
68
-
69
-
70
-
71
-
72
-
73
-
74
-
75
-
76
-
77
-
78
-
79
-
80
-
81
-
82
-
83
-
84
-
85
-
86
-
87
-
88
-
89
-
90
-
91
-
92
-
93
-
94
-
95
-
96
-
97
-
98
-
99
-
100
-
101
-
102
-
103
-
104
-
105
-
106
-
107
-
108
-
109
-
110
-
111
-
112
-
113
-
114
-
115
-
116
-
117
 |
 |

MX-M503N
MX-FN11
9 – 4
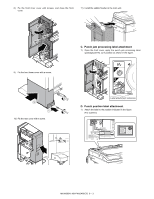
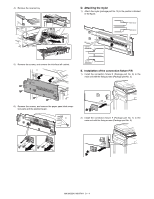
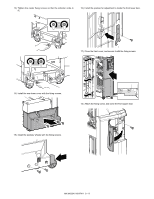
4)
Remove the reverse tray.
5)
Remove the screws, and remove the interface left cabinet.
6)
Remove the screws, and remove the paper pass latch recep-
tion parts and the positioning pin.
D.
Attaching the mylar
1)
Attach the mylar (package part No.13) to the position indicated
in the figure.
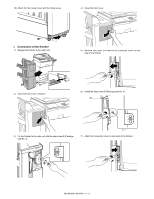
E.
Installation of the connection fixture F/R
1)
Install the connection fixture R (Package part No. 8) to the
main unit with the fixing screws (Package part No. 3).
2)
Install the connection fixture F (Package part No. 7) to the
main unit with the fixing screws (Package part No. 3).
Corner
reference
Corner
reference
Reference
Reference