Sharp MX-M363N Installation Manual - Page 56
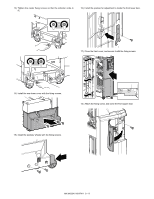
Turn the bolt for which the adjustment is necessary, and adjust
 |
View all Sharp MX-M363N manuals
Add to My Manuals
Save this manual to your list of manuals |
Page 56 highlights
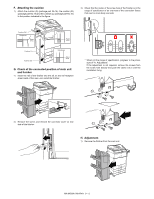
9) Loosen both of the caster fixing screws of the front side and rear side. 11) Turn the bolt for which the adjustment is necessary, and adjust to become it within the range of specification. 10) Remove the screw, and remove the spanner installed inside the front lower door. 12) Check to insure that the upper and lower clearances between the main unit and the finisher are even. MX-M503N MX-FN11 9 - 7
-
 1
1 -
2
-
3
-
4
-
5
-
6
-
7
-
8
-
9
-
10
-
11
-
12
-
13
-
14
-
15
-
16
-
17
-
18
-
19
-
20
-
21
-
22
-
23
-
24
-
25
-
26
-
27
-
28
-
29
-
30
-
31
-
32
-
33
-
34
-
35
-
36
-
37
-
38
-
39
-
40
-
41
-
42
-
43
-
44
-
45
-
46
-
47
-
48
-
49
-
50
-
 51
51 -
 52
52 -
 53
53 -
 54
54 -
 55
55 -
 56
56 -
 57
57 -
 58
58 -
 59
59 -
 60
60 -
 61
61 -
62
-
63
-
64
-
65
-
66
-
67
-
68
-
69
-
70
-
71
-
72
-
73
-
74
-
75
-
76
-
77
-
78
-
79
-
80
-
81
-
82
-
83
-
84
-
85
-
86
-
87
-
88
-
89
-
90
-
91
-
92
-
93
-
94
-
95
-
96
-
97
-
98
-
99
-
100
-
101
-
102
-
103
-
104
-
105
-
106
-
107
-
108
-
109
-
110
-
111
-
112
-
113
-
114
-
115
-
116
-
117
 |
 |

MX-M503N
MX-FN11
9 – 7
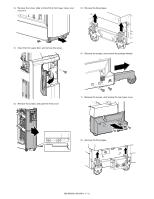
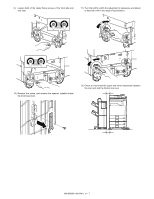
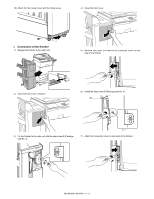
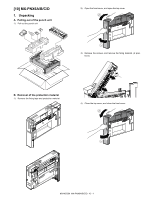
9)
Loosen both of the caster fixing screws of the front side and
rear side.
10) Remove the screw, and remove the spanner installed inside
the front lower door.
11)
Turn the bolt for which the adjustment is necessary, and adjust
to become it within the range of specification.
12)
Check to insure that the upper and lower clearances between
the main unit and the finisher are even.