Sharp MX-M363N Installation Manual - Page 55
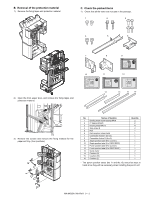
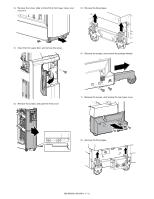
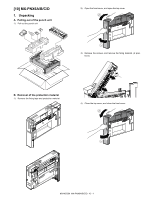
Remove the screws, and open the front cover., Remove the fixing tapes.
 |
View all Sharp MX-M363N manuals
Add to My Manuals
Save this manual to your list of manuals |
Page 55 highlights
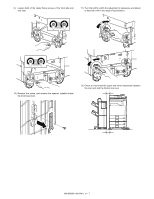
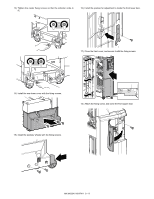
2) Remove the screw, slide to the left the front lower cover, and remove it. 5) Remove the fixing tapes. 3) Open the front upper door, and remove the screw. 6) Remove the screws, and remove the auxiliary wheels. 4) Remove the screws, and open the front cover. 7) Remove the screws, and remove the rear lower cover. 8) Remove the fixing tapes. MX-M503N MX-FN11 9 - 6
-
 1
1 -
2
-
3
-
4
-
5
-
6
-
7
-
8
-
9
-
10
-
11
-
12
-
13
-
14
-
15
-
16
-
17
-
18
-
19
-
20
-
21
-
22
-
23
-
24
-
25
-
26
-
27
-
28
-
29
-
30
-
31
-
32
-
33
-
34
-
35
-
36
-
37
-
38
-
39
-
40
-
41
-
42
-
43
-
44
-
45
-
46
-
47
-
48
-
49
-
 50
50 -
 51
51 -
 52
52 -
 53
53 -
 54
54 -
 55
55 -
 56
56 -
 57
57 -
 58
58 -
 59
59 -
 60
60 -
61
-
62
-
63
-
64
-
65
-
66
-
67
-
68
-
69
-
70
-
71
-
72
-
73
-
74
-
75
-
76
-
77
-
78
-
79
-
80
-
81
-
82
-
83
-
84
-
85
-
86
-
87
-
88
-
89
-
90
-
91
-
92
-
93
-
94
-
95
-
96
-
97
-
98
-
99
-
100
-
101
-
102
-
103
-
104
-
105
-
106
-
107
-
108
-
109
-
110
-
111
-
112
-
113
-
114
-
115
-
116
-
117
 |
 |

MX-M503N
MX-FN11
9 – 6
2)
Remove the screw, slide to the left the front lower cover, and
remove it.
3)
Open the front upper door, and remove the screw.
4)
Remove the screws, and open the front cover.
5)
Remove the fixing tapes.
6)
Remove the screws, and remove the auxiliary wheels.
7)
Remove the screws, and remove the rear lower cover.
8)
Remove the fixing tapes.