Sharp MX-M363N Installation Manual - Page 20
MX-LCX1, 1. Unpacking, A. Removal of the large capacity tray unit, B. Removal of the fixing material
 |
View all Sharp MX-M363N manuals
Add to My Manuals
Save this manual to your list of manuals |
Page 20 highlights
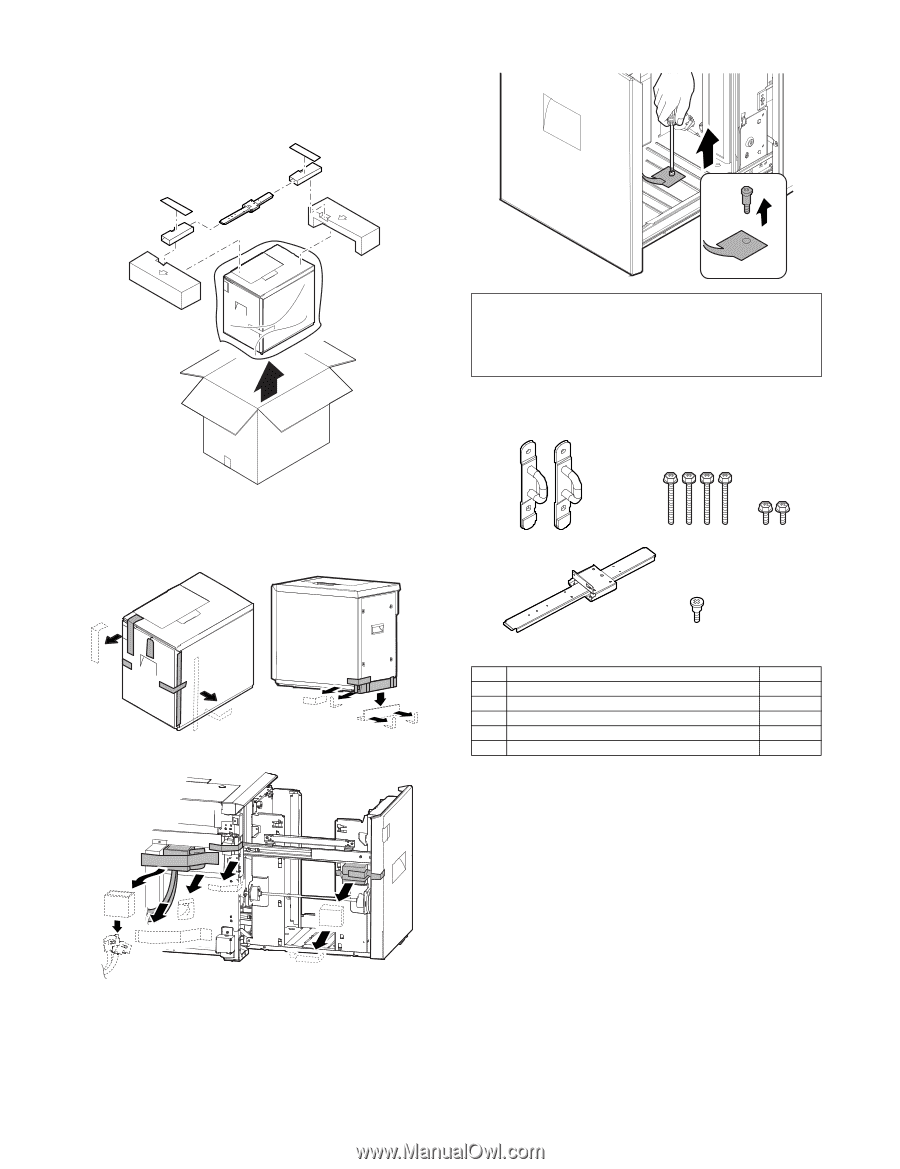
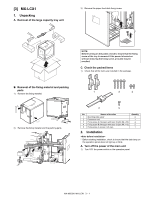
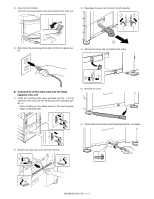
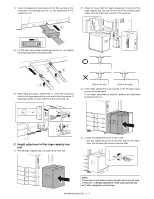
M[3X-]M50M3NX-LCX1 1. Unpacking A. Removal of the large capacity tray unit S3)erRveimcoeve tMhae npaupaelr feed desk fixing screw. NOTE: Before turning on the power, check to insure that the fixing screw of the tray is removed. If the power is turned on without removing the fixing screw, a trouble may be resulted. C. Check the packed items 1) Check that all the items are included in the package. B. Removal of the fixing material and packing parts 1) Remove the fixing material. 1 3 4 2) Remove the fixing material and the packing parts. 2 5 No. Names of bundles Quantity 1 Mounting plate upper 2 2 Connection unit 1 3 Fixing screw A (Hexagon with seat, S-tight, M4 x 35) 4 4 Fixing screw B (Hexagon with seat, S-tight, M4 x 12) 2 5 Fixing screw C (screw 4 x 8 cup) 1 2. Installation * Before starting installation, check to insure that the data lamp on the operation panel does not light up or blink. A. Turn off the power of the main unit 1) Turn OFF the power switch on the operation panel. MX-M503N MX-LCX1 3 - 1
-
 1
1 -
2
-
3
-
4
-
5
-
6
-
7
-
8
-
9
-
10
-
11
-
12
-
13
-
14
-
 15
15 -
 16
16 -
 17
17 -
 18
18 -
 19
19 -
 20
20 -
 21
21 -
 22
22 -
 23
23 -
 24
24 -
 25
25 -
26
-
27
-
28
-
29
-
30
-
31
-
32
-
33
-
34
-
35
-
36
-
37
-
38
-
39
-
40
-
41
-
42
-
43
-
44
-
45
-
46
-
47
-
48
-
49
-
50
-
51
-
52
-
53
-
54
-
55
-
56
-
57
-
58
-
59
-
60
-
61
-
62
-
63
-
64
-
65
-
66
-
67
-
68
-
69
-
70
-
71
-
72
-
73
-
74
-
75
-
76
-
77
-
78
-
79
-
80
-
81
-
82
-
83
-
84
-
85
-
86
-
87
-
88
-
89
-
90
-
91
-
92
-
93
-
94
-
95
-
96
-
97
-
98
-
99
-
100
-
101
-
102
-
103
-
104
-
105
-
106
-
107
-
108
-
109
-
110
-
111
-
112
-
113
-
114
-
115
-
116
-
117
 |
 |