Sony Ericsson Xperia T User Guide - Page 235
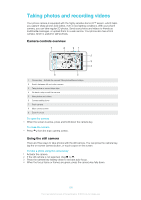
Smile detection, Adding the geographical position to your photos, Normal, Focus mode, Geotagging
 |
View all Sony Ericsson Xperia T manuals
Add to My Manuals
Save this manual to your list of manuals |
Page 235 highlights
To turn on face detection 1 Activate the camera. 2 If the still camera is not selected, drag to . 3 Tap the icon on the top left, then select Normal. 4 To display all settings, tap . 5 Tap Focus mode > Face detection. To take a photo using face detection 1 When the camera is open and Face detection turned on, point the camera at your subject. Up to five faces can be detected, and each detected face is framed. 2 Press the camera key halfway down. A green frame shows which face is in focus. 3 To take the photo, press the camera key fully down. Smile detection Smile detection allows you to capture a face just as it smiles. The camera detects up to five faces and selects one face for smile detection and auto focus. A green frame shows which face is selected. When the selected face smiles, the camera automatically takes a photo. To turn on smile detection 1 Activate the camera. 2 If the still camera is not selected, drag to . 3 To display all settings, tap . 4 Tap Smile detection and select a smile level. To take a photo using smile detection 1 When the camera is open and Smile detection is turned on, point the camera at your subject. Each detected face is framed in the viewfinder (not more than five faces). 2 The camera selects which face to focus on. 3 The face selected appears inside a green frame and the photo is taken automatically. 4 If no smile is detected, press the camera key to take the photo manually. Adding the geographical position to your photos Turn on geotagging to add the approximate geographical location (a geotag) to photos when you take them. The geographical location is determined either by wireless networks (mobile or Wi-Fi® networks) or GPS technology. When appears on the camera screen, geotagging is turned on but the geographical position has not been found. When appears, geotagging is turned on and the geographical location is available, so your photo can get geotagged. When neither of these two symbols appear, geotagging is turned off. To turn on geotagging 1 Activate the camera. 2 If the still camera is not selected, drag to . 3 Tap , then tap Geotagging > On. 4 Tap OK to agree to enable GPS and/or wireless networks. 5 Check the options you want to select under Location services. 6 After you confirm your settings, press to return to the camera screen. 7 If appears on the camera screen, your location is available and your photo can get geotagged. If not, check your GPS and/or wireless network connection. 102 This is an Internet version of this publication. © Print only for private use.
-
 1
1 -
2
-
3
-
4
-
5
-
6
-
7
-
8
-
9
-
10
-
11
-
12
-
13
-
14
-
15
-
16
-
17
-
18
-
19
-
20
-
21
-
22
-
23
-
24
-
25
-
26
-
27
-
28
-
29
-
30
-
31
-
32
-
33
-
34
-
35
-
36
-
37
-
38
-
39
-
40
-
41
-
42
-
43
-
44
-
45
-
46
-
47
-
48
-
49
-
50
-
51
-
52
-
53
-
54
-
55
-
56
-
57
-
58
-
59
-
60
-
61
-
62
-
63
-
64
-
65
-
66
-
67
-
68
-
69
-
70
-
71
-
72
-
73
-
74
-
75
-
76
-
77
-
78
-
79
-
80
-
81
-
82
-
83
-
84
-
85
-
86
-
87
-
88
-
89
-
90
-
91
-
92
-
93
-
94
-
95
-
96
-
97
-
98
-
99
-
100
-
101
-
102
-
103
-
104
-
105
-
106
-
107
-
108
-
109
-
110
-
111
-
112
-
113
-
114
-
115
-
116
-
117
-
118
-
119
-
120
-
121
-
122
-
123
-
124
-
125
-
126
-
127
-
128
-
129
-
130
-
131
-
132
-
133
-
134
-
135
-
136
-
137
-
138
-
139
-
140
-
141
-
142
-
143
-
144
-
145
-
146
-
147
-
148
-
149
-
150
-
151
-
152
-
153
-
154
-
155
-
156
-
157
-
158
-
159
-
160
-
161
-
162
-
163
-
164
-
165
-
166
-
167
-
168
-
169
-
170
-
171
-
172
-
173
-
174
-
175
-
176
-
177
-
178
-
179
-
180
-
181
-
182
-
183
-
184
-
185
-
186
-
187
-
188
-
189
-
190
-
191
-
192
-
193
-
194
-
195
-
196
-
197
-
198
-
199
-
200
-
201
-
202
-
203
-
204
-
205
-
206
-
207
-
208
-
209
-
210
-
211
-
212
-
213
-
214
-
215
-
216
-
217
-
218
-
219
-
220
-
221
-
222
-
223
-
224
-
225
-
226
-
227
-
228
-
229
-
 230
230 -
 231
231 -
 232
232 -
 233
233 -
 234
234 -
 235
235 -
 236
236 -
 237
237 -
 238
238 -
 239
239 -
 240
240 -
241
-
242
-
243
-
244
-
245
-
246
-
247
-
248
-
249
-
250
-
251
-
252
-
253
-
254
-
255
-
256
-
257
-
258
-
259
-
260
-
261
-
262
-
263
-
264
-
265
-
266
-
267
-
268
-
269
-
270
-
271
-
272
-
273
-
274
-
275
-
276
-
277
-
278
-
279
-
280
-
281
-
282
-
283
-
284
-
285
-
286
-
287
-
288
 |
 |
