Brother International PE-DESIGN Ver.4 3 2 Instructin Manual for PE-DESIGN Ver. - Page 11
Before Using, Principal Parts, Accessories, Options
 |
View all Brother International PE-DESIGN Ver.4 3 2 manuals
Add to My Manuals
Save this manual to your list of manuals |
Page 11 highlights
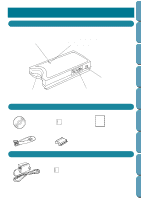
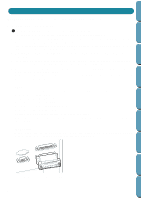
Contents Before Using Before Using Principal Parts Power Indicator LED (green) is on when the unit is powered. Busy Indicator LED (red) is on when the card is being accessed. Never connect or disconnect the power supply or the interface cable and never insert or remove a card while this LED is on. Getting Started Design Center Layout & Editing File Utility Programmable Stich Creator Card Slot Insert an original or embroidery card here. AC Adapter Connector Insert the AC adapter jack here. Interface Cable Connector Insert the interface cable here. CD-ROM Accessories Original Card (1) Instruction Manual Interface Cable Security Device Options AC Adapter Original Cards 1 Quik Reference Alphabetic Index
-
 1
1 -
2
-
3
-
4
-
5
-
 6
6 -
 7
7 -
 8
8 -
 9
9 -
 10
10 -
 11
11 -
 12
12 -
 13
13 -
 14
14 -
 15
15 -
 16
16 -
17
-
18
-
19
-
20
-
21
-
22
-
23
-
24
-
25
-
26
-
27
-
28
-
29
-
30
-
31
-
32
-
33
-
34
-
35
-
36
-
37
-
38
-
39
-
40
-
41
-
42
-
43
-
44
-
45
-
46
-
47
-
48
-
49
-
50
-
51
-
52
-
53
-
54
-
55
-
56
-
57
-
58
-
59
-
60
-
61
-
62
-
63
-
64
-
65
-
66
-
67
-
68
-
69
-
70
-
71
-
72
-
73
-
74
-
75
-
76
-
77
-
78
-
79
-
80
-
81
-
82
-
83
-
84
-
85
-
86
-
87
-
88
-
89
-
90
-
91
-
92
-
93
-
94
-
95
-
96
-
97
-
98
-
99
-
100
-
101
-
102
-
103
-
104
-
105
-
106
-
107
-
108
-
109
-
110
-
111
-
112
-
113
-
114
-
115
-
116
-
117
-
118
-
119
-
120
-
121
-
122
-
123
-
124
-
125
-
126
-
127
-
128
-
129
-
130
-
131
-
132
-
133
-
134
-
135
-
136
-
137
-
138
-
139
-
140
-
141
-
142
-
143
-
144
-
145
-
146
-
147
-
148
-
149
-
150
-
151
-
152
-
153
-
154
-
155
-
156
-
157
-
158
-
159
-
160
-
161
-
162
-
163
-
164
-
165
-
166
-
167
-
168
-
169
-
170
-
171
-
172
-
173
-
174
-
175
-
176
-
177
-
178
-
179
-
180
-
181
-
182
-
183
-
184
-
185
-
186
-
187
-
188
-
189
-
190
-
191
-
192
-
193
-
194
-
195
-
196
-
197
-
198
-
199
-
200
-
201
-
202
-
203
-
204
-
205
-
206
-
207
-
208
-
209
-
210
-
211
-
212
-
213
-
214
-
215
-
216
-
217
-
218
-
219
-
220
-
221
-
222
-
223
-
224
-
225
-
226
-
227
-
228
-
229
-
230
-
231
-
232
-
233
-
234
-
235
-
236
-
237
-
238
-
239
-
240
-
241
-
242
-
243
-
244
-
245
-
246
-
247
-
248
-
249
-
250
-
251
-
252
 |
 |

1
Before Using
Design Center
Layout & Editing
File Utility
Programmable
Stich Creator
Contents
Quik Reference
Alphabetic Index
Getting Started
Before Using
Principal Parts
AC Adapter Connector
Insert the AC adapter jack here.
Interface Cable Connector
Insert the interface cable here.
Card Slot
Insert an original or embroidery card here.
Power Indicator LED (green) is
on when the unit is powered.
Busy Indicator LED (red) is
on when the card is being accessed.
Never connect or disconnect the power supply or the
interface cable and never insert or remove a card
while this LED is on.
Accessories
CD-ROM
Original Card (1)
Instruction Manual
Interface Cable
Security Device
Options
Original Cards
AC Adapter