Brother International PE-DESIGN Ver.4 3 2 Instructin Manual for PE-DESIGN Ver. - Page 177
Align, For Letters Fit to a Path, For Objects set for Hole Sewing, Purpose, Shortcut key, Toolbar
 |
View all Brother International PE-DESIGN Ver.4 3 2 manuals
Add to My Manuals
Save this manual to your list of manuals |
Page 177 highlights
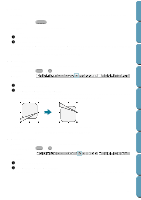
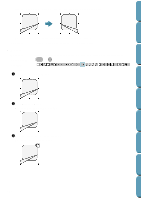
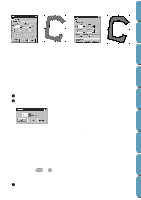
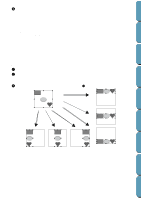
Contents Before Using Getting Started Design Center 2 Click Edit, then Center. The entire selected object moves to the center of Design Page. NOTE: For Letters Fit to a Path If you select either the letters or the path only, the selected object will be moved to the center of Design page, but the unselected object will not be moved with it. For Objects set for Hole Sewing When selecting an object set as part of a hole sewing pattern, the selected object will be moved to the center of Design Page, but the unselected objects will not be moved with it. s Align Purpose: Aligns the selected patterns as indicated. Shortcut key: No shortcut key for this function Toolbar: No button for this function Operation: 1 Select the patterns which you want to Align. 2 Click Edit, then Align, then Left, Center, Right, Top, Middle, or Bottom, depending on how you wish to align the patterns. The selected patterns are aligned as shown below. 3 To choose a different alignment, click Undo and repeat 2. Top Middle Left Center Right Bottom Text on a path: Text on a path can be aligned by selecting other objects on the design page as well as the text, the path, or both the text and the path. Each selected pattern is aligned on its outline. In order to align with object(s) on the design page all the object(s) must be selected with text and/or path. Layout & Editing File Utility Programmable Stich Creator Quik Reference Alphabetic Index 167
-
 1
1 -
2
-
3
-
4
-
5
-
6
-
7
-
8
-
9
-
10
-
11
-
12
-
13
-
14
-
15
-
16
-
17
-
18
-
19
-
20
-
21
-
22
-
23
-
24
-
25
-
26
-
27
-
28
-
29
-
30
-
31
-
32
-
33
-
34
-
35
-
36
-
37
-
38
-
39
-
40
-
41
-
42
-
43
-
44
-
45
-
46
-
47
-
48
-
49
-
50
-
51
-
52
-
53
-
54
-
55
-
56
-
57
-
58
-
59
-
60
-
61
-
62
-
63
-
64
-
65
-
66
-
67
-
68
-
69
-
70
-
71
-
72
-
73
-
74
-
75
-
76
-
77
-
78
-
79
-
80
-
81
-
82
-
83
-
84
-
85
-
86
-
87
-
88
-
89
-
90
-
91
-
92
-
93
-
94
-
95
-
96
-
97
-
98
-
99
-
100
-
101
-
102
-
103
-
104
-
105
-
106
-
107
-
108
-
109
-
110
-
111
-
112
-
113
-
114
-
115
-
116
-
117
-
118
-
119
-
120
-
121
-
122
-
123
-
124
-
125
-
126
-
127
-
128
-
129
-
130
-
131
-
132
-
133
-
134
-
135
-
136
-
137
-
138
-
139
-
140
-
141
-
142
-
143
-
144
-
145
-
146
-
147
-
148
-
149
-
150
-
151
-
152
-
153
-
154
-
155
-
156
-
157
-
158
-
159
-
160
-
161
-
162
-
163
-
164
-
165
-
166
-
167
-
168
-
169
-
170
-
171
-
 172
172 -
 173
173 -
 174
174 -
 175
175 -
 176
176 -
 177
177 -
 178
178 -
 179
179 -
 180
180 -
 181
181 -
 182
182 -
183
-
184
-
185
-
186
-
187
-
188
-
189
-
190
-
191
-
192
-
193
-
194
-
195
-
196
-
197
-
198
-
199
-
200
-
201
-
202
-
203
-
204
-
205
-
206
-
207
-
208
-
209
-
210
-
211
-
212
-
213
-
214
-
215
-
216
-
217
-
218
-
219
-
220
-
221
-
222
-
223
-
224
-
225
-
226
-
227
-
228
-
229
-
230
-
231
-
232
-
233
-
234
-
235
-
236
-
237
-
238
-
239
-
240
-
241
-
242
-
243
-
244
-
245
-
246
-
247
-
248
-
249
-
250
-
251
-
252
 |
 |
