Brother International PE-DESIGN Ver.4 3 2 Instructin Manual for PE-DESIGN Ver. - Page 143
Manual Punching Mode, Creating a manual punching pattern
 |
View all Brother International PE-DESIGN Ver.4 3 2 manuals
Add to My Manuals
Save this manual to your list of manuals |
Page 143 highlights
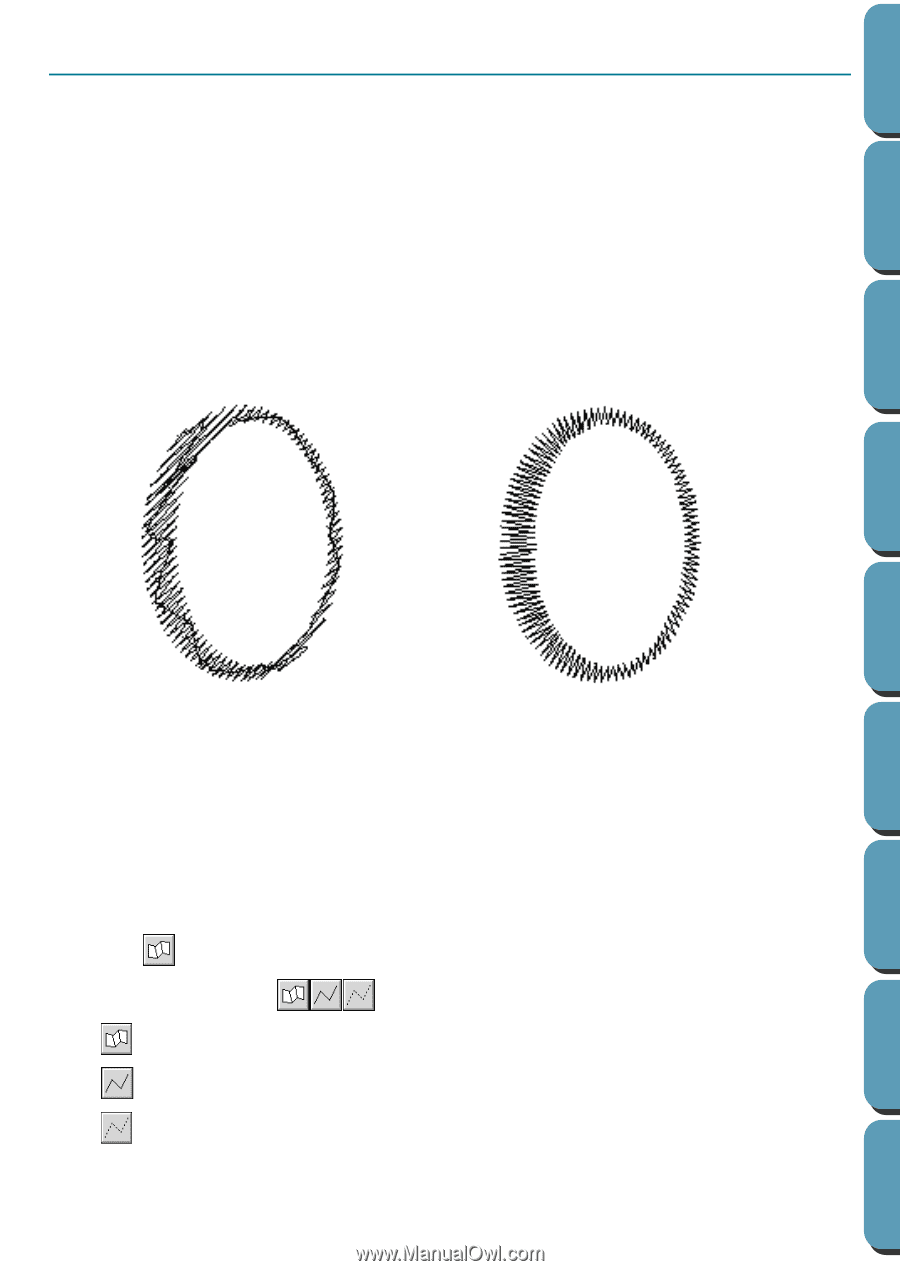
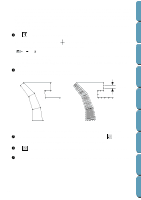
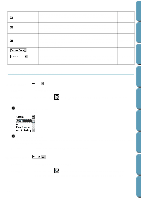
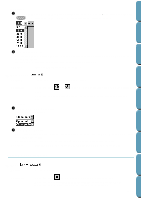
Contents Before Using Manual Punching Mode This mode is used to create patterns that look like manual embroidery. When you use the standard Fill or Satin stitch to fill a region, the thread in the whole region has the same direction. Some patterns, however, look better when the thread direction "follows" the curves of the pattern. The Manual Punching mode provides such a feature. Letters that you design yourself constitute a typical example of patterns that look better when using the Manual Punching mode. The illustrations below show the preview of two letters "O". The first one has been designed using two concentric ovals without a line sew setting, filling the larger oval with Fill stitch and turning off the region sew setting inside the small oval. The pair was then set for hole sewing. The second letter has been redrawn using Manual Punching. To do this, we duplicated the first letter, removed the region inside, and created a manual punching pattern using the outlines of the ovals as guides. The ovals were then deleted. The stitch density for both letters was set to a minimum in order to make it easier to see the difference between the two patterns on the preview display. Getting Started Design Center Layout & Editing File Utility Programmable Stich Creator Fill stitch (the thread has a constant direction) Manual Punching (the direction of the thread follows the curve) When creating a manual punching pattern, it is easier to use something in the background as a guide. In the above example, we used two ovals that we removed after completing the manual punching pattern. Another possibility is to load a template image and redraw it using manual punching patterns. The advantage of this method over the automatic conversion provided by Design Center is that you have a better control on the thread orientation. s Creating a manual punching pattern 1 Open a template or prepare a pattern that you will use as a guide. 2 Click on the Tool Box. Three buttons appear: . is for creating block-type punching patterns. is for creating running-type punching patterns (the broken line is sewn). is for creating feed-type punching patterns (the broken line is not sewn). 133 Quik Reference Alphabetic Index
-
 1
1 -
2
-
3
-
4
-
5
-
6
-
7
-
8
-
9
-
10
-
11
-
12
-
13
-
14
-
15
-
16
-
17
-
18
-
19
-
20
-
21
-
22
-
23
-
24
-
25
-
26
-
27
-
28
-
29
-
30
-
31
-
32
-
33
-
34
-
35
-
36
-
37
-
38
-
39
-
40
-
41
-
42
-
43
-
44
-
45
-
46
-
47
-
48
-
49
-
50
-
51
-
52
-
53
-
54
-
55
-
56
-
57
-
58
-
59
-
60
-
61
-
62
-
63
-
64
-
65
-
66
-
67
-
68
-
69
-
70
-
71
-
72
-
73
-
74
-
75
-
76
-
77
-
78
-
79
-
80
-
81
-
82
-
83
-
84
-
85
-
86
-
87
-
88
-
89
-
90
-
91
-
92
-
93
-
94
-
95
-
96
-
97
-
98
-
99
-
100
-
101
-
102
-
103
-
104
-
105
-
106
-
107
-
108
-
109
-
110
-
111
-
112
-
113
-
114
-
115
-
116
-
117
-
118
-
119
-
120
-
121
-
122
-
123
-
124
-
125
-
126
-
127
-
128
-
129
-
130
-
131
-
132
-
133
-
134
-
135
-
136
-
137
-
 138
138 -
 139
139 -
 140
140 -
 141
141 -
 142
142 -
 143
143 -
 144
144 -
 145
145 -
 146
146 -
 147
147 -
 148
148 -
149
-
150
-
151
-
152
-
153
-
154
-
155
-
156
-
157
-
158
-
159
-
160
-
161
-
162
-
163
-
164
-
165
-
166
-
167
-
168
-
169
-
170
-
171
-
172
-
173
-
174
-
175
-
176
-
177
-
178
-
179
-
180
-
181
-
182
-
183
-
184
-
185
-
186
-
187
-
188
-
189
-
190
-
191
-
192
-
193
-
194
-
195
-
196
-
197
-
198
-
199
-
200
-
201
-
202
-
203
-
204
-
205
-
206
-
207
-
208
-
209
-
210
-
211
-
212
-
213
-
214
-
215
-
216
-
217
-
218
-
219
-
220
-
221
-
222
-
223
-
224
-
225
-
226
-
227
-
228
-
229
-
230
-
231
-
232
-
233
-
234
-
235
-
236
-
237
-
238
-
239
-
240
-
241
-
242
-
243
-
244
-
245
-
246
-
247
-
248
-
249
-
250
-
251
-
252
 |
 |