Brother International PE-DESIGN Ver.4 3 2 Instructin Manual for PE-DESIGN Ver. - Page 20
Programmable Stitch Creator, File Utility, About
 |
View all Brother International PE-DESIGN Ver.4 3 2 manuals
Add to My Manuals
Save this manual to your list of manuals |
Page 20 highlights
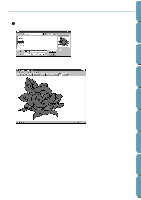
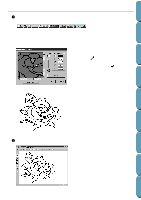
Contents Before Using Getting Started Design Center Layout & Editing After gathering the different components of your embroidery picture, you can use the layout functions to modify their relative position, orientation and scale. When an embroidery image is complete, you can save it (the file name extension will be pes) and write it to an Original card. The Original card can then be inserted into your sewing machine and the embroidery process continued. s Programmable Stitch Creator Programmable Stitch Creator allows you to create, edit and save fill stitch patterns, which you can apply to the enclosed regions of patterns, both in Design Center and Layout & Editing. The fill stitch pattern files are saved as pas files. The application comes with a number of pas files, which you can use as such or edit to enhance your embroidery patterns. s File Utility This application is used to handle file exchanges between your disk and the card module. It has two functions: x Install Embroidery Card: This is used to transfer embroidery data from an optional embroidery card to your hard drive or another disk. x Write to Original Card: Transfers embroidery data files created with Layout & Editing to an original card. About this Chapter The next three sections of this chapter are organized as a tutorial to provide you with a hands-on introduction to the different features of the applications. You will first create a pattern using Design Center. Next, the pattern will be imported into Layout & Editing. You will learn how to add a few components to the embroidery image and to organize the layout. In the third section, you will then learn how to use Programmable Stitch Creator to edit a programmable stitch in order to create your own. 10 File Utility Programmable Stich Creator Quik Reference Alphabetic Index
-
 1
1 -
2
-
3
-
4
-
5
-
6
-
7
-
8
-
9
-
10
-
11
-
12
-
13
-
14
-
 15
15 -
 16
16 -
 17
17 -
 18
18 -
 19
19 -
 20
20 -
 21
21 -
 22
22 -
 23
23 -
 24
24 -
 25
25 -
26
-
27
-
28
-
29
-
30
-
31
-
32
-
33
-
34
-
35
-
36
-
37
-
38
-
39
-
40
-
41
-
42
-
43
-
44
-
45
-
46
-
47
-
48
-
49
-
50
-
51
-
52
-
53
-
54
-
55
-
56
-
57
-
58
-
59
-
60
-
61
-
62
-
63
-
64
-
65
-
66
-
67
-
68
-
69
-
70
-
71
-
72
-
73
-
74
-
75
-
76
-
77
-
78
-
79
-
80
-
81
-
82
-
83
-
84
-
85
-
86
-
87
-
88
-
89
-
90
-
91
-
92
-
93
-
94
-
95
-
96
-
97
-
98
-
99
-
100
-
101
-
102
-
103
-
104
-
105
-
106
-
107
-
108
-
109
-
110
-
111
-
112
-
113
-
114
-
115
-
116
-
117
-
118
-
119
-
120
-
121
-
122
-
123
-
124
-
125
-
126
-
127
-
128
-
129
-
130
-
131
-
132
-
133
-
134
-
135
-
136
-
137
-
138
-
139
-
140
-
141
-
142
-
143
-
144
-
145
-
146
-
147
-
148
-
149
-
150
-
151
-
152
-
153
-
154
-
155
-
156
-
157
-
158
-
159
-
160
-
161
-
162
-
163
-
164
-
165
-
166
-
167
-
168
-
169
-
170
-
171
-
172
-
173
-
174
-
175
-
176
-
177
-
178
-
179
-
180
-
181
-
182
-
183
-
184
-
185
-
186
-
187
-
188
-
189
-
190
-
191
-
192
-
193
-
194
-
195
-
196
-
197
-
198
-
199
-
200
-
201
-
202
-
203
-
204
-
205
-
206
-
207
-
208
-
209
-
210
-
211
-
212
-
213
-
214
-
215
-
216
-
217
-
218
-
219
-
220
-
221
-
222
-
223
-
224
-
225
-
226
-
227
-
228
-
229
-
230
-
231
-
232
-
233
-
234
-
235
-
236
-
237
-
238
-
239
-
240
-
241
-
242
-
243
-
244
-
245
-
246
-
247
-
248
-
249
-
250
-
251
-
252
 |
 |
