Brother International PE-DESIGN Ver.4 3 2 Instructin Manual for PE-DESIGN Ver. - Page 48
Step 11 Selecting a Programmable Fill Stitch
 |
View all Brother International PE-DESIGN Ver.4 3 2 manuals
Add to My Manuals
Save this manual to your list of manuals |
Page 48 highlights
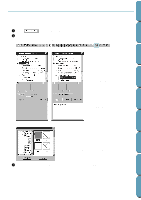
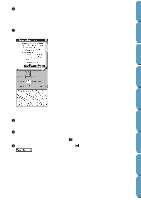
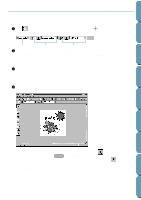
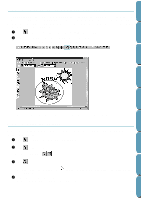
Contents Before Using Getting Started Step 11 Selecting a Programmable Fill Stitch You are going to see how to select a special stitch pattern (fill stitch) created with the Programmable Stitch Creator application, how to change its settings and how to apply it as the region stitch for the rays, which you will draw in Step 12. Stitch patterns are arranged in a tile-like manner within the selected regions, creating very decorative fill stitches. 1 Select in the Region sew type selector. 2 Click Sew - Sewing Attribute Setting on the menu bar to open the Sewing Attribute Setting dialog. You can also click on the Toolbar button shown hereafter. x Select Pattern in the Programmable Fill category. x Click Select Pattern to open the Browse dialog. x Select the path Program Files/ Version 4.0/Pattern. The Pattern folder contains the programmable stitch files. These files have the extension pas. The Browse dialog shown hereafter now allows you to preview and browse through the existing pas files. Note: "*.pas" files are patterns for Programmable Fill. "*.pmf" files are patterns for Motif. Design Center Layout & Editing File Utility Programmable Stich Creator Quik Reference Alphabetic Index x Browse through the illustrated stitches and click on the honey1 illustration, which is then highlighted. x Either double-click the illustration or click OK to select that stitch. The dialog closes and the selected stitch can now be previewed in the Sewing Attribute Setting dialog. 3 Change the stitch pattern size. Select a width and height of 10.0 mm (3/8 inch) by clicking on the "up" arrow. NOTE: As soon as you click an arrow in this dialog, an illustration of the stitch pattern as well as the type of setting you are selecting are displayed in the other preview window of the dialog. You can see how each click on an arrow affects the pattern. You may also type in a value. In that case however, you cannot preview the setting immediately as you set it. 38
-
 1
1 -
2
-
3
-
4
-
5
-
6
-
7
-
8
-
9
-
10
-
11
-
12
-
13
-
14
-
15
-
16
-
17
-
18
-
19
-
20
-
21
-
22
-
23
-
24
-
25
-
26
-
27
-
28
-
29
-
30
-
31
-
32
-
33
-
34
-
35
-
36
-
37
-
38
-
39
-
40
-
41
-
42
-
 43
43 -
 44
44 -
 45
45 -
 46
46 -
 47
47 -
 48
48 -
 49
49 -
 50
50 -
 51
51 -
 52
52 -
 53
53 -
54
-
55
-
56
-
57
-
58
-
59
-
60
-
61
-
62
-
63
-
64
-
65
-
66
-
67
-
68
-
69
-
70
-
71
-
72
-
73
-
74
-
75
-
76
-
77
-
78
-
79
-
80
-
81
-
82
-
83
-
84
-
85
-
86
-
87
-
88
-
89
-
90
-
91
-
92
-
93
-
94
-
95
-
96
-
97
-
98
-
99
-
100
-
101
-
102
-
103
-
104
-
105
-
106
-
107
-
108
-
109
-
110
-
111
-
112
-
113
-
114
-
115
-
116
-
117
-
118
-
119
-
120
-
121
-
122
-
123
-
124
-
125
-
126
-
127
-
128
-
129
-
130
-
131
-
132
-
133
-
134
-
135
-
136
-
137
-
138
-
139
-
140
-
141
-
142
-
143
-
144
-
145
-
146
-
147
-
148
-
149
-
150
-
151
-
152
-
153
-
154
-
155
-
156
-
157
-
158
-
159
-
160
-
161
-
162
-
163
-
164
-
165
-
166
-
167
-
168
-
169
-
170
-
171
-
172
-
173
-
174
-
175
-
176
-
177
-
178
-
179
-
180
-
181
-
182
-
183
-
184
-
185
-
186
-
187
-
188
-
189
-
190
-
191
-
192
-
193
-
194
-
195
-
196
-
197
-
198
-
199
-
200
-
201
-
202
-
203
-
204
-
205
-
206
-
207
-
208
-
209
-
210
-
211
-
212
-
213
-
214
-
215
-
216
-
217
-
218
-
219
-
220
-
221
-
222
-
223
-
224
-
225
-
226
-
227
-
228
-
229
-
230
-
231
-
232
-
233
-
234
-
235
-
236
-
237
-
238
-
239
-
240
-
241
-
242
-
243
-
244
-
245
-
246
-
247
-
248
-
249
-
250
-
251
-
252
 |
 |
