Brother International PE-DESIGN Ver.4 3 2 Instructin Manual for PE-DESIGN Ver. - Page 24
Step 3 Converting to Line Image
 |
View all Brother International PE-DESIGN Ver.4 3 2 manuals
Add to My Manuals
Save this manual to your list of manuals |
Page 24 highlights
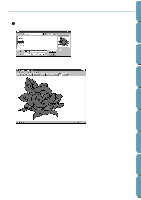
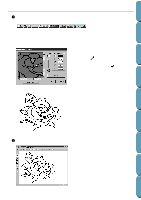
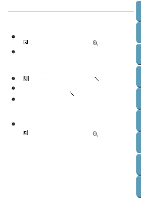
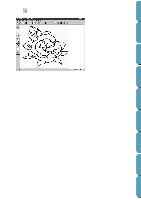
Contents Before Using Getting Started Design Center Step 3 Converting to Line Image 1 Move to line image: Click Stage on the menu bar, then click To Line Image on the submenu.You can also click the button of the Toolbar shown below: NOTE: Many menu functions can be activated by clicking a button on the Toolbar. The Cut out to Line Image dialog will display. In this dialog, you will select the color(s) that will be used to make the outline of the image. x If necessary, scroll and zoom the image. x Move the cursor over the image. Its shape changes to . Click on any point of the outline. The selected color displays in the upper box under Pick Colors and a appears in the check box to show that the color is selected. • When the outline of the image uses more than one color, you can repeat to select a total of five colors. If you try to select more, colors are scrolled down, and the color that was at the bottom is deselected. • If you selected a color by mistake, simply click its check box to deselect it. x Click View to see the effect of your selection. • If you wanted to select another choice of color, click Cancel. The image displays again and you can repeat this step with another color. x If your preview image looks like the one shown here, click OK to confirm the outline of your pattern. x Click Cancel to exit and go back to the image. x If necessary, click Image Tune to reduce the colors or the noise. (page 105) 2 When you click OK, the line image displays. • At this stage, the data can be saved as a *.pel file. Layout & Editing File Utility Programmable Stich Creator Quik Reference Alphabetic Index 14
-
 1
1 -
2
-
3
-
4
-
5
-
6
-
7
-
8
-
9
-
10
-
11
-
12
-
13
-
14
-
15
-
16
-
17
-
18
-
 19
19 -
 20
20 -
 21
21 -
 22
22 -
 23
23 -
 24
24 -
 25
25 -
 26
26 -
 27
27 -
 28
28 -
 29
29 -
30
-
31
-
32
-
33
-
34
-
35
-
36
-
37
-
38
-
39
-
40
-
41
-
42
-
43
-
44
-
45
-
46
-
47
-
48
-
49
-
50
-
51
-
52
-
53
-
54
-
55
-
56
-
57
-
58
-
59
-
60
-
61
-
62
-
63
-
64
-
65
-
66
-
67
-
68
-
69
-
70
-
71
-
72
-
73
-
74
-
75
-
76
-
77
-
78
-
79
-
80
-
81
-
82
-
83
-
84
-
85
-
86
-
87
-
88
-
89
-
90
-
91
-
92
-
93
-
94
-
95
-
96
-
97
-
98
-
99
-
100
-
101
-
102
-
103
-
104
-
105
-
106
-
107
-
108
-
109
-
110
-
111
-
112
-
113
-
114
-
115
-
116
-
117
-
118
-
119
-
120
-
121
-
122
-
123
-
124
-
125
-
126
-
127
-
128
-
129
-
130
-
131
-
132
-
133
-
134
-
135
-
136
-
137
-
138
-
139
-
140
-
141
-
142
-
143
-
144
-
145
-
146
-
147
-
148
-
149
-
150
-
151
-
152
-
153
-
154
-
155
-
156
-
157
-
158
-
159
-
160
-
161
-
162
-
163
-
164
-
165
-
166
-
167
-
168
-
169
-
170
-
171
-
172
-
173
-
174
-
175
-
176
-
177
-
178
-
179
-
180
-
181
-
182
-
183
-
184
-
185
-
186
-
187
-
188
-
189
-
190
-
191
-
192
-
193
-
194
-
195
-
196
-
197
-
198
-
199
-
200
-
201
-
202
-
203
-
204
-
205
-
206
-
207
-
208
-
209
-
210
-
211
-
212
-
213
-
214
-
215
-
216
-
217
-
218
-
219
-
220
-
221
-
222
-
223
-
224
-
225
-
226
-
227
-
228
-
229
-
230
-
231
-
232
-
233
-
234
-
235
-
236
-
237
-
238
-
239
-
240
-
241
-
242
-
243
-
244
-
245
-
246
-
247
-
248
-
249
-
250
-
251
-
252
 |
 |
