Brother International PE-DESIGN Ver.4 3 2 Instructin Manual for PE-DESIGN Ver. - Page 211
is inserted. If necessary, connect the, module and its power adaptor,
 |
View all Brother International PE-DESIGN Ver.4 3 2 manuals
Add to My Manuals
Save this manual to your list of manuals |
Page 211 highlights
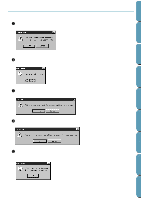
Contents Before Using Getting Started Design Center 4 If you don't type anything, this message will appear. x Click OK to remove the message and return to the previous dialog. 5 When you click OK on the Prefix Setting dialog with a valid prefix, this message displays. x Check that the card module is connected and powered, and that a card is inserted. If necessary, connect the module and its power adaptor, and insert a card. x Click OK to start installing. x Click Cancel to exit. Note that it is better to switch your computer off before connecting any peripheral. 6 If the card module is ready and no problems are detected, the application starts transferring the data from the card to the specified folder. The application informs you that the transfer is in progress. 7 Wait until the transfer is completed. When the transfer is complete, the Installation is completed message displays. x Click OK to remove the message. 8 The Install Embroidery Card dialog reappears, showing the new file. x Check that the new file appears in the Files box. x Click Close to remove the dialog from the screen. Layout & Editing File Utility Programmable Stich Creator Quik Reference Alphabetic Index 201
-
 1
1 -
2
-
3
-
4
-
5
-
6
-
7
-
8
-
9
-
10
-
11
-
12
-
13
-
14
-
15
-
16
-
17
-
18
-
19
-
20
-
21
-
22
-
23
-
24
-
25
-
26
-
27
-
28
-
29
-
30
-
31
-
32
-
33
-
34
-
35
-
36
-
37
-
38
-
39
-
40
-
41
-
42
-
43
-
44
-
45
-
46
-
47
-
48
-
49
-
50
-
51
-
52
-
53
-
54
-
55
-
56
-
57
-
58
-
59
-
60
-
61
-
62
-
63
-
64
-
65
-
66
-
67
-
68
-
69
-
70
-
71
-
72
-
73
-
74
-
75
-
76
-
77
-
78
-
79
-
80
-
81
-
82
-
83
-
84
-
85
-
86
-
87
-
88
-
89
-
90
-
91
-
92
-
93
-
94
-
95
-
96
-
97
-
98
-
99
-
100
-
101
-
102
-
103
-
104
-
105
-
106
-
107
-
108
-
109
-
110
-
111
-
112
-
113
-
114
-
115
-
116
-
117
-
118
-
119
-
120
-
121
-
122
-
123
-
124
-
125
-
126
-
127
-
128
-
129
-
130
-
131
-
132
-
133
-
134
-
135
-
136
-
137
-
138
-
139
-
140
-
141
-
142
-
143
-
144
-
145
-
146
-
147
-
148
-
149
-
150
-
151
-
152
-
153
-
154
-
155
-
156
-
157
-
158
-
159
-
160
-
161
-
162
-
163
-
164
-
165
-
166
-
167
-
168
-
169
-
170
-
171
-
172
-
173
-
174
-
175
-
176
-
177
-
178
-
179
-
180
-
181
-
182
-
183
-
184
-
185
-
186
-
187
-
188
-
189
-
190
-
191
-
192
-
193
-
194
-
195
-
196
-
197
-
198
-
199
-
200
-
201
-
202
-
203
-
204
-
205
-
 206
206 -
 207
207 -
 208
208 -
 209
209 -
 210
210 -
 211
211 -
 212
212 -
 213
213 -
 214
214 -
 215
215 -
 216
216 -
217
-
218
-
219
-
220
-
221
-
222
-
223
-
224
-
225
-
226
-
227
-
228
-
229
-
230
-
231
-
232
-
233
-
234
-
235
-
236
-
237
-
238
-
239
-
240
-
241
-
242
-
243
-
244
-
245
-
246
-
247
-
248
-
249
-
250
-
251
-
252
 |
 |
