Canon CanoScan FB 1200S User Guide - Page 40
Moving Images within the Preview All Window, Settings for 120 Format Films
 |
View all Canon CanoScan FB 1200S manuals
Add to My Manuals
Save this manual to your list of manuals |
Page 40 highlights
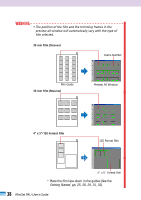
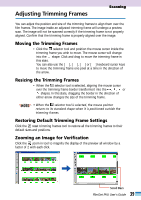
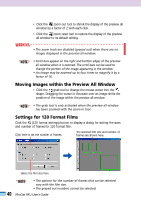
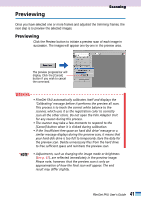
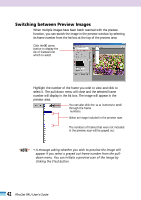
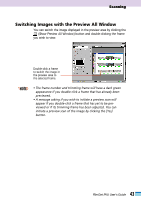
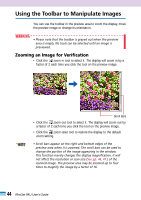
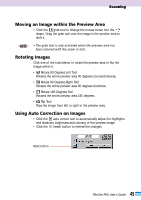
• Click the zoom out tool to shrink the display of the preview all window by a factor of 2 with each click. • Click the zoom reset tool to restore the display of the preview all window to its default setting. WARNING • The zoom tools are disabled (grayed out) when there are no images displayed in the preview all window. • NOTE • • Scroll bars appear on the right and bottom edges of the preview all window when it is zoomed. The scroll bars can be used to change the portion of the image appearing in the window. • An image may be zoomed up to four times to magnify it by a factor of 16. Moving Images within the Preview All Window • Click the grab tool to change the mouse cursor into the shape. Dragging the cursor in this state over an image shifts the position of the image within the preview all window. • • NOTE • The grab tool is only activated when the preview all window has been zoomed with the zoom in tool. Settings for 120 Format Films Click the (120 format settings) button to display a dialog for setting the sizes and number of frames for 120 format film. Click here to set the number of frames. The selected film size and number of frames are shown here. Select the film size here. • NOTE • • The options for the number of frames that can be selected vary with the film size. • The grayed out numbers cannot be selected. 40 FilmGet FAU User's Guide
-
 1
1 -
2
-
3
-
4
-
5
-
6
-
7
-
8
-
9
-
10
-
11
-
12
-
13
-
14
-
15
-
16
-
17
-
18
-
19
-
20
-
21
-
22
-
23
-
24
-
25
-
26
-
27
-
28
-
29
-
30
-
31
-
32
-
33
-
34
-
 35
35 -
 36
36 -
 37
37 -
 38
38 -
 39
39 -
 40
40 -
 41
41 -
 42
42 -
 43
43 -
 44
44 -
 45
45 -
46
-
47
-
48
-
49
-
50
-
51
-
52
-
53
-
54
-
55
-
56
-
57
-
58
-
59
-
60
-
61
-
62
-
63
-
64
-
65
-
66
-
67
-
68
-
69
-
70
-
71
-
72
-
73
-
74
-
75
-
76
-
77
-
78
-
79
-
80
-
81
-
82
-
83
-
84
-
85
-
86
-
87
-
88
-
89
-
90
-
91
-
92
-
93
-
94
-
95
-
96
-
97
-
98
-
99
-
100
-
101
-
102
-
103
-
104
-
105
-
106
-
107
-
108
-
109
-
110
-
111
-
112
 |
 |