Canon CanoScan FB 1200S User Guide - Page 63
Selecting the Scan Area, Adjusting the Scan Area Selection Frame, Adjusting the Selected Scan Area
 |
View all Canon CanoScan FB 1200S manuals
Add to My Manuals
Save this manual to your list of manuals |
Page 63 highlights
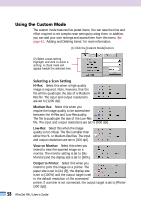
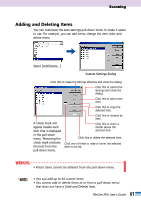
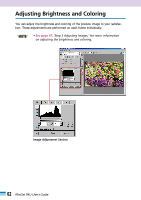
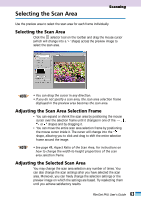
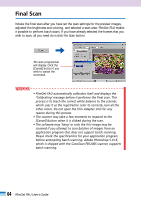
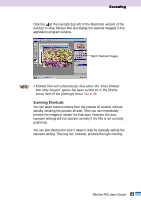
Selecting the Scan Area Scanning Use the preview area to select the scan area for each frame individually. Selecting the Scan Area Click the selector tool on the toolbar and drag the mouse cursor (which will change into a '+' shape) across the preview image to select the scan area. + • • NOTE • You can drag the cursor in any direction. • If you do not specify a scan area, the scan area selection frame displayed in the preview area becomes the scan area. Adjusting the Scan Area Selection Frame • You can expand or shrink the scan area by positioning the mouse cursor over the selection frame until it changes in one of the , , or shapes and by dragging it. • You can move the entire scan area selection frame by positioning the mouse cursor inside it. The cursor will change into the shape, allowing you to click and drag to shift the entire selection frame around the image. • • NOTE • See page 49, Aspect Ratio of the Scan Area, for instructions on how to change the width-to-height proportions of the scan area selection frame. Adjusting the Selected Scan Area You may change the scan area selection any number of times. You can also change the scan settings after you have selected the scan area. Moreover, you can freely change the selection settings or the preview image on which the settings are based. Try reselecting them until you achieve satisfactory results. 63 FilmGet FAU User's Guide
-
 1
1 -
2
-
3
-
4
-
5
-
6
-
7
-
8
-
9
-
10
-
11
-
12
-
13
-
14
-
15
-
16
-
17
-
18
-
19
-
20
-
21
-
22
-
23
-
24
-
25
-
26
-
27
-
28
-
29
-
30
-
31
-
32
-
33
-
34
-
35
-
36
-
37
-
38
-
39
-
40
-
41
-
42
-
43
-
44
-
45
-
46
-
47
-
48
-
49
-
50
-
51
-
52
-
53
-
54
-
55
-
56
-
57
-
 58
58 -
 59
59 -
 60
60 -
 61
61 -
 62
62 -
 63
63 -
 64
64 -
 65
65 -
 66
66 -
 67
67 -
 68
68 -
69
-
70
-
71
-
72
-
73
-
74
-
75
-
76
-
77
-
78
-
79
-
80
-
81
-
82
-
83
-
84
-
85
-
86
-
87
-
88
-
89
-
90
-
91
-
92
-
93
-
94
-
95
-
96
-
97
-
98
-
99
-
100
-
101
-
102
-
103
-
104
-
105
-
106
-
107
-
108
-
109
-
110
-
111
-
112
 |
 |