Canon CanoScan FB 1200S User Guide - Page 58
Using the Custom Mode, Selecting a Scan Setting
 |
View all Canon CanoScan FB 1200S manuals
Add to My Manuals
Save this manual to your list of manuals |
Page 58 highlights
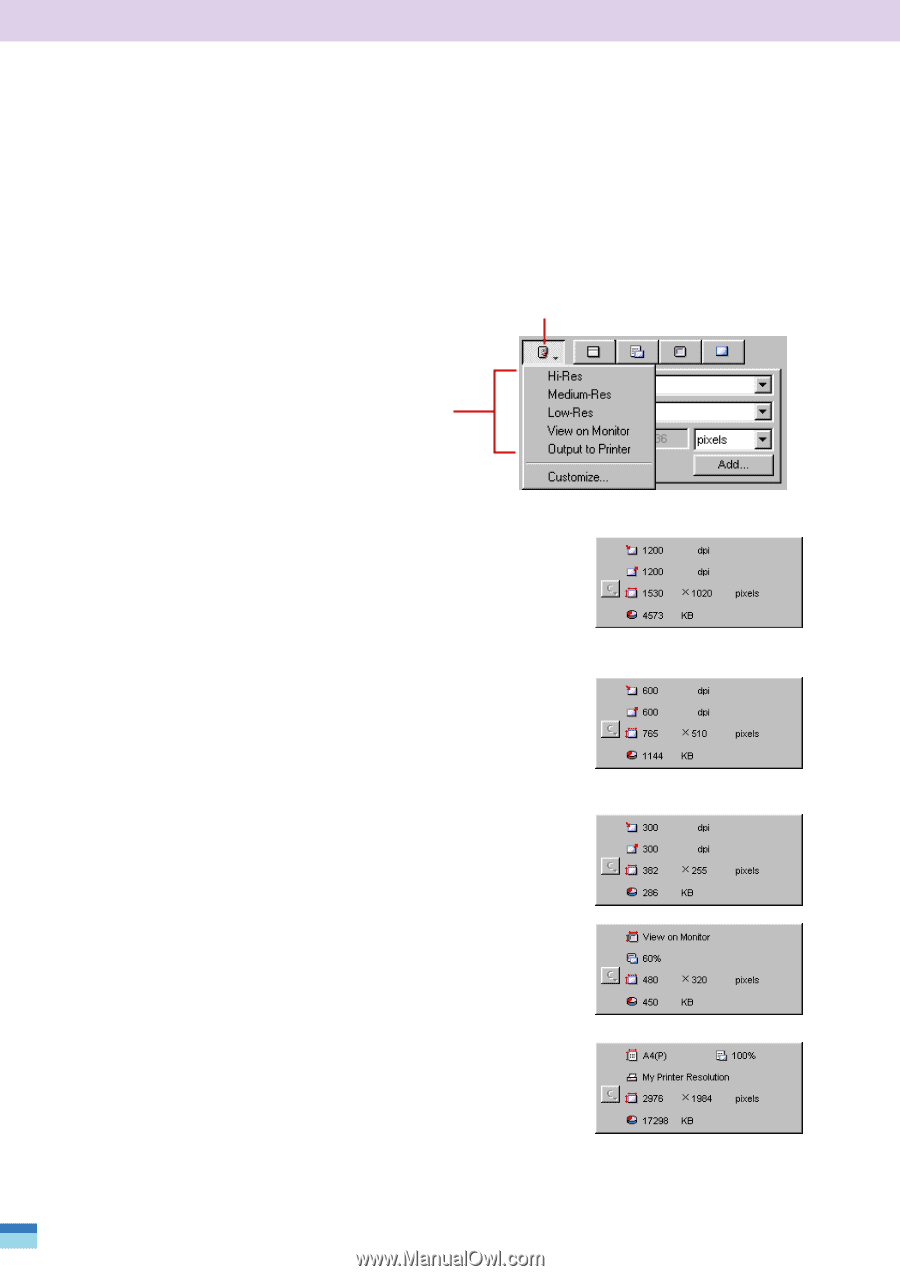
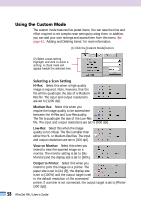
Using the Custom Mode The custom mode features five preset items. You can save the time and effort required to set complex scan settings by using them. In addition, you can add your own settings and access them from this menu. See page 61, 'Adding and Deleting Items,' for more information. (1) Click the [Custom Mode] button. (2) Select a scan setting Highlight and click to select a setting. A check mark will appear beside the selected item. Selecting a Scan Setting Hi-Res: Select this when a high-quality image is required. Note, however, that the file will be quadruple the size of a MediumRes file. The input and output resolutions are set to [1200 dpi]. Medium-Res: Select this when you require the image quality to be somewhere between the Hi-Res and Low-Res quality. The file is quadruple the size of the Low-Res file. The input and output resolutions are set to [600 dpi]. Low-Res: Select this when the image quality is not critical. The file is smaller than either the Hi- or Medium-Res files. The input and output resolutions are set to [300 dpi]. View on Monitor: Select this when you intend to view the scanned image on a monitor. The monitor setting is set to [My Monitor] and the display size is set to [60%]. Output to Printer: Select this when you intend to print the image on a printer. The paper size is set to [A4 (P)], the display size is set to [100%] and the output target is set to the default resolution of the connected printer. If a printer is not connected, the output target is set to [Printer (300 dpi)]. 58 FilmGet FAU User's Guide
-
 1
1 -
2
-
3
-
4
-
5
-
6
-
7
-
8
-
9
-
10
-
11
-
12
-
13
-
14
-
15
-
16
-
17
-
18
-
19
-
20
-
21
-
22
-
23
-
24
-
25
-
26
-
27
-
28
-
29
-
30
-
31
-
32
-
33
-
34
-
35
-
36
-
37
-
38
-
39
-
40
-
41
-
42
-
43
-
44
-
45
-
46
-
47
-
48
-
49
-
50
-
51
-
52
-
 53
53 -
 54
54 -
 55
55 -
 56
56 -
 57
57 -
 58
58 -
 59
59 -
 60
60 -
 61
61 -
 62
62 -
 63
63 -
64
-
65
-
66
-
67
-
68
-
69
-
70
-
71
-
72
-
73
-
74
-
75
-
76
-
77
-
78
-
79
-
80
-
81
-
82
-
83
-
84
-
85
-
86
-
87
-
88
-
89
-
90
-
91
-
92
-
93
-
94
-
95
-
96
-
97
-
98
-
99
-
100
-
101
-
102
-
103
-
104
-
105
-
106
-
107
-
108
-
109
-
110
-
111
-
112
 |
 |