Canon CanoScan FB 1200S User Guide - Page 73
Adjusting a Histogram, Guide to the Histogram Tab
 |
View all Canon CanoScan FB 1200S manuals
Add to My Manuals
Save this manual to your list of manuals |
Page 73 highlights
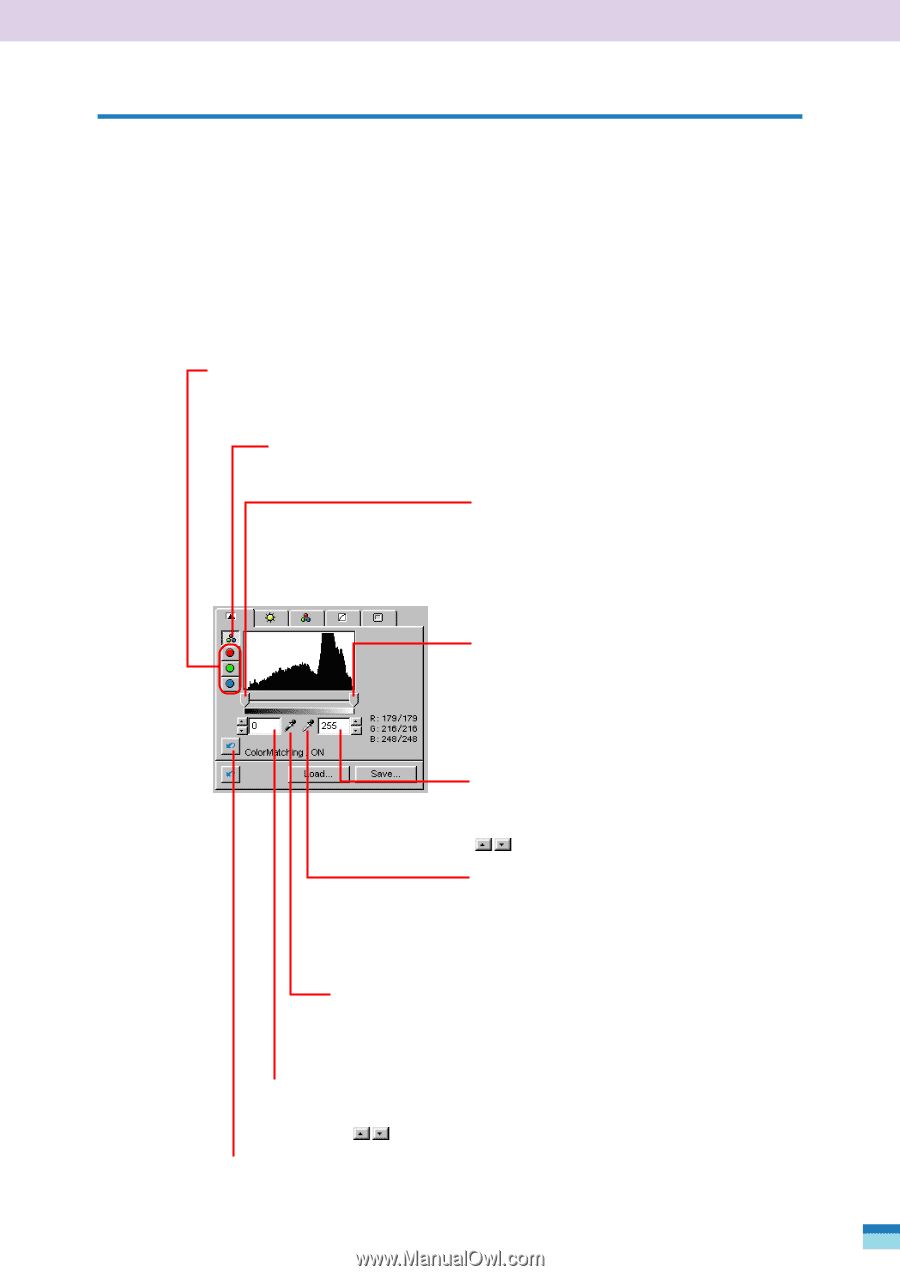
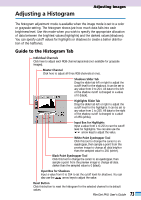
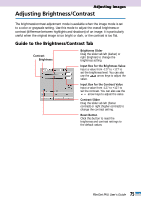
Adjusting a Histogram Adjusting Images The histogram adjustment mode is available when the image mode is set to a color or grayscale setting. The histogram shows just how much data falls into each brightness level. Use this mode when you wish to specify the appropriate allocation of data between the brightest values (highlights) and the darkest values (shadows). You can specify cutoff values for highlights or shadows to create a better distribution of the halftones. Guide to the Histogram Tab Individual Channels Click here to adjust each RGB channel separately (not available for grayscale images). Master Channel Click here to adjust all three RGB channels at once. Shadows Slider Tab Drag the slider tab left or right to adjust the cutoff level for the shadows. It can be set to any value from 0 to 254. All data to the left of the shadow cutoff is changed to a value of 0 (black). Highlights Slider Tab Drag the slider tab left or right to adjust the cutoff level for the highlights. It can be set to any value from 1 to 255. All data to the right of the shadow cutoff is changed to a value of 255 (white). Input Box for Highlights Input a value from 1 to 255 to set the cutoff level for highlights. You can also use the arrow keys to adjust the value. White Point Eyedropper Tool Click this tool to change the cursor to an eyedropper, then sample a point from the preview image to change all data brighter than the sampled value to 255 (white). Black Point Eyedropper Tool Click this tool to change the cursor to an eyedropper, then sample a point from the preview image to change all data darker than the sampled value to 0 (black). Input Box for Shadows Input a value from 0 to 254 to set the cutoff level for shadows. You can also use the arrow keys to adjust the value. Reset Button Click this button to reset the histogram for the selected channel to its default values. 73 FilmGet FAU User's Guide
-
 1
1 -
2
-
3
-
4
-
5
-
6
-
7
-
8
-
9
-
10
-
11
-
12
-
13
-
14
-
15
-
16
-
17
-
18
-
19
-
20
-
21
-
22
-
23
-
24
-
25
-
26
-
27
-
28
-
29
-
30
-
31
-
32
-
33
-
34
-
35
-
36
-
37
-
38
-
39
-
40
-
41
-
42
-
43
-
44
-
45
-
46
-
47
-
48
-
49
-
50
-
51
-
52
-
53
-
54
-
55
-
56
-
57
-
58
-
59
-
60
-
61
-
62
-
63
-
64
-
65
-
66
-
67
-
 68
68 -
 69
69 -
 70
70 -
 71
71 -
 72
72 -
 73
73 -
 74
74 -
 75
75 -
 76
76 -
 77
77 -
 78
78 -
79
-
80
-
81
-
82
-
83
-
84
-
85
-
86
-
87
-
88
-
89
-
90
-
91
-
92
-
93
-
94
-
95
-
96
-
97
-
98
-
99
-
100
-
101
-
102
-
103
-
104
-
105
-
106
-
107
-
108
-
109
-
110
-
111
-
112
 |
 |