Dell PowerVault TL4000 Dell Model TL2000/TL4000 Tape Library- User's Guide
Dell PowerVault TL4000 Manual
 |
View all Dell PowerVault TL4000 manuals
Add to My Manuals
Save this manual to your list of manuals |
Dell PowerVault TL4000 manual content summary:
- Dell PowerVault TL4000 | Dell Model TL2000/TL4000 Tape Library- User's
Guide - Page 1
Dell™ PowerVault™ TL2000 Tape Library and TL4000 Tape Library User's Guide - Dell PowerVault TL4000 | Dell Model TL2000/TL4000 Tape Library- User's Guide - Page 2
- Dell PowerVault TL4000 | Dell Model TL2000/TL4000 Tape Library- User's
Guide - Page 3
Dell™ PowerVault™ TL2000 Tape Library and TL4000 Tape Library User's Guide - Dell PowerVault TL4000 | Dell Model TL2000/TL4000 Tape Library- User's
Guide - Page 4
in any manner whatsoever without the written permission of Dell Inc. is strictly forbidden. Trademarks used in this text: Dell, the DELL logo and PowerVault are trademarks of Dell Inc. Other trademarks and trade names may be used in this document to refer to either the entities claiming the marks - Dell PowerVault TL4000 | Dell Model TL2000/TL4000 Tape Library- User's
Guide - Page 5
Required Dedicated Cleaning Slot removal Library firmware level must be greater than 3.90. Encryption Library firmware level must be 5.80 or greater. Key Path Diagnostics Path Failover IPv6 Support LTO 5 Drive Support LTO4 Drive firmware level must be 77BE or greater. Library firmware level - Dell PowerVault TL4000 | Dell Model TL2000/TL4000 Tape Library- User's
Guide - Page 6
iv Dell PowerVault TL2000 Tape Library and TL4000 Tape Library User's Guide - Dell PowerVault TL4000 | Dell Model TL2000/TL4000 Tape Library- User's
Guide - Page 7
Calibration 1-10 Power Management 1-10 Media 1-10 Library Specifications 1-11 Product Environment 1-13 Supported Device Drivers 1-13 Chapter 2. User Interfaces 2-1 Operator Control Panel 2-1 Operator Control Panel Philosophy . . . . . 2-1 Power-ON Display 2-2 Note about the Front Panel LEDs - Dell PowerVault TL4000 | Dell Model TL2000/TL4000 Tape Library- User's
Guide - Page 8
/Vista E-1 Notes on IPv6 Compatibility with Linux . . . . E-2 Appendix F. SNMP Status MIB Variables and Traps F-1 Appendix G. Library Configuration Form G-1 Appendix H. Accessibility H-1 Glossary I-1 Index X-1 vi Dell PowerVault TL2000 Tape Library and TL4000 Tape Library User's Guide - Dell PowerVault TL4000 | Dell Model TL2000/TL4000 Tape Library- User's
Guide - Page 9
1-9 Power-ON screens 2-2 Web User Interface login page . . . . . 2-6 2U library System Status screen . . . . . 2-6 4U library System Status screen . . . . . 2-6 4U library System Status screen showing media attention status 2-7 4U library System Status screen showing a power supply failure - Dell PowerVault TL4000 | Dell Model TL2000/TL4000 Tape Library- User's
Guide - Page 10
-26 10-25. Front view of rack showing screw placement 10-26 A-1. Configuration of a one - partition system A-4 A-2. Configuration of a two - partition system A-5 A-3. Configuration of a three - partition system A-5 viii Dell PowerVault TL2000 Tape Library and TL4000 Tape Library User's Guide - Dell PowerVault TL4000 | Dell Model TL2000/TL4000 Tape Library- User's
Guide - Page 11
A-4. Configuration of a four - partition system A-6 A-5. Examples of SCSI element addressing A-6 Figures ix - Dell PowerVault TL4000 | Dell Model TL2000/TL4000 Tape Library- User's
Guide - Page 12
x Dell PowerVault TL2000 Tape Library and TL4000 Tape Library User's Guide - Dell PowerVault TL4000 | Dell Model TL2000/TL4000 Tape Library- User's
Guide - Page 13
, storing, and shipping the LTO Ultrium Tape Cartridge . 6-10 Troubleshooting table 7-1 Power Supply LED Meanings . . . . . 7-8 Main Error Codes 8-2 Sub error codes 8-7 Warning Events 8-11 Shipping Lock/Shipping Label . . . . . 10-2 2U library SCSI Element Types and Element Addresses - Dell PowerVault TL4000 | Dell Model TL2000/TL4000 Tape Library- User's
Guide - Page 14
xii Dell PowerVault TL2000 Tape Library and TL4000 Tape Library User's Guide - Dell PowerVault TL4000 | Dell Model TL2000/TL4000 Tape Library- User's
Guide - Page 15
product, observe the danger, caution, and attention notices that are contained in this guide. The notices are accompanied by symbols that Department of Health and Human Services (for example, Class I, Class II, and so forth). A hazardous condition due to mechanical movement in or around the product - Dell PowerVault TL4000 | Dell Model TL2000/TL4000 Tape Library- User's
Guide - Page 16
expose its internal parts. 9. Check the cover of the library for proper fit. It should be in place and secure. 10. Check the product label at the rear of the library to make sure that it matches the voltage at your outlet. xiv Dell PowerVault TL2000 Tape Library and TL4000 Tape Library User's Guide - Dell PowerVault TL4000 | Dell Model TL2000/TL4000 Tape Library- User's
Guide - Page 17
stabilizer brackets on the rack cabinet. v To avoid hazardous conditions due to uneven mechanical loading, always install the heaviest devices in the bottom of the rack cabinet. Always install servers and optional devices starting from the bottom of the rack cabinet. v Rack mounted devices are - Dell PowerVault TL4000 | Dell Model TL2000/TL4000 Tape Library- User's
Guide - Page 18
on the equipment in the rack to determine the total power requirement of the supply circuit. v (For sliding drawers) Do not pull out or install any drawer or feature if the rack stabilizer brackets are fall out of the rack. xvi Dell PowerVault TL2000 Tape Library and TL4000 Tape Library User's Guide - Dell PowerVault TL4000 | Dell Model TL2000/TL4000 Tape Library- User's
Guide - Page 19
you are relocating is part of a suite of rack cabinets, detach the rack cabinet from the suite. v Inspect the route that you plan to take to eliminate potential hazards. v Verify the route that you choose can hold the weight of the loaded rack cabinet. Refer to the documentation that comes with your - Dell PowerVault TL4000 | Dell Model TL2000/TL4000 Tape Library- User's
Guide - Page 20
xviii Dell PowerVault TL2000 Tape Library and TL4000 Tape Library User's Guide - Dell PowerVault TL4000 | Dell Model TL2000/TL4000 Tape Library- User's
Guide - Page 21
This manual contains information and instructions necessary for the installation, operation, and service of the Dell™ PowerVault™ TL2000 Tape Library and TL4000 Tape Library. Related Publications Refer to the following publications for additional information. v Dell™ PowerVault™ TL2000 Tape Library - Dell PowerVault TL4000 | Dell Model TL2000/TL4000 Tape Library- User's
Guide - Page 22
xx Dell PowerVault TL2000 Tape Library and TL4000 Tape Library User's Guide - Dell PowerVault TL4000 | Dell Model TL2000/TL4000 Tape Library- User's
Guide - Page 23
with easy access to cartridges via four removable magazines. The 2U library houses up to 24 tape cartridges (or 23 and an elective 1-slot I/O Station) in a compact 2U form factor with easy access to cartridges via two removable magazines. The TL2000/TL4000 Library supports LT0 3 tape drives with - Dell PowerVault TL4000 | Dell Model TL2000/TL4000 Tape Library- User's
Guide - Page 24
12 cartridges. - The lower right magazine can hold up to 12 cartridges. These vents draw cooler air into the library enclosure and allow warm air to escape, which helps keep the library at a normal operating temperature. 1-2 Dell PowerVault TL2000 Tape Library and TL4000 Tape Library User's Guide - Dell PowerVault TL4000 | Dell Model TL2000/TL4000 Tape Library- User's
Guide - Page 25
2U library and 4U library front panel . v CANCEL (X) - The upper right button is used to cancel a user action and return to the previous menu screen. v SELECT (') - The out of the library. v The 2U library has an elective 1-slot I/O Station. v The 4U library has an elective 3-slot I/O Station. - Dell PowerVault TL4000 | Dell Model TL2000/TL4000 Tape Library- User's
Guide - Page 26
come in a full height or half height configuration. The drive sled is a customer replaceable unit (CRU), and is hot-pluggable, which is designed for easy removal and replacement. 1-4 Dell PowerVault TL2000 Tape Library and TL4000 Tape Library User's Guide - Dell PowerVault TL4000 | Dell Model TL2000/TL4000 Tape Library- User's
Guide - Page 27
Web User Interface by reading cartridge bar code labels. The library stores the customized inventory data in memory. Library firmware supports a 6 or 8 character volume serial number (VOLSER) on the bar code label on the tape cartridge. Bar code selection is available for libraries with library code - Dell PowerVault TL4000 | Dell Model TL2000/TL4000 Tape Library- User's
Guide - Page 28
are made. Please refer to "Power ON/OFF" on page 2-4 and "Removing Cartridges from Magazine Slots" on page 9-1 for instructions to take the library offline and to eject media from the drives. To prevent possible data loss due to an EKM server failure, Dell recommends the use of a primary - Dell PowerVault TL4000 | Dell Model TL2000/TL4000 Tape Library- User's
Guide - Page 29
of each drive in the library, firmware level, serial number and other address and status information. v Trap Definitions such as library status change, open magazine, I/O accessed, hard fault information, drive cleaning requests, excessive retries and library returning to normal operations. For - Dell PowerVault TL4000 | Dell Model TL2000/TL4000 Tape Library- User's
Guide - Page 30
in the library. The Ultrium 5 Tape Drive supports two SAS SFF-8088 connectors, or one LC Fibre Channel connector. The SFF-8088 SAS connectors on the Ultrium 5 tape drives are compatible with SAS-1 or SAS-2 cables. 1-8 Dell PowerVault TL2000 Tape Library and TL4000 Tape Library User's Guide - Dell PowerVault TL4000 | Dell Model TL2000/TL4000 Tape Library- User's
Guide - Page 31
or one LC Fibre Channel connector. The Ultrium 3 Half Height Drive supports one SAS SFF-8088 connector. The SFF-8088 SAS connectors on the Ultrium 3 tape drives are compatible with SAS-1 cables. a77ug008 Figure 1-6. Library drive sled without ESD springs (SCSI sled shown) 1 a77ug202 Figure - Dell PowerVault TL4000 | Dell Model TL2000/TL4000 Tape Library- User's
Guide - Page 32
1; read only) v LTO Ultrium Cleaning Cartridge Important: Cartridges placed in the library must be labeled with the correct bar code labels. For additional information, see Chapter 6, "Using Ultrium Media," on page 6-1. 1-10 Dell PowerVault TL2000 Tape Library and TL4000 Tape Library User's Guide - Dell PowerVault TL4000 | Dell Model TL2000/TL4000 Tape Library- User's
Guide - Page 33
Specifications AC power voltage Line frequency 100-127 VAC; 200-240 VAC (4 - 2 A) 50-60 Hz Operation Specifications Table 1-7. Operation Specifications: Ultrium 5 Library with Ultrium 5 drive(s) Maximum storage capacity Number of slots Sustained native data transfer rate 2U Library 4U Library - Dell PowerVault TL4000 | Dell Model TL2000/TL4000 Tape Library- User's
Guide - Page 34
Specifications Temperature Operating Storage, without cartridges Wet bulb, operating Temperature shock immunity - maximum rate of change Miscellaneous Dust concentration Altitude (operating) Maximum acoustical noise sound power Dell PowerVault TL2000 Tape Library and TL4000 Tape Library User's Guide - Dell PowerVault TL4000 | Dell Model TL2000/TL4000 Tape Library- User's
Guide - Page 35
of device drivers can be downloaded by visiting http://support.dell.com. Note: The TL2000 and TL4000 libraries utilize the generic SCSI drivers in RHEL 4 and 5. Depending on the ISV you are using, you will use either the sg or st driver. Please refer to your ISV documentation for more information - Dell PowerVault TL4000 | Dell Model TL2000/TL4000 Tape Library- User's
Guide - Page 36
1-14 Dell PowerVault TL2000 Tape Library and TL4000 Tape Library User's Guide - Dell PowerVault TL4000 | Dell Model TL2000/TL4000 Tape Library- User's
Guide - Page 37
from an empty slot - Loading a cartridge from any source to a full drive - Unloading a cartridge from an empty drive v Any error detected by the library or drive controller and not recoverable through predetermined firmware algorithms will be considered as fatal. An error code will be displayed - Dell PowerVault TL4000 | Dell Model TL2000/TL4000 Tape Library- User's
Guide - Page 38
constantly illuminated. If a library failure occurs, the Ready/Activity LED will turn OFF and the Error LED illuminates. The Operator Control Panel will also display an appropriate error code to help identify the failure. 2-2 Dell PowerVault TL2000 Tape Library and TL4000 Tape Library User's Guide - Dell PowerVault TL4000 | Dell Model TL2000/TL4000 Tape Library- User's
Guide - Page 39
→ Restore Defaults or Web User Interface: Configure Library → Restore Defaults). Complete the following steps: 1. Replace the failed power supply (see "Replacing a Power Supply" on page 10-10). Power supply fan failure 2. Cycle library power. Replace the power supply. v The Error LED is - Dell PowerVault TL4000 | Dell Model TL2000/TL4000 Tape Library- User's
Guide - Page 40
that displays a graphical representation of your library. For static IP Addresses only: After establishing a connection to the library, open any HTML browser and enter the IP address of the library. To configure the Web 2-4 Dell PowerVault TL2000 Tape Library and TL4000 Tape Library User's Guide - Dell PowerVault TL4000 | Dell Model TL2000/TL4000 Tape Library- User's
Guide - Page 41
personnel have access to all menus. The Service account has all the same privileges as the Admin account with the addition of advanced unit diagnostics. Note: User and Superuser accounts must be enabled by the library administrator. These accounts are disabled by default. Note: Passwords are case - Dell PowerVault TL4000 | Dell Model TL2000/TL4000 Tape Library- User's
Guide - Page 42
power supply fan, or a drive sled problem. To determine which, view the System Status screen. v The red X indicates that user intervention is required and that the library is not capable of performing operations. 2-6 Dell PowerVault TL2000 Tape Library and TL4000 Tape Library User's Guide a77ug089 - Dell PowerVault TL4000 | Dell Model TL2000/TL4000 Tape Library- User's
Guide - Page 43
the words Media Attention. The Auto Clean status disappears from the system status screen once Auto Clean has been properly configured. You will get messages if the cleaning media expires. Figure 2-5. 4U library System Status screen showing media attention status v The Power Supply Status will only - Dell PowerVault TL4000 | Dell Model TL2000/TL4000 Tape Library- User's
Guide - Page 44
the Web User Interface, click Logout in the upper right corner of the current screen. Important: If you click the X in the upper right corner of your internet browser window, you will not log out of the Web User Interface. 2-8 Dell PowerVault TL2000 Tape Library and TL4000 Tape Library User's Guide - Dell PowerVault TL4000 | Dell Model TL2000/TL4000 Tape Library- User's
Guide - Page 45
contain at least one drive. v A library configuration of exactly one logical library equals the entire physical library. v The library issues a warning to the user if media is moved across logical libraries. Library Sharing The library's default configuration allows a single application to operate - Dell PowerVault TL4000 | Dell Model TL2000/TL4000 Tape Library- User's
Guide - Page 46
to configure two logical libraries (create two partitions). This partitioning has been expanded with the new library firmware and half-high drive integration. Now it is possible to configure 1, 2, 3 or 4 partitions in 3-2 Dell PowerVault TL2000 Tape Library and TL4000 Tape Library User's Guide - Dell PowerVault TL4000 | Dell Model TL2000/TL4000 Tape Library- User's
Guide - Page 47
to space limitations. The user must navigate to the logical libraries status in the OCP to get the information on the additional library partitions. Partitioning of 2U Libraries When two half height drives are installed in a 2U library, the library firmware will support partitioning in the same way - Dell PowerVault TL4000 | Dell Model TL2000/TL4000 Tape Library- User's
Guide - Page 48
1: Slot 1 through slot 9 4096 (x1000) through 4104 (0x1008) v Logical Library 2: Slot 10 through slot 21 4096 (x1000) through 4107 (0x100B) v Logical Library 3: Slot 22 through slot 45 4096 (x1000) through 4119 (0x1017) 3-4 Dell PowerVault TL2000 Tape Library and TL4000 Tape Library User's Guide - Dell PowerVault TL4000 | Dell Model TL2000/TL4000 Tape Library- User's
Guide - Page 49
1 Element Address 256 Magazine 2 Magazine 4 Magazine 1 Magazine 3 Front side Figure 3-4. Configuration of a four - partition system SCSI Element Addressing a77ug164 Every logical library starts at the first drive slot with the current assigned element start address (default value 256). It - Dell PowerVault TL4000 | Dell Model TL2000/TL4000 Tape Library- User's
Guide - Page 50
. If it is not enabled, your host system will not scan beyond LUN 0 and will fail to discover the library. It will only see the tape drive. Important: Some HBAs, such as RAID controllers, do not support LUN scanning. 3-6 Dell PowerVault TL2000 Tape Library and TL4000 Tape Library User's Guide - Dell PowerVault TL4000 | Dell Model TL2000/TL4000 Tape Library- User's
Guide - Page 51
the LVD hardware in the library is capable of operating in single-ended (SE) mode, SE operation is not recommended. The library supports SCSI LVD attachments by using of the SCSI Interface The library operates as a set of SCSI-3 devices. The Ultrium Tape Drives attach to servers using an - Dell PowerVault TL4000 | Dell Model TL2000/TL4000 Tape Library- User's
Guide - Page 52
properly at each end v Cable restrictions are followed according to the SCSI-3 specification Under the SCSI library. The Medium Changer device may additionally be addressed via LUN 1 of other drives in any logical library. 3-8 Dell PowerVault TL2000 Tape Library and TL4000 Tape Library User's Guide - Dell PowerVault TL4000 | Dell Model TL2000/TL4000 Tape Library- User's
Guide - Page 53
installed on the last device on each end of a string of multiple devices. A terminator is included with each SCSI Ultrium Tape Drive. SCSI Differential - LVD LVD tape devices support related specifications, library allows the selection of the following Fibre channel port behaviors: v LN Port: (default - Dell PowerVault TL4000 | Dell Model TL2000/TL4000 Tape Library- User's
Guide - Page 54
needs service or replacement. Sharing on a Storage Area Network With Storage Area Network (SAN) components, the possibilities for connecting multiple systems and multiple drives have increased. Not all software and systems 3-10 Dell PowerVault TL2000 Tape Library and TL4000 Tape Library User's Guide - Dell PowerVault TL4000 | Dell Model TL2000/TL4000 Tape Library- User's
Guide - Page 55
support sharing. If your software does not support sharing, note that Fibre Channel switches have a zoning capability to form a SAN partition. For systems that do not cooperate, use zoning to prevent the systems from sharing the same drive. You can remove zoned partitions as you upgrade software - Dell PowerVault TL4000 | Dell Model TL2000/TL4000 Tape Library- User's
Guide - Page 56
3-12 Dell PowerVault TL2000 Tape Library and TL4000 Tape Library User's Guide - Dell PowerVault TL4000 | Dell Model TL2000/TL4000 Tape Library- User's
Guide - Page 57
Pads (for Desktop Installation ONLY)" on page 4-3. 5. "Removing and Storing the Shipping Lock" on page 4-4. 6. "Rackmounting the Library (for Rack Installation ONLY)" on page 4-5. 7. "Connecting the Host Interface Cable" on page 4-11. 8. "Connecting a Power Cord" on page 4-13. Choosing a Location - Dell PowerVault TL4000 | Dell Model TL2000/TL4000 Tape Library- User's
Guide - Page 58
: - SCSI terminator (one per SCSI drive) - SCSI library-to-host cable (if ordered by customer) v With every library containing a Fibre Channel drive: - Fibre Channel library-to-host/switch cable (if ordered by customer) 4-2 Dell PowerVault TL2000 Tape Library and TL4000 Tape Library User's Guide - Dell PowerVault TL4000 | Dell Model TL2000/TL4000 Tape Library- User's
Guide - Page 59
by customer) v Rack Mount Kit Installing the Library Foot Pads (for Desktop Installation ONLY) If you intend to install your library in a rack, skip this step and proceed to "Removing and Storing the Shipping Lock" on page 4-4. Important: Operating your library on a flat surface without foot pads - Dell PowerVault TL4000 | Dell Model TL2000/TL4000 Tape Library- User's
Guide - Page 60
back panel of the library for future use. To remove and store the shipping lock: 1. Remove the blue label ( 2 ) that is securing the lock ( 1 ) to the top of the library, then remove the lock (see Figure 4-2 on page 4-5). 4-4 Dell PowerVault TL2000 Tape Library and TL4000 Tape Library User's Guide - Dell PowerVault TL4000 | Dell Model TL2000/TL4000 Tape Library- User's
Guide - Page 61
( 1 ) and label ( 2 ) on the rear panel of the library as shown in Figure 4-3. 1 2 Figure 4-3. Library shipping lock and label storage location Rackmounting the Library (for Rack Installation ONLY) The 2U library and the 4U library are easily installed into a standard 19-inch rack system. The 2U - Dell PowerVault TL4000 | Dell Model TL2000/TL4000 Tape Library- User's
Guide - Page 62
on racks with round holes. ( 2 ) v Packaged in the small bag with "Square Hole" on the label: 9 screws to be used on racks with square holes. ( 3 ) 4-6 Dell PowerVault TL2000 Tape Library and TL4000 Tape Library User's Guide - Dell PowerVault TL4000 | Dell Model TL2000/TL4000 Tape Library- User's
Guide - Page 63
hardware 2. Determine the location in your rack for your library to be installed and, using a pencil, mark the location on each vertical rail in your rack. Note: A 2U library requires 2U (3.5 in.) of rack space. A 4U library requires 4U (7 in.) of rack space. 1 3 2 1 4 2 a77ug133 Figure - Dell PowerVault TL4000 | Dell Model TL2000/TL4000 Tape Library- User's
Guide - Page 64
4-7. 2U library side screws to remove 5. Install the library rack anchors ( 2 ) as shown in Figure 4-8 on page 4-9 on each side of your library using the longest counter-sunk screws included in the rack kit. 4-8 Dell PowerVault TL2000 Tape Library and TL4000 Tape Library User's Guide a77ug011 - Dell PowerVault TL4000 | Dell Model TL2000/TL4000 Tape Library- User's
Guide - Page 65
rack anchors and mounting brackets installed, slide the library onto the rails (as shown in Figure 4-9 and Figure 4-10 on page 4-10). When the library stops, gently push the library to lock the anchors installed on each side of the library to the rails and until the mounting brackets are flush - Dell PowerVault TL4000 | Dell Model TL2000/TL4000 Tape Library- User's
Guide - Page 66
(see Figure 4-11 for a 2U library; see Figure 4-12 on page 4-11 for a 4U library) by placing a screw in the center hole of each mounting bracket and tightening them ( 1 ). 1 Figure 4-11. Securing the 2U library to the rack 4-10 Dell PowerVault TL2000 Tape Library and TL4000 Tape Library User's Guide - Dell PowerVault TL4000 | Dell Model TL2000/TL4000 Tape Library- User's
Guide - Page 67
cables from the server and all attached accessories. Important: Failure to remove the power cords from these devices before connecting the host interface cable could result in damage to the library. 2. For a SCSI library, attach one end of the host interface cable to one of the connectors on the - Dell PowerVault TL4000 | Dell Model TL2000/TL4000 Tape Library- User's
Guide - Page 68
SUPPORTED. 1 2 3 a77ug134 Figure 4-15. Attaching a SAS interface cable to the 2U library 3. Attach the other end of the host interface cable as follows: v For a SCSI library library, if the library is the last or only 4-12 Dell PowerVault TL2000 Tape Library and TL4000 Tape Library User's Guide - Dell PowerVault TL4000 | Dell Model TL2000/TL4000 Tape Library- User's
Guide - Page 69
could subject the user to a shock hazard. For every power supply in the library, complete the following steps. 1. Remove the protective label from the power receptacle on your library. Figure 4-16. Removing the protective label from the power receptacle Chapter 4. Installation and Configuration 4-13 - Dell PowerVault TL4000 | Dell Model TL2000/TL4000 Tape Library- User's
Guide - Page 70
below shows the main default library settings. If you wish to use the defaults, no other changes need to be made before using your library Item Logical Libraries Active Slots I/O Slots Default Setting 1 Maximum Enabled 4-14 Dell PowerVault TL2000 Tape Library and TL4000 Tape Library User's Guide - Dell PowerVault TL4000 | Dell Model TL2000/TL4000 Tape Library- User's
Guide - Page 71
5-27. Configuring Your Library using the Web User Interface To configure your library using the Web User Interface, complete the following procedures: 1. "Establishing Remote Access to Your Library" 2. "Logging on to the Web User Interface" on page 4-17 3. "Verifying/Updating Firmware" on page 4-18 - Dell PowerVault TL4000 | Dell Model TL2000/TL4000 Tape Library- User's
Guide - Page 72
Press the UP or DOWN button to select the digit(s) in the first octet of your library's IP Address. c. Press the SELECT button to highlight the digit(s)in the next octet in the first octet of your library's Netmask address. 4-16 Dell PowerVault TL2000 Tape Library and TL4000 Tape Library User's Guide - Dell PowerVault TL4000 | Dell Model TL2000/TL4000 Tape Library- User's
Guide - Page 73
library or cancel the reboot. If you select CANCEL in the pop-up menu, you will need to power cycle the library field to access your library with the Web User Interface. The library address library's IP Address using the 0.0.0.0 format (four octets). Chapter 4. Installation and Configuration 4- - Dell PowerVault TL4000 | Dell Model TL2000/TL4000 Tape Library- User's
Guide - Page 74
of your library in your internet browser address field and press Enter on your keyboard. b. Log in to your library's Web User Interface. c. Expand Service Library in the left navigation pane of the Web User Interface. 4-18 Dell PowerVault TL2000 Tape Library and TL4000 Tape Library User's Guide - Dell PowerVault TL4000 | Dell Model TL2000/TL4000 Tape Library- User's
Guide - Page 75
Update. Do this for both library and drive firmware, if necessary. 4. Install the MIB file on your SNMP server. Refer to your server application documentation for instructions. Choosing General Library Settings If your library contains only one drive or logical library, both general and specific - Dell PowerVault TL4000 | Dell Model TL2000/TL4000 Tape Library- User's
Guide - Page 76
library has more than one drive, proceed to "Choosing the Number of Logical Libraries for Your Library" on page 4-21. If your library has one drive, proceed to "Entering Path Failover Feature Activation Key" on page 4-21. 4-20 Dell PowerVault TL2000 Tape Library and TL4000 Tape Library User's Guide - Dell PowerVault TL4000 | Dell Model TL2000/TL4000 Tape Library- User's
Guide - Page 77
Key For more information, refer to the Dell PowerVault TL4000 Failover Configuration Guide, included with the library documentation. 1. Click Configure Library → Path Failover in the left navigation pane. Figure 4-21. The Configure Library: Path Failover Feature Activation screen 2. Enter the - Dell PowerVault TL4000 | Dell Model TL2000/TL4000 Tape Library- User's
Guide - Page 78
Configure Library → Encryption in the left navigation pane. Figure 4-23. Feature Activation Key screen 2. On the Encryption screen, enter the Feature Activation Key to make available the library managed encryption options. 4-22 Dell PowerVault TL2000 Tape Library and TL4000 Tape Library User's Guide - Dell PowerVault TL4000 | Dell Model TL2000/TL4000 Tape Library- User's
Guide - Page 79
all cartridges using the default data keys specified in the EKM. This setting applies to all drives in a TL2000/TL4000 logical library. v Internal Label - Selective Encryption: Check your tape backup software application documentation to see if this feature is supported. v Internal Label - Encrypt - Dell PowerVault TL4000 | Dell Model TL2000/TL4000 Tape Library- User's
Guide - Page 80
a TCP port. Review your Dell PowerVault Encryption Key Manager User's Guide for instructions to locate the appropriate port settings. 8. Click Activate to apply the changes. 9. Install the Dell Encryption Key Manager (EKM) application on your host. Refer to the Dell EKM documentation provided with - Dell PowerVault TL4000 | Dell Model TL2000/TL4000 Tape Library- User's
Guide - Page 81
. Once the Submit button has been clicked, no other changes can be made until after the library has applied the current changes. After the Submit button has been clicked, depending on the changes Secure Sockets Layer) enabled, place a check in this box. Chapter 4. Installation and Configuration 4-25 - Dell PowerVault TL4000 | Dell Model TL2000/TL4000 Tape Library- User's
Guide - Page 82
will not take place. Entering User Access Information using the Web User Interface The Configure Library → User Access page is only accessible to the Admin and Service login. Access is denied to User and Superuser logins. 4-26 Dell PowerVault TL2000 Tape Library and TL4000 Tape Library User's Guide - Dell PowerVault TL4000 | Dell Model TL2000/TL4000 Tape Library- User's
Guide - Page 83
the new password again. 6. In Support Name, enter the name of the person that will be able to offer the user help with the library. Note: Only one support person can be configured for the entire tape library. The support person may or may not be one of the user, superuser, or admin account holders - Dell PowerVault TL4000 | Dell Model TL2000/TL4000 Tape Library- User's
Guide - Page 84
Filter options can be changed by Service personnel only. 4. Click one of the following: v Refresh - to cancel all of your entries and leave the settings as they were. v Submit - to apply the changes made to the screen. 4-28 Dell PowerVault TL2000 Tape Library and TL4000 Tape Library User's Guide - Dell PowerVault TL4000 | Dell Model TL2000/TL4000 Tape Library- User's
Guide - Page 85
User Interface This function is not available on the Operator Control Panel. Use this menu item to set up email notification of library errors and warnings. 1. Click Configure Library the Domain Name for your library. This field cannot be SNMP configuration of the library and allows modification to - Dell PowerVault TL4000 | Dell Model TL2000/TL4000 Tape Library- User's
Guide - Page 86
correct. Important: Ensure that library firmware and drive firmware are up to date before running the Key Path Diagnostic. Library firmware level must be greater than 6.xx. See "Verifying/Updating Firmware" on page 4-18. 4-30 Dell PowerVault TL2000 Tape Library and TL4000 Tape Library User's Guide - Dell PowerVault TL4000 | Dell Model TL2000/TL4000 Tape Library- User's
Guide - Page 87
(if Encryption was purchased) (see "Service Library: Key Path Diagnostics" on page 5-61) v Updating Firmware (see "Service Library: Upgrade Firmware" on page 5-62) Preparing the Host Follow these general guidelines: 1. Make sure that your backup application supports the SCSI, SAS, or Fibre Channel - Dell PowerVault TL4000 | Dell Model TL2000/TL4000 Tape Library- User's
Guide - Page 88
magazine (see Figure 4-34 on page 4-33) has twelve storage slots. For information about Element Addressing, see "2U Library I/O Slot, Storage Slots and Drive Slot Element Addresses and Physical Locations" on page A-1. 4-32 Dell PowerVault TL2000 Tape Library and TL4000 Tape Library User's Guide - Dell PowerVault TL4000 | Dell Model TL2000/TL4000 Tape Library- User's
Guide - Page 89
Output) Station (see Figure 4-35 on page 4-34) in a 2U library is part of the left magazine. To open the I/O Station, select Control → Open I/O Station. The I/O Station will pop open. To close the I/O Station, gently push it back into the left magazine. Chapter 4. Installation and Configuration 4-33 - Dell PowerVault TL4000 | Dell Model TL2000/TL4000 Tape Library- User's
Guide - Page 90
twelve storage slots. For information on Element Addressing, see "4U Library I/O Slots, Storage Slots, and Drive Slots Element Addresses and Physical Locations" on page A-2. Figure 4-36. 4U library left magazines 4-34 Dell PowerVault TL2000 Tape Library and TL4000 Tape Library User's Guide a77ug245 - Dell PowerVault TL4000 | Dell Model TL2000/TL4000 Tape Library- User's
Guide - Page 91
the lower left magazine. Figure 4-38. 4U library I/O Station in the lower left magazine There are finger holes on the back side of the I/O Station (see 1 in Figure 4-39 on page 4-36) that allow the user to push the cartridges out of the I/O station. Chapter 4. Installation and Configuration 4-35 - Dell PowerVault TL4000 | Dell Model TL2000/TL4000 Tape Library- User's
Guide - Page 92
Slots and Drive Slot Element Addresses and Physical Locations" on page A-1 or "4U Library I/O Slots, Storage Slots, and Drive Slots Element Addresses and Physical Locations" on page A-2 for determining slot location. 4-36 Dell PowerVault TL2000 Tape Library and TL4000 Tape Library User's Guide - Dell PowerVault TL4000 | Dell Model TL2000/TL4000 Tape Library- User's
Guide - Page 93
see Chapter 6, "Using Ultrium Media," on page 6-1. Note: Earlier versions of the 4U library contained a Dedicated Cleaning Slot (DCS). This DCS can be retained and is supported by future library firmware updates. However, library firmware later than 3.90 will allow removal of the DCS, thus enabling - Dell PowerVault TL4000 | Dell Model TL2000/TL4000 Tape Library- User's
Guide - Page 94
for the slots containing a cleaning cartridge. The number of Media Loads represent how many times the cleaning cartridge has been used. The number 50, minus that Media Load number represents the number of uses remaining. 4-38 Dell PowerVault TL2000 Tape Library and TL4000 Tape Library User's Guide - Dell PowerVault TL4000 | Dell Model TL2000/TL4000 Tape Library- User's
Guide - Page 95
User Interface For More Info Accessor, number Monitor → Library → Status → of cartridge Cycles moves "Monitor: Library" on page 5-10 Monitor Library → Library "Monitor Library: Status Library Status" on page 5-37 Auto Clean, enable Configure → Library Settings → "Configure: Auto Clean - Dell PowerVault TL4000 | Dell Model TL2000/TL4000 Tape Library- User's
Guide - Page 96
Library: Perform Diagnostics" on page 5-60 Diagnostics, run Service → Run Tests System Test "Service: Run Service Library → Perform Tests" on page Diagnostics 5-31 "Service Library: Perform Diagnostics" on page 5-60 5-2 Dell PowerVault TL2000 Tape Library and TL4000 Tape Library User's Guide - Dell PowerVault TL4000 | Dell Model TL2000/TL4000 Tape Library- User's
Guide - Page 97
: Drive Identity" on page 5-35 Drive, turn Service → Service → Drive power ON/OFF Power "Service: Service (Drives)" on page 5-31 Configure Library → Drive "Configure Library: Drives" on page 5-49 Drive activity, current Monitor → Drive → Status → Drive (n)/Activity "Monitor: Drive" on page - Dell PowerVault TL4000 | Dell Model TL2000/TL4000 Tape Library- User's
Guide - Page 98
→ Drives "Configure Library: Drives" on page 5-49 Fibre Channel, topology Monitor → Drive → Status → Drive (n) "Monitor: Drive" on page 5-12 Monitor Library → Drive Status "Monitor Library: Drive Status" on page 5-38 5-4 Dell PowerVault TL2000 Tape Library and TL4000 Tape Library User's Guide - Dell PowerVault TL4000 | Dell Model TL2000/TL4000 Tape Library- User's
Guide - Page 99
current level "Monitor: Library" on page 5-10 Monitor Library → Library "Monitor Library: Identity Library Identity" on page 5-34 Firmware, library Not available with this or drive update interface. Service Library → Upgrade "Service Library: Firmware Upgrade Firmware" on page 5-62 - Dell PowerVault TL4000 | Dell Model TL2000/TL4000 Tape Library- User's
Guide - Page 100
: Library" on page 5-10 Monitor Library → Library "Monitor Library: Identity Library Identity" on page 5-34 Slots, number active Monitor → Library → Identity "Monitor: Library" on page 5-10 System Status screen 5-6 Dell PowerVault TL2000 Tape Library and TL4000 Tape Library User's Guide - Dell PowerVault TL4000 | Dell Model TL2000/TL4000 Tape Library- User's
Guide - Page 101
Service Port "Service: Telnet Service Port" on page 5-33 Not available with this interface. Time elapsed Monitor → Library → Status since power ON "Monitor: Library" on page 5-10 Monitor Library → Library "Monitor Library: Status Library Status" on page 5-37 Operator Control Panel, access - Dell PowerVault TL4000 | Dell Model TL2000/TL4000 Tape Library- User's
Guide - Page 102
user action and return to the previous menu screen. 3 SELECT (') - Lower-right button Used to display a sub-menu or force an accessor action. 4 DOWN (∨) - Lower-left button Used to scroll downward through menu items. 5-8 Dell PowerVault TL2000 Tape Library and TL4000 Tape Library User's Guide - Dell PowerVault TL4000 | Dell Model TL2000/TL4000 Tape Library- User's
Guide - Page 103
( 1 ) or DOWN( 4 ) keys to enter Interaction Mode. The Main Selection Menu will appear. The Main Selection screen shows Monitor, Control, Configure, and Service. 2. Scroll to your selection, then press the SELECT ( 3 ) key. The sub-menu for the selected menu item will appear. 3. Use the UP ( 1 ) or - Dell PowerVault TL4000 | Dell Model TL2000/TL4000 Tape Library- User's
Guide - Page 104
Tree on your library. Monitor Menu The Monitor menu contains information about the following sub menu items: v Library v Drive v Inventory Monitor: Library This menu item displays current library information and settings. 5-10 Dell PowerVault TL2000 Tape Library and TL4000 Tape Library User's Guide - Dell PowerVault TL4000 | Dell Model TL2000/TL4000 Tape Library- User's
Guide - Page 105
Monitor Library Status Identity Error Log Network Status Serial Number IP Stack Act. Cart. On Time Slots Empty Cycles I/O Station Date/Time Version Vendor ID DHCP-ON Product ID Active Slots WWNN Library Mode DHCP-OFF (IPv4 & IPv4+IPv6) IP Address Netmask DHCP-OFF (IPv6) Stateless - Dell PowerVault TL4000 | Dell Model TL2000/TL4000 Tape Library- User's
Guide - Page 106
Local IPv6 Address - local link-only IPv6 address of the library v Router assigned IPv6 Address - IPv6 address(es) discovered by the network router Monitor: Drive This menu item displays drive information and settings. 5-12 Dell PowerVault TL2000 Tape Library and TL4000 Tape Library User's Guide - Dell PowerVault TL4000 | Dell Model TL2000/TL4000 Tape Library- User's
Guide - Page 107
Monitor Drive Status Identity Drive (n) Drive (n) Status Firmware Rev Activity Vendor ID Source Product ID Encryption Topology (A) Speed (A) Loop ID (A) Fibre Channel Drive Port A Status Speed (A) Hashed Address (A) Port B Status Speed (B) Serial Number WWNN Topology (A) Speed (A) - Dell PowerVault TL4000 | Dell Model TL2000/TL4000 Tape Library- User's
Guide - Page 108
fibre channel tape drive v Loop ID - unique identifier assigned to a fibre channel tape drive v PID - port identification (SAS only) Monitor: Inventory This menu item displays the current library inventory of a 4U library. 5-14 Dell PowerVault TL2000 Tape Library and TL4000 Tape Library User's Guide - Dell PowerVault TL4000 | Dell Model TL2000/TL4000 Tape Library- User's
Guide - Page 109
status) Lower Left Lower Right a77ug036 (Graphic of left magazine) (Graphic of right magazine) Figure 5-6. Example of a 4U Monitor: Inventory menu Note: 2U has a single right side magazine. Under Magazine Left Magazine of a 4U Library Note: Left magazine of a 2U Library has a 1-slot I/O - Dell PowerVault TL4000 | Dell Model TL2000/TL4000 Tape Library- User's
Guide - Page 110
Attention: After closing the I/O Station, you must wait for the library to complete its inventory before proceeding with normal library operations. Control: Move Cartridges Use this menu item to move cartridges in the library. 5-16 Dell PowerVault TL2000 Tape Library and TL4000 Tape Library User - Dell PowerVault TL4000 | Dell Model TL2000/TL4000 Tape Library- User's
Guide - Page 111
: If the Attention LED is ON magazines. Control Magazine Left Right a77ug054 "Left magazine unlocking" "Right magazine unlocking" Figure 5-11. Control: Magazine menu Choose "Left" or "Right" to unlock the corresponding cartridge magazine(s). The magazines can now be removed from the library - Dell PowerVault TL4000 | Dell Model TL2000/TL4000 Tape Library- User's
Guide - Page 112
v Save/Restore v Set Date and Time Configure: Logical Libraries Use this menu item to select the number of logical libraries. The Currently Configured - x section shows the number of logical libraries currently configured. 5-18 Dell PowerVault TL2000 Tape Library and TL4000 Tape Library User's Guide - Dell PowerVault TL4000 | Dell Model TL2000/TL4000 Tape Library- User's
Guide - Page 113
Whenever there is a hardware configuration change such as drives being swapped with different form factors (i.e. HH to FH or FH to HH), a library configuration change is needed. Reconfiguring the library by reassigning the amount of logical libraries will clear this issue. Chapter 5. Operations 5-19 - Dell PowerVault TL4000 | Dell Model TL2000/TL4000 Tape Library- User's
Guide - Page 114
Host Label Length Host Label Length Figure 5-14. Configure: Library menu Note: The Remove DCS No is only available on libraries with the DCS feature. The following library configuration items are in this menu: v Mode: 5-20 Dell PowerVault TL2000 Tape Library and TL4000 Tape Library User's Guide - Dell PowerVault TL4000 | Dell Model TL2000/TL4000 Tape Library- User's
Guide - Page 115
the selection of the cartridges. After initialization, the firmware causes the library to select the first available cartridge found (counting from the I/O Station through slot 23) for loading into the drive. Important: If a Logical Library in Sequential Mode contains more than one drive, only - Dell PowerVault TL4000 | Dell Model TL2000/TL4000 Tape Library- User's
Guide - Page 116
option will no longer appear in the Operator Control Panel. v Host Label Length - The Host Label Length is related to the Bar Code Labels appearing on the media being used. The default value is 8, but 6 can also be chosen. 5-22 Dell PowerVault TL2000 Tape Library and TL4000 Tape Library User's Guide - Dell PowerVault TL4000 | Dell Model TL2000/TL4000 Tape Library- User's
Guide - Page 117
, and Loop ID to a Fibre Channel drive. SAS drives do not require user configuration. For more information on drive interfaces, refer to "Host Interfaces" on control path drive. Each logical library must have a control path drive; however, all drives in a logical library can be designated as control - Dell PowerVault TL4000 | Dell Model TL2000/TL4000 Tape Library- User's
Guide - Page 118
. v IP Stack - Choose IPv4 only, IPv6 only, or IPv4 & IPv6. v IPv6 Only and Dual Stack IPv4 & IPv6 - Choose Enable Stateless Auto Config Address (Web User Interface) or Stateless Autoconfig (Operator Control Panel) if 5-24 Dell PowerVault TL2000 Tape Library and TL4000 Tape Library User's Guide - Dell PowerVault TL4000 | Dell Model TL2000/TL4000 Tape Library- User's
Guide - Page 119
settings from being tampered with. Users will be allowed to review the library status and manipulate media without entering the OCP pin. If a unit administrator needs to make a configuration change in the unit, the OCP will ask for the 4-digit code in order to allow access to make changes. Once all - Dell PowerVault TL4000 | Dell Model TL2000/TL4000 Tape Library- User's
Guide - Page 120
sign (#) are the only menus accessible when the Access PIN is enabled, but entered incorrectly or before it is entered. To gain access to all menus, disable the Access PIN or enter the correct PIN number when requested. 5-26 Dell PowerVault TL2000 Tape Library and TL4000 Tape Library User's Guide - Dell PowerVault TL4000 | Dell Model TL2000/TL4000 Tape Library- User's
Guide - Page 121
. Pound sign (#) shows accessible menus when access PIN is enabled but before it is entered Configure: Save/Restore Use this menu item to restore the factory default settings. Configure Save/Restore a77ug045 Restore Passwords Restore All Restore Library Config. Save Library Config. Figure 5-19 - Dell PowerVault TL4000 | Dell Model TL2000/TL4000 Tape Library- User's
Guide - Page 122
"0.0.0.0". Network IP Mode IPv4 Only Bar Code Label Length Reported to 8 Host SNMP Disabled Email Notifications None User Access Restore from Operator Control Panel or Web User Interface Admin secure (default) 5-28 Dell PowerVault TL2000 Tape Library and TL4000 Tape Library User's Guide - Dell PowerVault TL4000 | Dell Model TL2000/TL4000 Tape Library- User's
Guide - Page 123
) Restored Item Default Setting* Comments Library Mode Random Library Name (Blank) Host Name (Depends on MAC Address) Logs & Traces Error Log Mode Continuous Path Failover Key No change License Key is protected, if previously entered. OCP Access PIN Disabled If OCP Access PIN has - Dell PowerVault TL4000 | Dell Model TL2000/TL4000 Tape Library- User's
Guide - Page 124
Height drives. Library firmware levels higher than 8.xx support Path Failover on LTO 5 drives, as well as LTO 4 Full Height drives.For more information, refer to the Dell PowerVault TL4000 Failover Configuration Guide, included with the library documentation. Service Menu The 2U/4U library is always - Dell PowerVault TL4000 | Dell Model TL2000/TL4000 Tape Library- User's
Guide - Page 125
Panel will display library status. v If the test PASSES, resume normal library operations. v If the test FAILS, an error code will be displayed. Make note of the error, then refer to Chapter 7, "Troubleshooting," on page 7-1. Note: Library Verify requires a piece of scratch media to perform the - Dell PowerVault TL4000 | Dell Model TL2000/TL4000 Tape Library- User's
Guide - Page 126
(OCP), the drive powers ON after committing changes. When configuration changes of a disabled drive are made from the Web Interface (RMU), the drive does not power ON after committing changes. Service: Display Contrast 5-32 Dell PowerVault TL2000 Tape Library and TL4000 Tape Library User's Guide - Dell PowerVault TL4000 | Dell Model TL2000/TL4000 Tape Library- User's
Guide - Page 127
the brightest. Service: Telnet Service Port The Telnet Service Port menu item is to be used under the direction of Dell Technical Support. Web User Interface Menus Note: Depending on the version of library firmware, there may be differences between the Menu description in this document and the web - Dell PowerVault TL4000 | Dell Model TL2000/TL4000 Tape Library- User's
Guide - Page 128
address. assigned address X X Router discovery This is the IPv6 router discovery address assigned to your library. X X IPv6 address MAC Address This is the machine's access code assigned to your library. X X 5-34 Dell PowerVault TL2000 Tape Library and TL4000 Tape Library User's Guide - Dell PowerVault TL4000 | Dell Model TL2000/TL4000 Tape Library- User's
Guide - Page 129
identification number of the tape drive that was assigned by the manufacturer. X X X X X X Firmware This is the current level of firmware installed on the X X X X X X Revision drive. For information on updating your firmware, refer to "Service Library: Upgrade Firmware" on page 5-62 - Dell PowerVault TL4000 | Dell Model TL2000/TL4000 Tape Library- User's
Guide - Page 130
that of the server), 1Gb/s, 2Gb/s or 4 Gb/s. Port B This port is enabled for full height SAS drives for X failover only. 4U Library SCSI Fibre SAS X X X X X X X X X X X X X X X X X X X X X X 5-36 Dell PowerVault TL2000 Tape Library and TL4000 Tape Library User's Guide - Dell PowerVault TL4000 | Dell Model TL2000/TL4000 Tape Library- User's
Guide - Page 131
B (for example, from a storage slot to a drive). Total Power On This is the total amount of time that the library has been powered ON. X X Time Accessor Status This is the current status of the accessor. X X Left Magazine This displays whether the left magazine is "Present" or "Not Present - Dell PowerVault TL4000 | Dell Model TL2000/TL4000 Tape Library- User's
Guide - Page 132
This indicates whether or not the drive is operating. X X X Port A Status This indicates whether Port A is logged on or out. X X 4U Library SCSI Fibre SAS X X X X X X X X X X X X X X X X X 5-38 Dell PowerVault TL2000 Tape Library and TL4000 Tape Library User's Guide - Dell PowerVault TL4000 | Dell Model TL2000/TL4000 Tape Library- User's
Guide - Page 133
elements (continued) Menu Item Description 2U Library SCSI Fibre SAS Port B Status This indicates whether Port B is logged on the WWID for use on the SAS interface Encryption This shows the status of any encryption that is Status enabled on the drive. X X Encryption This is the type of - Dell PowerVault TL4000 | Dell Model TL2000/TL4000 Tape Library- User's
Guide - Page 134
a magazine, click on the + button. This will expand the display for the magazine. To determine whether a cartridge is encrypted, refer to the Comments column in the Cartridge Details screen. See Figure 5-31 on page 5-42. 5-40 Dell PowerVault TL2000 Tape Library and TL4000 Tape Library User's Guide - Dell PowerVault TL4000 | Dell Model TL2000/TL4000 Tape Library- User's
Guide - Page 135
Inventory As Of 14:02:04 Library Time Drive Inventory Drive Status Label 1 Empty Source 8 4 IO-Station Magazine Inventory 9 10 11 + 5 6 7 1 2 3 23 22 21 19 18 17 15 14 13 Refresh Figure 5-30. The 2U library Monitor Library: Inventory page 20 + 16 12 a77ug067 - Dell PowerVault TL4000 | Dell Model TL2000/TL4000 Tape Library- User's
Guide - Page 136
Manage Library: Move Media This page allows the user to move tape cartridges within the library. The source and destination are selected and then the MOVE button in the center of the screen is clicked to activate the move. 5-42 Dell PowerVault TL2000 Tape Library and TL4000 Tape Library User's Guide - Dell PowerVault TL4000 | Dell Model TL2000/TL4000 Tape Library- User's
Guide - Page 137
the current media inventory. Figure 5-33. Manage Library: Perform Inventory page Manage Library: Release Magazine This page allows the user to release the right or left magazine from the library. Figure 5-34. Manage Library: Release Magazine page Note: To manually release a magazine, see "Releasing - Dell PowerVault TL4000 | Dell Model TL2000/TL4000 Tape Library- User's
Guide - Page 138
logical library, there is a Library Mode entry for each logical library. Important: If a Logical Library in Sequential Mode contains more than one drive, only the first drive in the Logical Library will be utilized. 5-44 Dell PowerVault TL2000 Tape Library and TL4000 Tape Library User's Guide - Dell PowerVault TL4000 | Dell Model TL2000/TL4000 Tape Library- User's
Guide - Page 139
Drive 2 and the upper left cartridge magazines. v Logical Library 3 will contain Drive 3 and the lower right cartridge magazine. v Logical Library 4 will contain Drive 4 and the upper right cartridge magazine. The I/O Station and the reserved slot (or dedicated cleaning slot (DCS) if one is assigned - Dell PowerVault TL4000 | Dell Model TL2000/TL4000 Tape Library- User's
Guide - Page 140
the feature key correctly. Figure 5-38. Path Failover license verification page Note: Follow the instructions in the Dell PowerVault TL4000 Failover Configuration Guide to configure your environment for failover. 5-46 Dell PowerVault TL2000 Tape Library and TL4000 Tape Library User's Guide a77ug117 - Dell PowerVault TL4000 | Dell Model TL2000/TL4000 Tape Library- User's
Guide - Page 141
) Note: Fibre Channel is full height drive only. v Ultrium 4 Tape Cartridge v Library firmware level 5.80 or higher v Drive firmware level 77BE or higher v Tape backup software application that supports LTO4 encryption Prerequisites for Library Managed Encryption v SAS and Fibre Channel LTO Ultrium - Dell PowerVault TL4000 | Dell Model TL2000/TL4000 Tape Library- User's
Guide - Page 142
. v Primary TCP port: After entering the Primary IP address, the library will automatically set the value of the Primary TCP port. v Secondary IP address (IPv4 or IPv6): Enter the IP address of the secondary EKM server. 5-48 Dell PowerVault TL2000 Tape Library and TL4000 Tape Library User's Guide - Dell PowerVault TL4000 | Dell Model TL2000/TL4000 Tape Library- User's
Guide - Page 143
TCP port. Review the Dell PowerVault Encryption Key Manager User's Guide for instructions to locate the appropriate port settings. 11. Click Submit to apply the changes. 12. Install the Dell Encryption Key Manager (EKM) application on your host. Refer to the Dell EKM documentation provided with your - Dell PowerVault TL4000 | Dell Model TL2000/TL4000 Tape Library- User's
Guide - Page 144
configuration of the library and allows modification to the configuration. When a change is requested, a pop-up box checks confirms the request. 1. Click Network in the left navigation pane, to display the Network page. 5-50 Dell PowerVault TL2000 Tape Library and TL4000 Tape Library User's Guide - Dell PowerVault TL4000 | Dell Model TL2000/TL4000 Tape Library- User's
Guide - Page 145
has been clicked, no other changes can be made until after the library has applied the current changes. After the Submit button has been clicked, you will either be disconnected and need to login again or reboot the library. Clicking the Refresh button will refresh the page and any changes made will - Dell PowerVault TL4000 | Dell Model TL2000/TL4000 Tape Library- User's
Guide - Page 146
and modify user accounts. See "Login" on page 2-5 for information on user types. The Configure Library → User Access page is only accessible to the Admin and Service login. Access is denied to User and Superuser logins. 5-52 Dell PowerVault TL2000 Tape Library and TL4000 Tape Library User's Guide - Dell PowerVault TL4000 | Dell Model TL2000/TL4000 Tape Library- User's
Guide - Page 147
Password again. Support name The name of the individual within your company to contact for Web User Interface or library support. Note: Only one support person can be configured for the entire tape library. The support person may or may not be one of the user, superuser, or admin account holders - Dell PowerVault TL4000 | Dell Model TL2000/TL4000 Tape Library- User's
Guide - Page 148
for the Error Log Mode so that all information for logs and traces will be captured. Click one of the following: v Refresh - to cancel the changes made to the screen. v Submit - to apply the changes made to the screen. 5-54 Dell PowerVault TL2000 Tape Library and TL4000 Tape Library User's Guide - Dell PowerVault TL4000 | Dell Model TL2000/TL4000 Tape Library- User's
Guide - Page 149
item to be notified of library warnings via email. To Email Address Enter the email address of the individual you would like to receive the errors and/or warnings. Note: The TL2000/TL400 email address field cannot be empty (clear). The email notification setup allows the user to turn off the feature - Dell PowerVault TL4000 | Dell Model TL2000/TL4000 Tape Library- User's
Guide - Page 150
) and/or the Operator Control Panel (OCP). The feature has been implemented on the RMU and on the OCP, but with slightly different functionality. 5-56 Dell PowerVault TL2000 Tape Library and TL4000 Tape Library User's Guide - Dell PowerVault TL4000 | Dell Model TL2000/TL4000 Tape Library- User's
Guide - Page 151
. Service Library: Clean Drive If the library is not configured for Auto Clean, this page allows the user to manually clean the tape drive. A drive cleaning should only be performed after the library/drive has posted a status message indicating Cleaning Required To manually perform a drive cleaning - Dell PowerVault TL4000 | Dell Model TL2000/TL4000 Tape Library- User's
Guide - Page 152
pop-up boxes to appear. For example, on Microsoft Internet Explorer, under Tools, ensure that the Pop-up Blocker is turned OFF and Internet 5-58 Dell PowerVault TL2000 Tape Library and TL4000 Tape Library User's Guide - Dell PowerVault TL4000 | Dell Model TL2000/TL4000 Tape Library- User's
Guide - Page 153
Prev | Next> buttons do not appear. Figure 5-54. Service Library: View Logs page Service Library: View Drive Logs This page allows the drive logs to be viewed after selecting the following: v Log Type - Error: Logs drive error code information. - SCSI: Logs ASC/ASCQ and FSC information. v Additional - Dell PowerVault TL4000 | Dell Model TL2000/TL4000 Tape Library- User's
Guide - Page 154
error message "Slot Empty" will occur, and the test will not complete successfully. The media type must be compatible with the drive type. Otherwise, an error message "Incompatible Media" will occur and the test will fail. 5-60 Dell PowerVault TL2000 Tape Library and TL4000 Tape Library User's Guide - Dell PowerVault TL4000 | Dell Model TL2000/TL4000 Tape Library- User's
Guide - Page 155
of cycles. The second field displays the cycles completed. Service Library: Key Path Diagnostics Please refer to http://support.dell.com to determine the availability of this feature. Important: Ensure that library firmware and drive firmware are up to date before running the Key Path Diagnostic - Dell PowerVault TL4000 | Dell Model TL2000/TL4000 Tape Library- User's
Guide - Page 156
or drive you want to update. (You can update only one device at a time). Be sure you choose the correct firmware for the library or drive type. Click the Update button to initiate the file transfer and firmware update. 5-62 Dell PowerVault TL2000 Tape Library and TL4000 Tape Library User's Guide - Dell PowerVault TL4000 | Dell Model TL2000/TL4000 Tape Library- User's
Guide - Page 157
The 2U library Service Library: Upgrade Firmware page Figure 5-60. The 4U library Service Library: Upgrade Firmware page Service Library: Reboot Important: Some options of the Web User Interface take the library OFFLINE. This inactive mode can interfere with host-based application software, causing - Dell PowerVault TL4000 | Dell Model TL2000/TL4000 Tape Library- User's
Guide - Page 158
computer, use the program to run an audit of the library after new cartridges have been added to update the backup program. Export Media To remove cartridges from your library using your I/O Station, follow these steps: 5-64 Dell PowerVault TL2000 Tape Library and TL4000 Tape Library User's Guide - Dell PowerVault TL4000 | Dell Model TL2000/TL4000 Tape Library- User's
Guide - Page 159
Cleaning Slot Earlier versions of the 4U library contained a Dedicated Cleaning Slot (DCS). This DCS can be retained and is supported by future library firmware updates. Library firmware after 1.95 will allow removal of the DCS, thus enabling this slot to be used as a storage slot. To remove - Dell PowerVault TL4000 | Dell Model TL2000/TL4000 Tape Library- User's
Guide - Page 160
in your library, go to the Web User Interface at "Choosing General Library Settings" on page 4-19 or the Operator Control Panel at "Configure: Library" on page 5-20 to get directions on reducing the Active slot count. 5-66 Dell PowerVault TL2000 Tape Library and TL4000 Tape Library User's Guide - Dell PowerVault TL4000 | Dell Model TL2000/TL4000 Tape Library- User's
Guide - Page 161
Media Figure 6-1 shows the LTO Ultrium 1500 GB Data Cartridge and its components. 1 LTO cartridge memory 2 Cartridge door 3 Leader Pin 4 Write-protect Switch 5 Label area 6 Insertion guide coat, metal-particle tape. When processing tape in the cartridges, Ultrium Tape Drives use a - Dell PowerVault TL4000 | Dell Model TL2000/TL4000 Tape Library- User's
Guide - Page 162
the beginning of the tape to near the end of the tape. The head then guide 6 is a large, notched area that prevents the cartridge from being inserted incorrectly. Table 6-1. Nominal Cartridge Life: Load/Unload Cycles Type Load Dell PowerVault TL2000 Tape Library and TL4000 Tape Library User's Guide - Dell PowerVault TL4000 | Dell Model TL2000/TL4000 Tape Library- User's
Guide - Page 163
When the drive senses a WORM cartridge, the firmware prohibits the changing or altering of user data already written on the tape. The firmware keeps track of the last appendable point on the tape. WORM Media Errors The following conditions cause WORM media errors to occur: v Information in the servo - Dell PowerVault TL4000 | Dell Model TL2000/TL4000 Tape Library- User's
Guide - Page 164
a WORM tape cartridge into a drive that is not WORM capable causes the cartridge to be treated as an unsupported medium. The drive will report a media Error Code 7. Upgrading the drive firmware to the correct code level will resolve the problem. Cleaning Cartridge With each library, a specially - Dell PowerVault TL4000 | Dell Model TL2000/TL4000 Tape Library- User's
Guide - Page 165
can cause loading problems in the drive. Attention: Do not place any type of mark on the white space at either end of the bar code. A mark in this area may prevent the library from reading the label. L T O 1 2 3 L5 a69i0349 Figure 6-3. Sample bar code label on the LTO Ultrium 5 Tape Cartridge. The - Dell PowerVault TL4000 | Dell Model TL2000/TL4000 Tape Library- User's
Guide - Page 166
manually set the write-protect switch, slide it left or right to the desired position. A67E0026 1 Figure 6-4. Setting the write-protect switch Table 6-4. Location of the write-protect switch 1 Write-Protect Switch 6-6 Dell PowerVault TL2000 Tape Library and TL4000 Tape Library User's Guide - Dell PowerVault TL4000 | Dell Model TL2000/TL4000 Tape Library- User's
Guide - Page 167
. This includes operators, users, programmers, archival services, and shipping personnel. v Ensure that any service or contract personnel who perform archiving are properly trained in media-handling procedures. v Include media-handling procedures as part of any services contract. v Define and - Dell PowerVault TL4000 | Dell Model TL2000/TL4000 Tape Library- User's
Guide - Page 168
power part that loads first into the tape load compartment) and ensure that there are no gaps in the seam of the cartridge case. If there are gaps in the seam (see Figure 6-6 on page 6-9), the leader pin may be dislodged. 6-8 Dell PowerVault TL2000 Tape Library and TL4000 Tape Library User's Guide - Dell PowerVault TL4000 | Dell Model TL2000/TL4000 Tape Library- User's
Guide - Page 169
. v Review handling and tape and the brake mechanism in the cartridge. v Do not stack more than six cartridges. v Do not degauss a cartridge that you intend to reuse. Degaussing makes the tape unusable. Environmental and Shipping Specifications for Tape Cartridges Before you use a tape Media 6-9 - Dell PowerVault TL4000 | Dell Model TL2000/TL4000 Tape Library- User's
Guide - Page 170
LTO Ultrium Tape Cartridges. Table 6-5. Environment for operating, storing, and shipping the LTO Ultrium Tape Cartridge Environmental Specifications Environmental Factor is for durations of six months up to ten years. 6-10 Dell PowerVault TL2000 Tape Library and TL4000 Tape Library User's Guide - Dell PowerVault TL4000 | Dell Model TL2000/TL4000 Tape Library- User's
Guide - Page 171
User Interface and check the error log (Service Library → View Logs). Look up the error code and try to resolve (see Chapter 8, "Error Codes," on page 8-1). 3. Upgrade/reinstall the latest library firmware. To download the latest library firmware, visit http://www.support.dell.com. v If the problem - Dell PowerVault TL4000 | Dell Model TL2000/TL4000 Tape Library- User's
Guide - Page 172
: View Logs" on page 5-58 to view logs using the Web User Interface. Look up the error code and try to resolve (see Chapter 8, "Error Codes," on page 8-1 and/or Appendix C, "Sense Data," on page C-1). FRONT PANEL LEDs 7-2 Dell PowerVault TL2000 Tape Library and TL4000 Tape Library User's Guide - Dell PowerVault TL4000 | Dell Model TL2000/TL4000 Tape Library- User's
Guide - Page 173
, order a new cleaning cartridge. v If the problem still exists, contact technical support. If the Error LED remains ON after completing any user action listed for the error code in Chapter 8, "Error Codes," on page 8-1, run Library verify (Operator Control Panel: Service → Library Verify). v If - Dell PowerVault TL4000 | Dell Model TL2000/TL4000 Tape Library- User's
Guide - Page 174
the library from the host server and power cycling eliminates the host and its software as a problem source. 3. If the problem still exists, contact technical support. See "Removing Cartridges from Magazine Slots" on page 9-1. MEDIA Ensure that you are using data and cleaning cartridges - Dell PowerVault TL4000 | Dell Model TL2000/TL4000 Tape Library- User's
Guide - Page 175
"Verifying/Updating Firmware" on page 4-18 to determine the level of firmware on your library. If necessary, visit http://support.dell.com to download the latest levels of firmware for your library. Auto Clean status displayed as "Chk Media/Rsvd Slot?" on the Web User Interface System Status screen - Dell PowerVault TL4000 | Dell Model TL2000/TL4000 Tape Library- User's
Guide - Page 176
in an alternative manner. Of course, if the operation is successful within the allotted retry count, the appropriate retry counter is updated and recorded in the retry log and the next library operation will commence. 7-6 Dell PowerVault TL2000 Tape Library and TL4000 Tape Library User's Guide - Dell PowerVault TL4000 | Dell Model TL2000/TL4000 Tape Library- User's
Guide - Page 177
the appropriate error code. However, failure to detect Troubleshooting table "Cartridge Movement Problems". Procedures for Isolating CRU Problems Isolating a Power Supply Problem Note: Not all power supplies have LEDs. The original power supply for the 2U library did not have LEDs though any power - Dell PowerVault TL4000 | Dell Model TL2000/TL4000 Tape Library- User's
Guide - Page 178
outlet to test. c. If the outlet tests OK, try another power cord with the library. 4. For power supplies with LED's, if the "Amber" LED is lit, replace the power supply (refer to "Replacing a Power Supply" on page 10-10). 7-8 Dell PowerVault TL2000 Tape Library and TL4000 Tape Library User's Guide - Dell PowerVault TL4000 | Dell Model TL2000/TL4000 Tape Library- User's
Guide - Page 179
. Note: If you are instructed by Dell Technical Support to copy the drive dump to your host computer, use one of the following methods: v Web User Interface: Refer to "Service Library: Save Drive Dump" on page 5-60. v ITDT: Refer to "Using the ITDT Firmware Update, Dump Retrieval and Drive Test - Dell PowerVault TL4000 | Dell Model TL2000/TL4000 Tape Library- User's
Guide - Page 180
Manually" on page 9-1) and observe the accessor path for any obvious obstruction or problems. Resolve any observed problem if possible. Execute a Library System Test. See "Service Library: Perform Diagnostics" on page 5-60 7-10 Dell PowerVault TL2000 Tape Library and TL4000 Tape Library User's Guide - Dell PowerVault TL4000 | Dell Model TL2000/TL4000 Tape Library- User's
Guide - Page 181
on the accessor mechanism to be inoperable. Execute a Library System Test. See "Service Library: Perform Diagnostics" on page 5-60 for the web or "Service: Run Tests" on page 5-31 for the OCP If the problem is persistent, contact Dell technical support. Isolating Web User Interface Problems If the - Dell PowerVault TL4000 | Dell Model TL2000/TL4000 Tape Library- User's
Guide - Page 182
Station. If the amber LED was lit because of bad media, the Attention LED will turn OFF. If the amber LED is still on, check the power supply or the power supply fans. See "Isolating a Power Supply Problem" on page 7-7. 7-12 Dell PowerVault TL2000 Tape Library and TL4000 Tape Library User's Guide - Dell PowerVault TL4000 | Dell Model TL2000/TL4000 Tape Library- User's
Guide - Page 183
the error by cycling power to the library and retrying the last operation. If the error persists, contact technical support. Example Error Code EVENT -6 8D 07 Where: v -6 indicates the position in sequence list, 0 being the most recent. v 8D 07 indicates the error. (code 8D = sled blocked,). The - Dell PowerVault TL4000 | Dell Model TL2000/TL4000 Tape Library- User's
Guide - Page 184
the Shipping Lock" on page 4-4). 2. Refer to "Isolating a Library Controller Card vs. Accessor Enclosure Problem" on page 7-10. Possible Replacement CRUs: v Primary: Library Enclosure v Secondary: Library Controller Card 8-2 Dell PowerVault TL2000 Tape Library and TL4000 Tape Library User's Guide - Dell PowerVault TL4000 | Dell Model TL2000/TL4000 Tape Library- User's
Guide - Page 185
Table 8-1. Main Error Codes (continued) Error Code Description 8E Cannot find gripper block within the expected range 8F Cannot find slider block within the expected range 90 Cannot find elevator block within the expected range 91 Cannot find rotation block within the expected range 92 - Dell PowerVault TL4000 | Dell Model TL2000/TL4000 Tape Library- User's
Guide - Page 186
Retry the operation.. 2. After several occurrences, contact technical support. DD Warning Event! See Table 8-3 on page 8-11 DE Warning Event! See Table 8-3 on page 8-11 DF Warning Event! See Table 8-3 on page 8-11 8-4 Dell PowerVault TL2000 Tape Library and TL4000 Tape Library User's Guide - Dell PowerVault TL4000 | Dell Model TL2000/TL4000 Tape Library- User's
Guide - Page 187
: Subcode 02: drive #2 User Action 1. Remove magazine from library. 2. Insert magazine in library. If error recurs, contact technical support. 1. Check the ambient temperature conditions, and check all fans. 2. Refer to "Isolating Drive Sled Problems" on page 7-9. Chapter 8. Error Codes 8-5 - Dell PowerVault TL4000 | Dell Model TL2000/TL4000 Tape Library- User's
Guide - Page 188
which drive is affected. Example: Subcode 02: drive #2 F5 Drive Unload Timeout Drive has run in a timeout while unloading a tape The subcode indicates which drive is affected. Example: subcode 02: drive #2 8-6 Dell PowerVault TL2000 Tape Library and TL4000 Tape Library User's Guide - Dell PowerVault TL4000 | Dell Model TL2000/TL4000 Tape Library- User's
Guide - Page 189
Drive Sled Problems" on page 7-9. FB Drive logged out FC Internal SCSI command failed with check condition FD Internal SCSI command timeout Sub Error Codes Table 8-2. Sub error codes Error Code 00 01 Description No sub error code Mechanical initialization failure ROBOTICS 02 Connection - Dell PowerVault TL4000 | Dell Model TL2000/TL4000 Tape Library- User's
Guide - Page 190
rotation in FLMoveRotation function 35 Error during elevator movement in FLMoveSled function 36 Error during sled movement in FLMoveSled function 37 Error during sled positioning to sensor in FLMoveSled function 8-8 Dell PowerVault TL2000 Tape Library and TL4000 Tape Library User's Guide - Dell PowerVault TL4000 | Dell Model TL2000/TL4000 Tape Library- User's
Guide - Page 191
failed. 70 Release magazine failed. 71 Error during sled movement to rotation position. 72 Error during rotation to unlock position. 73 Error during move sled to block. 80 Opening I/O slot failed. 81 Error during movement to I/O slot open position. 82 Error during moving back - sensor - Dell PowerVault TL4000 | Dell Model TL2000/TL4000 Tape Library- User's
Guide - Page 192
. The Attention LED will blink when warning events for the following occur: v Media v Fan v Redundant power supply An appropriate message will be posted on the Operator Control Panel and the Web User Interface. 8-10 Dell PowerVault TL2000 Tape Library and TL4000 Tape Library User's Guide - Dell PowerVault TL4000 | Dell Model TL2000/TL4000 Tape Library- User's
Guide - Page 193
't Check robotics status. Refer to "Isolating a Library initialized Controller Card vs. Accessor Enclosure Problem" on page 7-10. 50 SCSI: cartridge belongs to another Refer to your host application documentation for problem partition determination information. Chapter 8. Error Codes 8-11 - Dell PowerVault TL4000 | Dell Model TL2000/TL4000 Tape Library- User's
Guide - Page 194
cooling fan error (fan motion has stopped). The subcode indicates which drive sled fan is affected Refer to "Isolating Drive Sled Problems" on page 7-9. Subcode 01: drive sled #1(bottom) Subcode 02: drive sled #2 8-12 Dell PowerVault TL2000 Tape Library and TL4000 Tape Library User's Guide - Dell PowerVault TL4000 | Dell Model TL2000/TL4000 Tape Library- User's
Guide - Page 195
to "Isolating a Power Supply Problem" on page 7-7. Subcode 01: 1st PS fan from bottom Subcode 02: 2nd PS fan from bottom DF Power Good signal changed from 2 to 1 Power Supplies F6 No drive installed. A drive has never been installed. Install at least one drive. Chapter 8. Error Codes 8-13 - Dell PowerVault TL4000 | Dell Model TL2000/TL4000 Tape Library- User's
Guide - Page 196
8-14 Dell PowerVault TL2000 Tape Library and TL4000 Tape Library User's Guide - Dell PowerVault TL4000 | Dell Model TL2000/TL4000 Tape Library- User's
Guide - Page 197
9. Service Procedures Removing Cartridges from Magazine Slots In the event of a severe mechanical problem with the library or if circumstances require you to remove tape cartridges, do the following. If the Operator Control Panel or the Web User Interface is still operational: 1. Move the tapes from - Dell PowerVault TL4000 | Dell Model TL2000/TL4000 Tape Library- User's
Guide - Page 198
clip into the access hole for each magazine at the back of the library. While holding the paper clip, have a second person pull the magazine out of the front of the unit. DO NOT push the paper clip in more than 1/2 inch. 9-2 Dell PowerVault TL2000 Tape Library and TL4000 Tape Library User's Guide - Dell PowerVault TL4000 | Dell Model TL2000/TL4000 Tape Library- User's
Guide - Page 199
magazine pulled out of the 2U library Figure 9-4. Left Magazines pulled out of the 4U Library 4. If there are additional tapes still in the library, or if you were unable to manually remove the magazines and drive, contact technical support for further instructions. Chapter 9. Service Procedures - Dell PowerVault TL4000 | Dell Model TL2000/TL4000 Tape Library- User's
Guide - Page 200
library host operating system is at the latest released level. This will ensure optimum read/write operations for diagnostics. To download the ITDT tool and instructions for using the tool, visit http://support.dell.com. 9-4 Dell PowerVault TL2000 Tape Library and TL4000 Tape Library User's Guide - Dell PowerVault TL4000 | Dell Model TL2000/TL4000 Tape Library- User's
Guide - Page 201
electrostatic-sensitive parts in their containers library. 2. Power OFF the library. This will align the robot with the shipping lock slot. 3. Remove any cables and terminators connected to the library. 4. Remove the library from the rack, if necessary. 5. Remove the shipping label ( 2 ) and lock - Dell PowerVault TL4000 | Dell Model TL2000/TL4000 Tape Library- User's
Guide - Page 202
10-3. Shipping Lock and Label 7. Pack the library in its original packaging materials (or equivalent packaging) for moving or shipping. Table 10-1. Shipping Lock/Shipping Label 1 Shipping Lock 2 Shipping Label 10-2 Dell PowerVault TL2000 Tape Library and TL4000 Tape Library User's Guide - Dell PowerVault TL4000 | Dell Model TL2000/TL4000 Tape Library- User's
Guide - Page 203
Removing/Installing/Adding a Tape Drive Sled There are two types of drive sleds in a TL2000 library (2U library) and a TL4000 library (4U library). The contents of the ship groups are specific to the type of drive sled. v Drive sled without ElectroStatic Discharge (ESD) springs (see Figure 10-4) - Dell PowerVault TL4000 | Dell Model TL2000/TL4000 Tape Library- User's
Guide - Page 204
Panel: Control → Move Cartridges v Using the Web User Interface: Manage Library → Move Media 4. Remove the host interface cable ( 1 , 2 , or 4 in Figure 10-6 on page 10-5) and terminator ( 3 for SCSI drive sled only). 10-4 Dell PowerVault TL2000 Tape Library and TL4000 Tape Library User's Guide - Dell PowerVault TL4000 | Dell Model TL2000/TL4000 Tape Library- User's
Guide - Page 205
, you will need to perform the following procedures: a. Install a drive cover plate to protect your library from dust and debris. b. To remove the "Missing drive" indicators on the Operator Control Panel (Attention LED) and the Web User Interface (System Status screen), modify or resubmit logical - Dell PowerVault TL4000 | Dell Model TL2000/TL4000 Tape Library- User's
Guide - Page 206
it is properly seated. Damage to the connector pins may occur if this procedure is not followed. 4. Push the drive sled slowly into the drive slot until the sled seats itself against the back of the library. 10-6 Dell PowerVault TL2000 Tape Library and TL4000 Tape Library User's Guide - Dell PowerVault TL4000 | Dell Model TL2000/TL4000 Tape Library- User's
Guide - Page 207
the drive sled into the library (drive sled without ESD springs shown) 5. Tighten the captive thumbscrews ( 7 in Figure 10-6 on page 10-5) until the drive sled is secure. 6. If you are installing a drive sled without ESD springs (see Figure 10-4 on page 10-3), apply conductive tape to the sled as - Dell PowerVault TL4000 | Dell Model TL2000/TL4000 Tape Library- User's
Guide - Page 208
of the error, then refer to the Troubleshooting chapter in this document for additional instructions. 10. Package the failed drive sled in the same packaging in which the new sled was shipped to you and return to Dell. 10-8 Dell PowerVault TL2000 Tape Library and TL4000 Tape Library User's Guide - Dell PowerVault TL4000 | Dell Model TL2000/TL4000 Tape Library- User's
Guide - Page 209
" on page 10-10. v If the test fails, an error code will be displayed. Make note of the error, then refer to the Troubleshooting chapter in the Dell PowerVault TL2000 Tape Library and TL4000 Tape Library User's Guide for additional instructions. Chapter 10. Check, Adjust, Remove, and Replace 10-9 - Dell PowerVault TL4000 | Dell Model TL2000/TL4000 Tape Library- User's
Guide - Page 210
located on the back panel of the library. 4. Pull on two of the thumbscrews to pull the unit away from the rear panel of the library, then grasp the top and bottom edge of the power supply and pull it out of the library. 10-10 Dell PowerVault TL2000 Tape Library and TL4000 Tape Library User's Guide - Dell PowerVault TL4000 | Dell Model TL2000/TL4000 Tape Library- User's
Guide - Page 211
. 9. Power ON the library using the power button on the front panel. 10. Run the Library Verify test (refer to "Service: Library Verify" on page 5-30). 11. Package the failed power supply in the same packaging in which the new power supply was shipped to you and return to Dell. Replacing a Library - Dell PowerVault TL4000 | Dell Model TL2000/TL4000 Tape Library- User's
Guide - Page 212
VPD to restore from/to. An error in selection here could cause a long downtime. 13. Package the failed Library Controller Card in the same packaging in which the new control board was shipped to you and return to Dell. 10-12 Dell PowerVault TL2000 Tape Library and TL4000 Tape Library User's Guide - Dell PowerVault TL4000 | Dell Model TL2000/TL4000 Tape Library- User's
Guide - Page 213
cartridge magazines, a power supply, a Library Controller Card, and a packet of library foot pads. These items are included with the replacement library enclosure due to safety agency requirements. These unused parts will be removed from the replacement library enclosure and returned to Dell in - Dell PowerVault TL4000 | Dell Model TL2000/TL4000 Tape Library- User's
Guide - Page 214
between the front and back. 2) Gently set the replacement library enclosure on top of the feet. Adjust foot pad placement as necessary to stabilize the library. Do not permanently attach the foot pads to the library. 10-14 Dell PowerVault TL2000 Tape Library and TL4000 Tape Library User's Guide - Dell PowerVault TL4000 | Dell Model TL2000/TL4000 Tape Library- User's
Guide - Page 215
areas ( 1 ) as shown in Figure 10-13. 1 Figure 10-13. Foot pads installed on the bottom of the library enclosure 3. Carefully return the library to an upright position. 4. Remove the shipping lock from the top of the replacement library enclosure (see Figure 10-14 on page 10-16). Chapter 10. Check - Dell PowerVault TL4000 | Dell Model TL2000/TL4000 Tape Library- User's
Guide - Page 216
Replacement Library Enclosure Note: It is important to install the drives from the defective library into the same positions in the replacement library enclosure in order to maintain your current library configuration. 10-16 Dell PowerVault TL2000 Tape Library and TL4000 Tape Library User's Guide - Dell PowerVault TL4000 | Dell Model TL2000/TL4000 Tape Library- User's
Guide - Page 217
: Damage to the connector pins may occur if this procedure is not followed. f. Place each tape drive into the replacement library enclosure in the same drive slot as it was positioned in the defective library. v While supporting the drive assembly, align the drive sled with the groove in the drive - Dell PowerVault TL4000 | Dell Model TL2000/TL4000 Tape Library- User's
Guide - Page 218
down, remove the CRU LCC and replace it with the original LCC to have VPD transferred from the original LCC to the new chassis. 4) Proceed to "Swapping Power Supplies" on page 10-19. b. If power ON is not successful: 10-18 Dell PowerVault TL2000 Tape Library and TL4000 Tape Library User's Guide - Dell PowerVault TL4000 | Dell Model TL2000/TL4000 Tape Library- User's
Guide - Page 219
it from the library. b. Install the power supply removed from the replacement library enclosure in the defective library to return to Dell. To install a power supply: 1) While supporting the power supply, align the power supply with the groove in the enclosure rails. 2) Push the power supply forward - Dell PowerVault TL4000 | Dell Model TL2000/TL4000 Tape Library- User's
Guide - Page 220
enclosure rails. 2) Push the Library Controller Card forward until it is properly seated. Note: You will hear a snap when the Library Controller Card is fully engaged and installed properly. 3) Tighten the thumbscrews. 10-20 Dell PowerVault TL2000 Tape Library and TL4000 Tape Library User's Guide - Dell PowerVault TL4000 | Dell Model TL2000/TL4000 Tape Library- User's
Guide - Page 221
have to be ordered. 2. Plug one end of the power cord (removed earlier from the defective library) into the rear panel of the replacement library enclosure and plug the other end into a power source. 3. Power ON the replacement library enclosure. a. If power ON is successful: 1) The Ready/Activity - Dell PowerVault TL4000 | Dell Model TL2000/TL4000 Tape Library- User's
Guide - Page 222
to Dell technical support for further instructions. 1 2 3 4 a77ug258 Figure 10-20. Library front panel LEDs 1 Ready/Activity LED (green) 3 2 Clean Drive LED (amber) 4 Attention LED (amber) Error LED (amber) Swapping Cartridge Magazines 1. Manually release and remove all magazines from - Dell PowerVault TL4000 | Dell Model TL2000/TL4000 Tape Library- User's
Guide - Page 223
a77ug025 Figure 10-21. Access hole for the left magazine (facing rear of library) Chapter 10. Check, Adjust, Remove, and Replace 10-23 - Dell PowerVault TL4000 | Dell Model TL2000/TL4000 Tape Library- User's
Guide - Page 224
holding the paper clip, have a second person pull the magazine out from the front of the unit. Note: To prevent dropping the magazine, support both ends of the magazine before it clears the front edge of the library. 10-24 Dell PowerVault TL2000 Tape Library and TL4000 Tape Library User's Guide - Dell PowerVault TL4000 | Dell Model TL2000/TL4000 Tape Library- User's
Guide - Page 225
on page 10-19. b. If inventory is not successful: 1) The Error LED ( 4 in Figure 10-20 on page 10-22) will turn ON. 2) Power OFF the enclosure. 3) Contact Technical Support for further instructions. Installing the Replacement Library Enclosure Refer to the appropriate procedure in this section (rack - Dell PowerVault TL4000 | Dell Model TL2000/TL4000 Tape Library- User's
Guide - Page 226
the mounting bracket screws ( 1 in Figure 10-12 on page 10-14) to anchor the replacement library enclosure to the rack. 4. Proceed to "Completing the Installation of the Replacement Library Enclosure" on page 10-27. 10-26 Dell PowerVault TL2000 Tape Library and TL4000 Tape Library User's Guide - Dell PowerVault TL4000 | Dell Model TL2000/TL4000 Tape Library- User's
Guide - Page 227
Power ON the replacement library enclosure. 3. Upgrade library firmware and drive firmware to the latest version. a. Visit http://www.support.dell.com/ to download the latest levels of library and drive firmware. b. Using the Web User Interface (Service Library → Upgrade Firmware), upgrade library - Dell PowerVault TL4000 | Dell Model TL2000/TL4000 Tape Library- User's
Guide - Page 228
10-28 Dell PowerVault TL2000 Tape Library and TL4000 Tape Library User's Guide - Dell PowerVault TL4000 | Dell Model TL2000/TL4000 Tape Library- User's
Guide - Page 229
address (decimal and hexadecimal) of the I/O slot, storage slots, and drive slot in the 2U librarylibrary configured with one drive and one logical partition. If a second drive were installed, it would be located at address 257 (0x101). With two drives installed, the library can be configured as one - Dell PowerVault TL4000 | Dell Model TL2000/TL4000 Tape Library- User's
Guide - Page 230
SCSI element addresses for storage slots and drive slot (one logical partition with drives in slot 1 and slot 2) Upper Left Magazine ⇐Front of 4U library Library Rear Panel Upper Right Magazine Front of 4U library⇒ A-2 Dell PowerVault TL2000 Tape Library and TL4000 Tape Library User's Guide - Dell PowerVault TL4000 | Dell Model TL2000/TL4000 Tape Library- User's
Guide - Page 231
When two half height drives are installed in a 2U library, the library firmware will support partitioning in the same way that the 4U supports partitioning with two full height drives today. The first partition will contain the first magazine and the first drive. The second partition will contain - Dell PowerVault TL4000 | Dell Model TL2000/TL4000 Tape Library- User's
Guide - Page 232
system Configuration of a 2 - Partition System Magazine 2 Magazine 4 Magazine 1 Magazine 3 Front side a77ug161 A two partition system must have Library 1: Slot 1 through slot 21 4096 (x1000) through 4116 (0x1014) A-4 Dell PowerVault TL2000 Tape Library and TL4000 Tape Library User's Guide - Dell PowerVault TL4000 | Dell Model TL2000/TL4000 Tape Library- User's
Guide - Page 233
4. Partition 3 will also contain magazine 3 and magazine 4. STE assignments v Logical Library 1: Slot 1 through slot 9 4096 (x1000) through 4104 (0x1008) v Logical Library 2: Slot 10 through slot 21 4096 (x1000) through 4107 (0x100B) v Logical Library 3: Slot 22 through slot 45 4096 (x1000) through - Dell PowerVault TL4000 | Dell Model TL2000/TL4000 Tape Library- User's
Guide - Page 234
. A drive slot which does not contain a drive, and has a position between used slots, needs to be reported as a SCSI element. To signal the host application that this slot is not usable, its ACCESS bit will be disabled. A-6 Dell PowerVault TL2000 Tape Library and TL4000 Tape Library User's Guide - Dell PowerVault TL4000 | Dell Model TL2000/TL4000 Tape Library- User's
Guide - Page 235
number of drives in your library, update the Logical Library configuration. This will remove the Attention LED on the front panel and the exclamation mark on the Home screen indicating that a drive is missing. Updating the Logical Library configuration will also update the drive element addressing - Dell PowerVault TL4000 | Dell Model TL2000/TL4000 Tape Library- User's
Guide - Page 236
A-8 Dell PowerVault TL2000 Tape Library and TL4000 Tape Library User's Guide - Dell PowerVault TL4000 | Dell Model TL2000/TL4000 Tape Library- User's
Guide - Page 237
will contain any drive error codes. Therefore there is no need to open the Library to access the buttons on the drive as described in this chapter. TapeAlert is a standard that defines status conditions and problems experienced by devices such as tape drives, autoloaders, and libraries. The standard - Dell PowerVault TL4000 | Dell Model TL2000/TL4000 Tape Library- User's
Guide - Page 238
Action Required 3 Hard error Set for any unrecoverable read, write, See the Action Required column for or positioning error. (This flag is set in Flag Number 4, 5, or 6 in this table. conjunction with flags 4, 5, or 6.) B-2 Dell PowerVault TL2000 Tape Library and TL4000 Tape Library User's Guide - Dell PowerVault TL4000 | Dell Model TL2000/TL4000 Tape Library- User's
Guide - Page 239
Set when a cartridge memory (CM) Replace the tape cartridge. failure failure is detected on the loaded tape cartridge. 16 Forced eject Set when you manually unload the tape cartridge while the drive was reading or writing. No action required. 17 Media loaded is Read-only format Set when - Dell PowerVault TL4000 | Dell Model TL2000/TL4000 Tape Library- User's
Guide - Page 240
area successfully. cartridge. 53 Tape system area read Set when the tape system area could Copy the data to another tape failure not be read successfully at load time. cartridge, then discard the old cartridge. B-4 Dell PowerVault TL2000 Tape Library and TL4000 Tape Library User's Guide - Dell PowerVault TL4000 | Dell Model TL2000/TL4000 Tape Library- User's
Guide - Page 241
tape from Panel (Control → Move being ejected. The tape may actually Cartridge) or the Web User be stuck in the drive. Interface (Manage Library → Move Media). 2. Cycle drive power using the Operator Control Panel (Service → Service → Drive Power) or the Web User Interface (Configure Library - Dell PowerVault TL4000 | Dell Model TL2000/TL4000 Tape Library- User's
Guide - Page 242
B-6 Dell PowerVault TL2000 Tape Library and TL4000 Tape Library User's Guide - Dell PowerVault TL4000 | Dell Model TL2000/TL4000 Tape Library- User's
Guide - Page 243
83h Door open 04h 85h Firmware upgrade in progress 04h 87h The drive is not enabled 04h 88h The drive is busy 04h 89h The drive is not empty 04h 9Ah Drive fibre down 04h 8Eh The media changer is in sequential mode 30h 03h Cleaning in progress 3Bh 12h Magazine removed C-1 - Dell PowerVault TL4000 | Dell Model TL2000/TL4000 Tape Library- User's
Guide - Page 244
Table C-1. Library Sense Keys, ASC and ASCQ (continued) Sense Key ASC ASCQ Description Medium Error (03) 30h 00h Incompatible media installed 30h 03h Cleaning tape installed 30h 07h Cleaning failure C-2 Dell PowerVault TL2000 Tape Library and TL4000 Tape Library User's Guide - Dell PowerVault TL4000 | Dell Model TL2000/TL4000 Tape Library- User's
Guide - Page 245
Library Sense Keys, ASC and ASCQ (continued) Sense Key ASC ASCQ Description Hardware Error (04) 81h 80h Cannot initialize bar code reader 81h 81h No response from bar code reader 81h 82h No response from EEPROM 81h 83h Slave robotic generic problem 81h 84h Setting of gripper pic - Dell PowerVault TL4000 | Dell Model TL2000/TL4000 Tape Library- User's
Guide - Page 246
communication error 82h F2h Drive sled not present 82h F3h Drive broken: needs repair 82h F4h Drive load timeout 82h F5h Drive unload timeout 82h F6h Drive never present 82h F7h Drive support ticket error C-4 Dell PowerVault TL2000 Tape Library and TL4000 Tape Library User's Guide - Dell PowerVault TL4000 | Dell Model TL2000/TL4000 Tape Library- User's
Guide - Page 247
error 39h 00h Saving parameters not supported 3Bh 0Dh Medium destination element full 3Bh 0Eh Medium source element empty 3Bh 11h Medium magazine not accessible 3Bh 81h Cartridge of other partition 3Bh A0h Medium transfer element full 53h 02h Library media removal prevented - Dell PowerVault TL4000 | Dell Model TL2000/TL4000 Tape Library- User's
Guide - Page 248
E - Reserved F - Reserved 3 Information byte (most significant byte) 4 Information byte 5 Information byte 6 Information byte (least significant byte) 7 Additional Sense Length 8-11 Command specific information C-6 Dell PowerVault TL2000 Tape Library and TL4000 Tape Library User's Guide - Dell PowerVault TL4000 | Dell Model TL2000/TL4000 Tape Library- User's
Guide - Page 249
could not be loaded or unloaded without manual intervention 04 10 - Logical unit not ready, auxiliary memory not accessible 04 12 - Logical unit not ready, offline 08 01 - Logical unit communication failure 09 00 - Track following error (servo) 0C 00 - Write Error - A Write operation has - Dell PowerVault TL4000 | Dell Model TL2000/TL4000 Tape Library- User's
Guide - Page 250
has changed 3F 0E - Reported LUNs data has changed 3F 0F - Echo buffer overwritten 40 xx - Diagnostic failure - A diagnostic test has failed. The xx (ASCQ) is a vendor specific code indicating the failing component. C-8 Dell PowerVault TL2000 Tape Library and TL4000 Tape Library User's Guide - Dell PowerVault TL4000 | Dell Model TL2000/TL4000 Tape Library- User's
Guide - Page 251
Key 04) An attempt to load or eject the cartridge failed due to a problem with the drive 53 02 - Media Removal Prevented - An Unload command has failed to eject the cartridge because media removal has been prevented 5A 01 - Operator medium removal request 5D 00 - Failure Prediction Threshold - Dell PowerVault TL4000 | Dell Model TL2000/TL4000 Tape Library- User's
Guide - Page 252
Key Service Not Configured 26 11 - Encryption - Incomplete Key - Associate Data Set 26 12 - Encryption (T10) - Vendor Specific Reference Key Not Found 55 08 - Encryption (T10) - Maximum Number of Supplemental Keys Exceeded C-10 Dell PowerVault TL2000 Tape Library and TL4000 Tape Library User - Dell PowerVault TL4000 | Dell Model TL2000/TL4000 Tape Library- User's
Guide - Page 253
Tape Drive Sense Data (continued) Bit Address or Name Byte 7 6 5 4 3 2 1 0 12-13 Sense Key 6 (Unit Attention - Data Encryption Parameters Changed by Vendor Specific Event Sense Key 7 (Data Protect) 74 05 - Encryption - Error Decrypting Data 14 FRU code 15 SKSV C/D Reserved BPV - Dell PowerVault TL4000 | Dell Model TL2000/TL4000 Tape Library- User's
Guide - Page 254
58 59 60 61 62 63 64 (Current LBA that would be reported in Read Position command) Data set Number 1st Error FSC 1st Error Flag Data 2nd Error FSC 2nd Error Flag Data Next-to-Last Error FSC Next-to-Last Error Flag Data C-12 Dell PowerVault TL2000 Tape Library and TL4000 Tape Library User's Guide - Dell PowerVault TL4000 | Dell Model TL2000/TL4000 Tape Library- User's
Guide - Page 255
is set. This occurs only for current errors and not for deferred errors. 7. The Field Replaceable Unit field (Byte 14) is set to either zero or to a non-zero, vendor-specific code indicating which part of the drive is suspected of causing the failure. 8. The Clean (CLN) flag (Byte 21, bit 3) is set - Dell PowerVault TL4000 | Dell Model TL2000/TL4000 Tape Library- User's
Guide - Page 256
returned range from 00h to 0Fh. 14. This field (Byte 35) contains the frame and drive number, passed across the RS-422 serial interface. C-14 Dell PowerVault TL2000 Tape Library and TL4000 Tape Library User's Guide - Dell PowerVault TL4000 | Dell Model TL2000/TL4000 Tape Library- User's
Guide - Page 257
services are running (for example, they automatically start when the OS loads), they must be disabled and re-enabled after the above procedure. The other way to enable LUN support is to recompile the kernel and enable LUN scanning in the Adaptec driver, but it requires advanced knowledge of Linux - Dell PowerVault TL4000 | Dell Model TL2000/TL4000 Tape Library- User's
Guide - Page 258
39160/3960D - Ultra160 SCSI [slot 202] 2. From the System Console, type nwconfig. 3. Select NCF files Options from the Configuration Options screen. 4. Select Edit STARTUP.NCF from the Available NCF Files Options screen. D-2 Dell PowerVault TL2000 Tape Library and TL4000 Tape Library User's Guide - Dell PowerVault TL4000 | Dell Model TL2000/TL4000 Tape Library- User's
Guide - Page 259
the LUN and binding the appropriate driver. Note: The command scan all must be typed upon OS boot every time. If backup software services automatically start on OS boot, you must disable them, run the scan all command, and re-enable the services. Appendix D. Enabling LUN Support in Linux D-3 - Dell PowerVault TL4000 | Dell Model TL2000/TL4000 Tape Library- User's
Guide - Page 260
D-4 Dell PowerVault TL2000 Tape Library and TL4000 Tape Library User's Guide - Dell PowerVault TL4000 | Dell Model TL2000/TL4000 Tape Library- User's
Guide - Page 261
:FFFF:FFFF:FFFF:FFFF, where there are 8 segments each 2 bytes long. Windows 2003/XP IPv6 support in Windows 2003 is not turned on by default. Use the following instructions to enable IPv6 support. 1. Go to Control Panel → Network Connections, and right-click on the Local Area Connection interface - Dell PowerVault TL4000 | Dell Model TL2000/TL4000 Tape Library- User's
Guide - Page 262
Directory\system32\drivers\etc\ accessible in Linux via a link-local IPv6 address. Global unicast IPv6 addresses are supported in the same manner as in Windows 2008/Vista browsers. 2. The RMU is accessible through IPv4. E-2 Dell PowerVault TL2000 Tape Library and TL4000 Tape Library User's Guide - Dell PowerVault TL4000 | Dell Model TL2000/TL4000 Tape Library- User's
Guide - Page 263
a clean. Drive Error 6 Drive has reported an error. Loader Retries Excessive 7 Library has reported excessive load retries. Loader OK 8 Library has resumed normal operations. Account Password Change 9 Account password in the library has changed. Note: Trap ID 9 requires library firmware - Dell PowerVault TL4000 | Dell Model TL2000/TL4000 Tape Library- User's
Guide - Page 264
F-2 Dell PowerVault TL2000 Tape Library and TL4000 Tape Library User's Guide - Dell PowerVault TL4000 | Dell Model TL2000/TL4000 Tape Library- User's
Guide - Page 265
Form Use this form when planning your library configuration. Keep this document in a secure location and update it when changes are made to the library configuration. General Information Library type TL2000 TL4000 Library Serial Number Library name I/O Station Enabled Disabled AutoClean - Dell PowerVault TL4000 | Dell Model TL2000/TL4000 Tape Library- User's
Guide - Page 266
: ID: Logical Library: Position: ID: 4U Position 4:4U Position 3:2U/4U Position 2:2U/4U Position 1: Logical Library: Position: Speed: Port type: Loop ID: Logical Library: Position: ID: Logical Library: Position: ID: G-2 Dell PowerVault TL2000 Tape Library and TL4000 Tape Library User's Guide - Dell PowerVault TL4000 | Dell Model TL2000/TL4000 Tape Library- User's
Guide - Page 267
of the Dell PowerVault TL2000 Tape Library and TL4000 Tape Library User's Guide help Accessing the publications You can view the publications for this library in Adobe Portable Document Format (PDF) using the Adobe Acrobat Reader. The PDFs are provided at the following Web site: http://support.dell - Dell PowerVault TL4000 | Dell Model TL2000/TL4000 Tape Library- User's
Guide - Page 268
H-2 Dell PowerVault TL2000 Tape Library and TL4000 Tape Library User's Guide - Dell PowerVault TL4000 | Dell Model TL2000/TL4000 Tape Library- User's
Guide - Page 269
. ac. Alternating current. access method. A technique for moving data between main storage and input or output devices. accessor. This component contains the library robot and bar code reader. The accessor moves cartridges to and from the I/O Station, storage slots, and tape drives. adapter card - Dell PowerVault TL4000 | Dell Model TL2000/TL4000 Tape Library- User's
Guide - Page 270
access storage. A storage device in which the access time is independent of the location of the data. download. (1) To transfer programs or data from a computer to a connected device, typically a personal ctrl. Control. I-2 Dell PowerVault TL2000 Tape Library and TL4000 Tape Library User's Guide - Dell PowerVault TL4000 | Dell Model TL2000/TL4000 Tape Library- User's
Guide - Page 271
layer protocol that uses TCP and Telnet services to transfer bulk-data files between machines or hosts. firmware. Proprietary code that is usually delivered as microcode as part of an operating system. Firmware is more efficient than software loaded from an alterable medium and more adaptable - Dell PowerVault TL4000 | Dell Model TL2000/TL4000 Tape Library- User's
Guide - Page 272
preferred format when capacity (rather than fast access) is the key storage consideration. An Ultrium cartridge has a compressed data capacity of up to 800 GB (2:1 compression) and a native data capacity of up to 400 GB. I-4 Dell PowerVault TL2000 Tape Library and TL4000 Tape Library User's Guide - Dell PowerVault TL4000 | Dell Model TL2000/TL4000 Tape Library- User's
Guide - Page 273
of data. media-type identifier. Pertaining to the bar code on the bar code label of the Ultrium Tape Cartridge, a 2-character code, L1, that . (1) One or more micro instructions. (2) A code, representing the instructions of an instruction set, implemented in a part of storage that is not program - Dell PowerVault TL4000 | Dell Model TL2000/TL4000 Tape Library- User's
Guide - Page 274
Parity check. PCC. Power control compartment. PDF. Portable Document Format. PE. Parity error. Product engineer. pick. Pertaining to the library, to remove, by means of a robotic device, a tape cartridge from a storage slot or drive. picker. A robotic mechanism located inside the library that moves - Dell PowerVault TL4000 | Dell Model TL2000/TL4000 Tape Library- User's
Guide - Page 275
but is not essential for its basic work. SR. Service representative, see also CE. SRAM. Static random access memory. SS. Status store. ST. Store. standard feature. The significant design elements of a product that are included as part of the fundamental product. START. Start maintenance. subsystem - Dell PowerVault TL4000 | Dell Model TL2000/TL4000 Tape Library- User's
Guide - Page 276
. World Wide Node Name (WWNN). In a fibre channel connected library, the Drive ID as listed in the Web User Interface. Write. Write command. WT. world trade. X XR. External register. XRA. External register address register. I-8 Dell PowerVault TL2000 Tape Library and TL4000 Tape Library User's Guide - Dell PowerVault TL4000 | Dell Model TL2000/TL4000 Tape Library- User's
Guide - Page 277
specifications 6-9 Write-Protect Switch 6-6 cartridge magazines 1-1, 4-32 Cartridge, environment 6-8 cartridge, suspect 2-2 cartridges inserting in library 4-36 populating library 4-36 Cartridges, insert and remove 5-64 channel calibration 1-10 choosing a location 4-1 clean drive 5-57 cleaning slot - Dell PowerVault TL4000 | Dell Model TL2000/TL4000 Tape Library- User's
Guide - Page 278
1-3 Tape drives channel calibration 1-10 power management 1-10 quantity in library 1-8 speed matching 1-10 TapeAlert Flags for drives B-2 TapeAlert Flags, library B-1 Telnet Service Port 5-33 Traps F-1 troubleshooting 7-1 X-2 Dell PowerVault TL2000 Tape Library and TL4000 Tape Library User's Guide - Dell PowerVault TL4000 | Dell Model TL2000/TL4000 Tape Library- User's
Guide - Page 279
Ultra160 1-8 Ultra320 1-8 Ultrium Tape Drives 1-8 unpacking the library 4-2 Updating firmware using ITDT Tool 9-4 upgrade firmware 5-62 USB port 1-3 V verifying the shipment 4-2 View Drive Logs 5-59 W Web User Interface Configure Library: Email Notification 5-55 Configure Library: Save/Restore 5-56 - Dell PowerVault TL4000 | Dell Model TL2000/TL4000 Tape Library- User's
Guide - Page 280
X-4 Dell PowerVault TL2000 Tape Library and TL4000 Tape Library User's Guide - Dell PowerVault TL4000 | Dell Model TL2000/TL4000 Tape Library- User's Guide - Page 281
- Dell PowerVault TL4000 | Dell Model TL2000/TL4000 Tape Library- User's
Guide - Page 282
Printed in USA - Dell PowerVault TL4000 | Dell Model TL2000/TL4000 Tape Library- User's
Guide - Page 283
Spine information: Dell™ PowerVault™ TL2000 Tape Dell PowerVault TL2000 Tape Library and TL4000 Library and TL4000 Tape Library Tape Library User's Guide
-
 1
1 -
 2
2 -
 3
3 -
 4
4 -
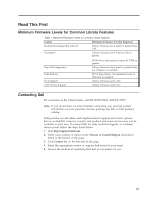 5
5 -
 6
6 -
 7
7 -
8
-
9
-
10
-
11
-
12
-
13
-
14
-
15
-
16
-
17
-
18
-
19
-
20
-
21
-
22
-
23
-
24
-
25
-
26
-
27
-
28
-
29
-
30
-
31
-
32
-
33
-
34
-
35
-
36
-
37
-
38
-
39
-
40
-
41
-
42
-
43
-
44
-
45
-
46
-
47
-
48
-
49
-
50
-
51
-
52
-
53
-
54
-
55
-
56
-
57
-
58
-
59
-
60
-
61
-
62
-
63
-
64
-
65
-
66
-
67
-
68
-
69
-
70
-
71
-
72
-
73
-
74
-
75
-
76
-
77
-
78
-
79
-
80
-
81
-
82
-
83
-
84
-
85
-
86
-
87
-
88
-
89
-
90
-
91
-
92
-
93
-
94
-
95
-
96
-
97
-
98
-
99
-
100
-
101
-
102
-
103
-
104
-
105
-
106
-
107
-
108
-
109
-
110
-
111
-
112
-
113
-
114
-
115
-
116
-
117
-
118
-
119
-
120
-
121
-
122
-
123
-
124
-
125
-
126
-
127
-
128
-
129
-
130
-
131
-
132
-
133
-
134
-
135
-
136
-
137
-
138
-
139
-
140
-
141
-
142
-
143
-
144
-
145
-
146
-
147
-
148
-
149
-
150
-
151
-
152
-
153
-
154
-
155
-
156
-
157
-
158
-
159
-
160
-
161
-
162
-
163
-
164
-
165
-
166
-
167
-
168
-
169
-
170
-
171
-
172
-
173
-
174
-
175
-
176
-
177
-
178
-
179
-
180
-
181
-
182
-
183
-
184
-
185
-
186
-
187
-
188
-
189
-
190
-
191
-
192
-
193
-
194
-
195
-
196
-
197
-
198
-
199
-
200
-
201
-
202
-
203
-
204
-
205
-
206
-
207
-
208
-
209
-
210
-
211
-
212
-
213
-
214
-
215
-
216
-
217
-
218
-
219
-
220
-
221
-
222
-
223
-
224
-
225
-
226
-
227
-
228
-
229
-
230
-
231
-
232
-
233
-
234
-
235
-
236
-
237
-
238
-
239
-
240
-
241
-
242
-
243
-
244
-
245
-
246
-
247
-
248
-
249
-
250
-
251
-
252
-
253
-
254
-
255
-
256
-
257
-
258
-
259
-
260
-
261
-
262
-
263
-
264
-
265
-
266
-
267
-
268
-
269
-
270
-
271
-
272
-
273
-
274
-
275
-
276
-
277
-
278
-
279
-
280
-
281
-
282
-
283
 |
 |

Dell
™
PowerVault
™
TL2000 Tape Library and TL4000
Tape Library
User's Guide
±²³