Dell PowerVault TL4000 Dell Model TL2000/TL4000 Tape Library- User's Guide - Page 173
Power Supply or Fan Issues, Drive Sled Issues - media attention error
 |
View all Dell PowerVault TL4000 manuals
Add to My Manuals
Save this manual to your list of manuals |
Page 173 highlights
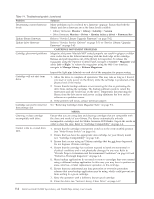
Table 7-1. Troubleshooting table (continued) Problem Solution Attention LED To determine why the Attention LED is turned ON, log in to the Web User Interface and select Service Library → View Logs → Warning Trace. Drive Sled Issues: v Refer to "Isolating Drive Sled Problems" on page 7-9. v Whenever there is a hardware configuration change such as drives being swapped with different form factors (i.e. HH to FH or FH to HH), a library configuration change is needed. Reconfiguring the library by reassigning the amount of logical libraries will clear this issue. Navigate to the Web User Interface Configure Library → Logical Libraries or to the Operator Control Panel's Configure → Logical Libraries section and reassign the logical libraries. If you do not want to change your logical library configuration, resubmit your current settings. v Restore factory defaults (Operator Control Panel: Configure → Save/Restore and select Restore All, or Web User Interface: Configure Library → Save/Restore and select Restore). Media Issues: v Avoid contamination by ensuring that the library is installed in a clean, contamination-free environment. Continue cleaning the tape drive as needed. Refer to "Choosing a Location" on page 4-1. v A cartridge should be acclimated for at least 24 hours before being used, particularly if it has been stored at a substantially different temperature or level of humidity than the library. Refer to "Provide Proper Acclimation and Environmental Conditions" on page 6-8. v Any cartridge that is suspected of being defective or contaminated should NOT be reused, in any drive. Power Supply or Fan Issues: Clean Drive LED Error LED Check the power supply (or redundant power supply) for failure, and also check any power supply fans. Replace any defective units. Refer to "System Status" on page 2-6 for a redundant power supply failure on a 4U library and"Isolating a Power Supply Problem" on page 7-7. v Ensure that you are using an Ultrium universal cleaning cartridge (see "Cleaning Cartridge" on page 6-4). v Ensure that the cleaning cartridge has not expired. A drive will automatically eject an expired cleaning cartridge. A cleaning cartridge is good for 50 cleans. If your cleaning cartridge has expired, order a new cleaning cartridge. v If the problem still exists, contact technical support. If the Error LED remains ON after completing any user action listed for the error code in Chapter 8, "Error Codes," on page 8-1, run Library verify (Operator Control Panel: Service → Library Verify). v If the test passes, the Error LED will turn OFF. v If the test fails, cycle library power to turn the Error LED OFF. To check the library error log, log on to the Web User Interface and click Service Library, then View Logs.If the Operator Control Panel displays WARNING: Unit Busy, click OK to turn the error LED OFF. FIRMWARE Chapter 7. Troubleshooting 7-3
-
 1
1 -
2
-
3
-
4
-
5
-
6
-
7
-
8
-
9
-
10
-
11
-
12
-
13
-
14
-
15
-
16
-
17
-
18
-
19
-
20
-
21
-
22
-
23
-
24
-
25
-
26
-
27
-
28
-
29
-
30
-
31
-
32
-
33
-
34
-
35
-
36
-
37
-
38
-
39
-
40
-
41
-
42
-
43
-
44
-
45
-
46
-
47
-
48
-
49
-
50
-
51
-
52
-
53
-
54
-
55
-
56
-
57
-
58
-
59
-
60
-
61
-
62
-
63
-
64
-
65
-
66
-
67
-
68
-
69
-
70
-
71
-
72
-
73
-
74
-
75
-
76
-
77
-
78
-
79
-
80
-
81
-
82
-
83
-
84
-
85
-
86
-
87
-
88
-
89
-
90
-
91
-
92
-
93
-
94
-
95
-
96
-
97
-
98
-
99
-
100
-
101
-
102
-
103
-
104
-
105
-
106
-
107
-
108
-
109
-
110
-
111
-
112
-
113
-
114
-
115
-
116
-
117
-
118
-
119
-
120
-
121
-
122
-
123
-
124
-
125
-
126
-
127
-
128
-
129
-
130
-
131
-
132
-
133
-
134
-
135
-
136
-
137
-
138
-
139
-
140
-
141
-
142
-
143
-
144
-
145
-
146
-
147
-
148
-
149
-
150
-
151
-
152
-
153
-
154
-
155
-
156
-
157
-
158
-
159
-
160
-
161
-
162
-
163
-
164
-
165
-
166
-
167
-
 168
168 -
 169
169 -
 170
170 -
 171
171 -
 172
172 -
 173
173 -
 174
174 -
 175
175 -
 176
176 -
 177
177 -
 178
178 -
179
-
180
-
181
-
182
-
183
-
184
-
185
-
186
-
187
-
188
-
189
-
190
-
191
-
192
-
193
-
194
-
195
-
196
-
197
-
198
-
199
-
200
-
201
-
202
-
203
-
204
-
205
-
206
-
207
-
208
-
209
-
210
-
211
-
212
-
213
-
214
-
215
-
216
-
217
-
218
-
219
-
220
-
221
-
222
-
223
-
224
-
225
-
226
-
227
-
228
-
229
-
230
-
231
-
232
-
233
-
234
-
235
-
236
-
237
-
238
-
239
-
240
-
241
-
242
-
243
-
244
-
245
-
246
-
247
-
248
-
249
-
250
-
251
-
252
-
253
-
254
-
255
-
256
-
257
-
258
-
259
-
260
-
261
-
262
-
263
-
264
-
265
-
266
-
267
-
268
-
269
-
270
-
271
-
272
-
273
-
274
-
275
-
276
-
277
-
278
-
279
-
280
-
281
-
282
-
283
 |
 |